Headset Speakerphone OPERATING INSTRUCTIONS 21
Contents 1. Important Notes ...................................................................... 2 Intended use ............................................................................................... 2 Telephone facilities ..................................................................................... 2 REN number ............................................................................................... 3 Emergency calls ..................................................................
1. Important Notes Intended use This apparatus is intended for use on 2 wire analogue PSTN and PABX circuits within Europe.
ringer volume control ringer pitch adjust redial / pause mute function with LED indicator line powered triple standard message waiting (high voltage, reverse polarity + voltage drop) 20 memories accessed via 10 memory button (10 one touch and 10 two touch memories) EEprom lockable memories (EEprom memory selector underneath memory card) inductive loop hearing aid compatible desk or wall mountable (no bracket required) REN number The REN number of this telephone is 1.
Emergency calls Calls can be made on this telephone to contact the emergency services. An access code may also be required, if the phone is connected to a PABX. The European code for emergency services is 112, however, you can still use 999 in the UK.
2. Installation This telephone is designed to plug straight into a modular style socket. If you do not have one of these sockets, they can be obtained from your Network Supplier. Connection Insert the line cord into the socket. Set the ringer volume and pitch control as desired. Wall mounting Using the template supplied, position the telephone where you want to wall mount. Drill two holes and fix round headed screws, leaving them slightly proud of the surface.
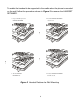
To enable the handset to be supported in the cradle when the phone is mounted on the wall, follow the procedure shown in Figure 2 to reserve the HANDSET RETAINER. 1.Use your thumb to press the HANDSET RETAINER 2. Push the HANDSET RETAINER out of the slot 3. Turn the HANDSET RETAINER 180. 4.
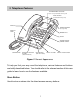
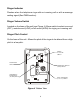
3. Telephone Features EEPROM MEMORY SELECTOR (P, P+U, U) undernearth memory card RESET BUTTON (underneath memory card) HANDSET RINGER INDICATOR (message wait) HANDSET CORD MEMORY KEYS KEYPAD SPEAKER VOLUME CONTROL SWITCH STORE BUTTON HANDSFREE/ HEADSET BUTTON (with LED Indicator) MUTE BUTTON (with LED Indicator) RECALL BUTTON REDIAL / PAUSE BUTTON Figure 3 General Appearance To help you find your way round the telephone, various features and buttons are briefly described below.
Handsfree / Headset button The function of this button is determined by the position of the HS/HF switch underneath the telephone (see section 4). With the switch set of HF (handsfree) then pressing this button switches the speakerphone mode on or off. The LED above the button glows when the speakerphone is on. With the switch set to HS (headset), then pressing this button transfers an incoming call directly to the headset.
Ringer Indicator Flashes when the telephone rings with an incoming call or with a message waiting signal (See PABX section). Ringer Volume Switch Located on the base of the unit (see Figure 4). Move switch to select no sound (OFF), muted sound (LOW) or full sound (HIGH) for ringing on incoming call. Ringer Pitch Control On the base of the unit. Allows the pitch of the ringer to be altered from a high pitch to a low pitch.
Recall Button For PABX use, to carry out call transfers and access other PABX facilities. Memory Stores There are 10 buttons able to provide 20 memory locations (10 one touch and 10 two touch), each able to store 32 digits. Speaker Volume Control Allows the volume of the incoming caller to be adjusted, in handsfree operation. Simply move the slider switch to give a satisfactory voice level.
4. Operation To dial a number, either lift the handset or press the handsfree button, wait for the tone and then key in the number required. Handsfree / Headset Mode The default setting is handsfree. If you do not intend to use the headset with this telephone then ignore this section. If you are using a headset, then you will need to change the operating mode of this telephone. Turn the unit over, locate the HS/HF switch (see figure 4) and move it to HS.
Manual Dialling Lift the handset, listen for the dial tone and then dial the required number using the keypad. Handsfree Dialling Press the handsfree button firmly and the dial tone will be heard in the speaker. Dial the required number on the keypad When the called party answers the phone, continue to speak using the microphone in the telephone or pick up the handset, if you so wish.
To dial numbers from memory either lift the handset or press the handsfree button once dialling tone is present press the required memory button either ONCE to access the top location or TWICE IN QUICK SUCCESSION to access the bottom location. The required number will be sent to line. Memory Lock All memories programmed are stored on an eeprom inside the telephone and if required, can be locked to prevent them being overwritten.
Pause The Pause command may be needed if the phone is connected to certain types of PABX or to any network where a pause is required. Note:No more that 3 pauses should be inserted consecutively otherwise the telephone may not function properly.
5. PABX & System Usage This telephone can be used behind a PABX or on a network that utilises the recall function. There are many such systems and whilst it is likely that no problems will be encountered, it cannot be guaranteed that the telephone will operate correctly under all circumstances and any cases of difficulty should be referred to your supplier. Recall Before you attempt to change the recall switch, labelled TBR ER, see (Figure 4&5), you should disconnect the phone from the network.
PABX access Where a PABX access digit is required to obtain a direct outside line, it may be necessary to insert a pause after dialling the access digit (see redial / pause section of this manual ). Voice messaging When used behind a PABX, this telephone will respond to voice messaging systems on many PABX types, giving a visual signal of a message waiting.
6. Maintenance and Problem Solving Your telephone is a precision electronic instrument. Avoid rough handling and extreme temperatures. Use a mild detergent and a damp cloth when cleaning. Never use a stronger cleaner. If your telephone does not appear to be working correctly, please check the following: No dialling tone Will not ring - Is phone cord properly connected to the wall socket? - ringer switch is set to off ? - REN number may exceed 4, for all telephones connected to the line.
7. Warranty and Service This product is guaranteed, by Interquartz (UK) Limited, for six years from the date of manufacture. Every Interquartz telephone has a unique serial number and part of that number refers to the date of manufacture. A label, similar to that shown below is affixed to each telephone 0011 000852 (model no) The figure 0011 means that the telephone was made during week 11 (12 March) 2001. The six year warranty, cover will apply until 12 March 2007.
If you need to return a faulty unit to us, send it to: Interquartz (UK) Limited Pennine House Salford Street Bury BL9 6YA Please ensure that you tell us what appears to be the problem with the telephone. DO NOT FORGET TO INCLUDE YOUR OWN NAME AND ADDRESS. We ask that you bear the cost of returning the telephone to us. We will return it to you, at our expense. This warranty is in addition to any statutory rights. For further advice visit our Website www.interquartz.co.
This telephone is approved to EEC directive 1999/5/EC Distributed in the United Kingdom by Interquartz (UK) Limited Manufactured by International Quartz Limited 3C9393012S12B A Subsidiary of Chiaphua Industries Ltd. ©Copyright INTERNATIONAL QUARTZ LTD.