
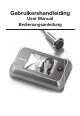
Operation Manual
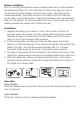

Before installation:
Prior to mounting the peephole viewer, please make sure you have installed
the batteries included. For door thickness 35-39mm you need to mount a
separate acrylic plate between door and door viewer. This plate can be
ordered separately. The article number of this plate is S00106. Keep the
acrylic plate in horizontal direction, make the hole aligned, and use adhesive
tape to fix its position. For door thickness 40-43mm, need to use one or two
washer between the camera and outside door leaf.
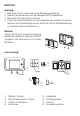
Installation:
1. Replace the existing door viewer or drill a 14mm hole in the door at
eye level. Insert the camera from the outside while inserting the washer
between the back of the lens and the door. Make sure that the arrow
mark on front of the camera points upwards.
2. Fit the holding plate over the end of the lens then screw the locking
barrel on to the threaded part of the camera and tighten, this will hold the
plate to the door. You can then secure the plate with 2 or 3 screws
(provided). Make sure that the arrow on the plate points upwards.
3. The wire of camera should be connected to the socket in the back of the
digital door viewer,excess wire should be attached behind the small hook.
4. Hook the digital door viewer over the bracket at the top of the locking
plate and secure with two small bolts through the holes in the bottom of
the Digital Door Viewer case.
Operation:
Power Button:
Press and release the power button, then the unit will continue working for the
next 10 seconds.
Light Indicator:
If the light indicator turns on, please replace the batteries.
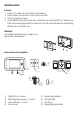
②
⑤
⑥
⑦
①
③
AA
AA
A
A
AA
④
⑧
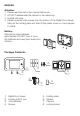
②
⑤
⑥
⑦
①
③
AA
AA
A
A
AA
④
⑧