
Instructions


Intesis
TM
INMBSDAI001I000
User’s Manual r2.3 EN
© HMS Industrial Networks S.L.U - All rights reserved
This information is subject to change without notice
URL https://www.intesis.com
7 / 22
3. Quick Start Guide
1. Disconnect the air conditioning from the Mains Power.
2. Attach the interface next to the AC indoor unit (wall mounting) following the
instructions of the diagram below or install it inside the AC indoor unit (respect the
safety instructions given above).
3. Connect the connection cable included with the interface between the interface and
the AC indoor unit following the instructions of the diagram.
4. Connect the EIA-485 bus to the connector EIA485 of the interface.
5. Close the AC indoor unit.
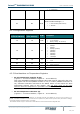
6. Check the DIP-Switch configuration of the Intesis interface and make sure it matches
the current installation’s parameters (see section 4.3).
By default, the interface is set to:
▪ Modbus Slave Address ➔ 1
▪ Modbus baud rate ➔ 9600 bps
These parameters can be modified from SW4 and SW3 DIP-Switches.
All other switch positions are set at low level (Off position ) by default.
NOTE: All changes on the DIP-Switch configuration require a system power cycle to
be applied.
7. Connect the AC system to Mains Power.
IMPORTANT: The Intesis interface requires to be connected to the AC unit
(powered) to start communicating.
ON
ON
SW3
SW4