
Installation Guide

Page 1 of 3
Intex Column Wrap, Post Wrap and Newel
Installation Instructions
Column Wraps
1. Structural Post Preparation
a. Insure that structural post is sound, straight and plumb.
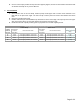
• Note that all Intex Column Wrap sizing is given as outside dimensions. See the table at the end of these
instructions for specific internal sizing information.
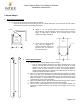
b. Attach ½” x 3” x 5” internal spacers to structural post as shown.
Locate spacers 4” up from bottom, 4” down from top and at center of
length. If railing will be attached to the Column, locate center
spacers at location of handrail.
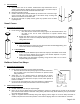
c. For 10” and 12” column wraps
only, place the supplied ‘U’
shaped stand-offs around the
structural post and attach to
the internal spacers.
2. Column Wrap Installation
a. Cut both halves of Column Wrap to required height.
• Note for Columns Wraps with raised, recessed or fluted designs, cut only
the tops. This will allow the bottom of the design to remain at the same
height across all columns and newels (if used) on the facade. Maximum
amount of trim on these columns is 2 inches from standard height. If
required height is more than 2” shorter than standard height, custom size
and design spacing should be ordered.
b. Place one of the Column Wrap halves in place against the spacers (or stand-
offs) on one side of the structural post and attach with stainless steel finish
nails, placing nails where they will be hidden by the top and bottom trim wrap
whenever possible. If Column Wrap has a design such as recessed, raised
or fluted panels, insure correct orientation.
c. Apply the supplied adhesive liberally along both mitered edges of the Column
Wrap half which is installed, and place the other half in position.
d. Use the Velcro straps provided to keep the halves properly aligned, and
secure with stainless steel finish nails as with first half. Wipe off any excess
adhesive.
Spacers
6"
4 X 4
Typical
3-5/8" x 3-5/8"
4 X 4 or
6 X 6 Post
Stand-off
Spacers