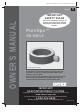
(346PO) SPA ENGLISH 7.5” X 10.3” PANTONE 295U 08/10/2019 English 346 PO OWNER’S MANUAL IMPORTANT SAFETY RULES Please read, understand, and follow all instructions carefully before installing and using this product. Keep for future reference. PureSpa™ SB-HW10 For illustrative purposes only. Do not forget to try these other fine Intex products: pools, pool accessories, in-home toys, airbeds and boats available at fine retailers or visit our website.
(346PO) SPA ENGLISH 7.5” X 10.3” PANTONE 295U 08/10/2019 English TABLE OF CONTENTS Warning.......................................................................................... 3-6 Parts............................................................................................... 7-8 Set-up............................................................................................. 9-14 Operation.......................................................................................
(346PO) SPA ENGLISH 7.5” X 10.3” PANTONE 295U 08/10/2019 English 346 PO IMPORTANT SAFETY RULES When installing and using this electrical equipment, basic safety precautions should always be followed, including the following. READ AND FOLLOW ALL INSTRUCTIONS DANGER • Risk of Accidental Drowning. Extreme caution must be exercised to prevent unauthorized access by children. To avoid accidents, ensure that children cannot use this spa unless they are supervised at all times. • Risk of drowning.
(346PO) SPA ENGLISH 7.5” X 10.3” PANTONE 295U 08/10/2019 English 346 PO WARNING j) Exit immediately if uncomfortable, dizzy, or sleepy. Spa heat can cause hyperthermia and unconsciousness. The use of alcohol, drugs, or medication can greatly increase the risk of fatal hyperthermia. The causes, symptoms, and effects of hyperthermia may be described as follows: Hyperthermia occurs when the internal temperature of the body reaches a level several degrees above the normal body temperature of 98.6°F (37°C).
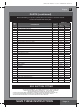
(346PO) SPA ENGLISH 7.5” X 10.3” PANTONE 295U 08/10/2019 346 PO English PARTS Before assembling your product, please take a few minutes to check the contents and become familiar with all the parts. 21 20 14 13 12 30 15 19 16 17 6 18 5 28 25 7 1 24 27 26 11 9 2 22 23 8 10 3 29 4 NOTE: Drawings for illustration purpose only. Actual product may vary. Not to scale.
(346PO) SPA ENGLISH 7.5” X 10.3” PANTONE 295U 08/10/2019 English 346 PO PARTS (continued) Before assembling your product, please take a few minutes to check the contents and become familiar with all the parts. PART NO. REF. NO. DESCRIPTION QTY.
(346PO) SPA ENGLISH 7.5” X 10.3” PANTONE 295U 08/10/2019 English PRODUCT SPECIFICATIONS Maximum seating capacity: Water capacity: Inner/outer diameter: Height: Bubble air blower: Filter pump flow rate: Heater power: Temperature range: Temperature rise: Number of Bubble Jets: Spa tub recommended working air pressure: 4 adults 6 adults 210 gal (795 L) 290 gal (1098 L) 57/77 in (145/196 cm) 65/85 in (165/216 cm) 28 in (71 cm) 1.
(346PO) SPA ENGLISH 7.5” X 10.3” PANTONE 295U 08/10/2019 English SET UP (continued) • Humidity is a natural side effect of indoor spa installation. The room shall be properly ventilated to allow moisture to escape. Install a ventilating system to prevent excess condensation, moisture in the room. Additional requirements for outdoor installation • Spa owners may need to comply with local or states laws relating to childproof fencing, safety barriers, lighting, and other safety requirements.
(346PO) SPA ENGLISH 7.5” X 10.3” PANTONE 295U 08/10/2019 English SET UP (continued) Inflation Inflate the Spa Tub Wall 1. 2. Take out the ground cloth (19) and spread it over the cleared area. Then spread out the spa liner over the ground cloth and point the drain valve towards a suitable draining area. NOTE: Spread the ground cloth with the bubbles facing down over the cleared area where you intend to setup your spa. Flip up the control base side cover (36) to reveal the air blower inflation outlet.
(346PO) SPA ENGLISH 7.5” X 10.3” PANTONE 295U 08/10/2019 English SET UP (continued) 6. Press the button again to turn it off. IMPORTANT: To prevent damage to the air blower motor never block the air blower outlet opening during inflation. Replace the air valve cap back. The cap is designed to be screwed on and off. Never exert force as this could cause the complete internal inflation system of the valve to come loose. See “Spa Tub Air Valve Fastening” for valve maintenance.
(346PO) SPA ENGLISH 7.5” X 10.3” PANTONE 295U 08/10/2019 English SET UP (continued) Deflation For Spa Tub Wall: 1. 2. 3. 9 Unscrew the cap to reveal the stem, push the stem in and turn 90 degree right to secure it in the down position (see drawing 9). Once the deflation is completed, push the stem in and turn 90 degree left to return it to the inflation position. Replace the cap back. NOTE: To deflate the spa tub for storage, see “STORAGE” section. For Cover Air Bladder: 1. 2.
(346PO) SPA ENGLISH 7.5” X 10.3” PANTONE 295U 08/10/2019 English 346 PO SET UP (continued) Spa Control Unit Installation 1. 2. Connect the spa control unit to the spa tub (see drawing 10). Hand-tighten the connectors securely. Do not use tools to tighten. NOTE: Never attach external accessories not supplied with the kit to the spa tub or control base unit, as this will void the warranty. Replace the control base side covers (4) (see drawing 11).
(346PO) SPA ENGLISH 7.5” X 10.3” PANTONE 295U 08/10/2019 English OPERATION SPA CONTROL PANEL C D E B A A: B: C D: E: On/Off Button Lock/Unlock Button Control Panel Battery Indicator Bubble Button Water Filter Button On/Off Button: Once the unit is plugged in, press this button to active the control panel buttons. Press this button again to turn off all currently activated functions. Lock/Unlock Button: Press and hold this button 3 seconds to lock/unlock the control buttons.
(346PO) SPA ENGLISH 7.5” X 10.3” PANTONE 295U 08/10/2019 English OPERATION (continued) SPA CONTROL PANEL F F: G: H: I: G H Heat Button Celsius/Fahrenheit Toggle Button Heat System Delay Timer (HSDT) Button Heat System Operating Hours (HSOH) Button I Heat Button: Press this button to activate the heating system. Press or to set the desired water temperature. The system will heat the spa water until the water temperature reaches the set temperature.
(346PO) SPA ENGLISH 7.5” X 10.3” PANTONE 295U 08/10/2019 English OPERATION (continued) SPA CONTROL PANEL L K J J: Decrease Button K: Increase Button L: LED Display RF frequency band:2408~2476 MHz Transmitter power: 10dBm Adjustment Buttons: Press the increase or decrease buttons to adjust the desire function settings. Press and hold the button will rapidly increase or decrease the numbers. LED Display: Once plugged in the LED displays the current water temperature automatically.
(346PO) SPA ENGLISH 7.5” X 10.
(346PO) SPA ENGLISH 7.5” X 10.3” PANTONE 295U 08/10/2019 English LED CODE CHART LED Reading E81 CAUSE Transmission signal failure SOLUTION • Reset the RCD, restart all over again. • Place the control panel within 5 m (16 ft) of the control base unit. • Press and hold POWER button for 5 seconds to turn off and charge the panel again. • If problem persists, contact Intex Service Center. No water flow • Turn off and unplug the control unit.
(346PO) SPA ENGLISH 7.5” X 10.3” PANTONE 295U 08/10/2019 English 346 PO MAINTENANCE AND CHEMICALS WARNING Always unplug this product from the electrical outlet before removing, cleaning, servicing or making any adjustment to the product. Water Sanitation The spa owner must regularly check and keep the spa water sanitized with scheduled maintenance (daily, if necessary). Adding sanitizer and other chemical will control bacteria and viruses present in the spa water.
(346PO) SPA ENGLISH 7.5” X 10.3” PANTONE 295U 08/10/2019 English SPA WATER CHEMISTRY AND BALANCE Preferred Water Chemistry Reading Free Chlorine pH Total Alkalinity (TA) Calcium Hardness (CaCO3) Saturation Index (SI) Water Temperature Minimum 2 ppm 7.2 60 ppm 100 ppm –0.3 20ºC / 68ºF Ideal 2 - 4 ppm 7.2 - 7.6 80 ppm 150–250 ppm 0 20–40ºC / 68–104ºF Maximum 5 ppm 7.8 120 ppm 350 ppm +0.3 40ºC / 104ºF Free chlorine: is the chlorine residual present in the spa water.
(346PO) SPA ENGLISH 7.5” X 10.3” PANTONE 295U 08/10/2019 English 346 PO SPA WATER CHEMISTRY AND BALANCE (continued) SPA Water Adjustment How to adjust the spa water chemistry when the levels are off the range. CAUTION: Always follow the chemical manufacturer’s directions, and the health and hazard warnings. Total Alkalinity (TA) Adjustment Remove the spa cover to aerate the water and use the included test strips to check the chemistry level.
(346PO) SPA ENGLISH 7.5” X 10.3” PANTONE 295U 08/10/2019 English 346 PO SPA WATER CHEMISTRY AND BALANCE (continued) Lowering pH Lowering pH Using Muriatic Acid Volume Total Alkalinity 8.4→7.2 From→To 7.8→7.2 210 gal (795 L) 120 ppm 80 ppm 0.028 qt 0.018 qt 26 mL 18 mL 0.019 qt 0.013 qt 18 mL 12 mL 290 gal (1098 L) 120 ppm 80 ppm 0.038 qt 0.025 qt 36 mL 24 mL 0.026 qt 0.017 qt 22 mL 16 mL Lowering pH Using Sodium Bisulfate Volume Total Alkalinity 8.4→7.2 From→To 7.8→7.
(346PO) SPA ENGLISH 7.5” X 10.3” PANTONE 295U 08/10/2019 346 PO English MAINTENANCE Spa Tub Drainage 1. 2. 3. 4. 5. 6. 7. 8. 9. Turn off the spa control unit. Connect the drain valve adaptor to a garden hose and point the other end of the garden hose to a suitable draining area (see drawing 14). Remove the drain valve cap from outside of the spa tub and attach the drain valve adaptor to the drain valve (see drawing 14).
(346PO) SPA ENGLISH 7.5” X 10.3” PANTONE 295U 08/10/2019 English 346 PO MAINTENANCE (continued) Spa Cover The attachment buckles of the cover are locking buckles. Two keys are provided in the plastic bag with the manual and other accessories. Each buckle is marked with “locked” and “unlocked” symbols for easy operation: put the key into the slot on the buckle and turn it to the appropriate position to lock or unlock the buckle respectively.
(346PO) SPA ENGLISH 7.5” X 10.3” PANTONE 295U 08/10/2019 English 346 PO TROUBLESHOOTING PROBLEM CAUSE Spa is unplugged or off. Control panel cable plug loose. Power failure. GFCI/RCD tripped. GFCI/RCD broken. SOLUTION NO DISPLAY/SPA CONTROL UNIT DOES NOT WORK • • • • • • Ensure the spa is plugged and switched on. • Ensure the control panel cable plug is firmly attached to the control base receptacle. • Check power source. • Reset the GFCI/RCD. • Contact Intex Service Center.
(346PO) SPA ENGLISH 7.5” X 10.3” PANTONE 295U 08/10/2019 English 346 PO TROUBLESHOOTING (continued) PROBLEM TUB LOSES AIR PRESSURE CAUSE • Air valve cap loose. • Air valve base loose. • Hole, cut or split on spa tub. SOLUTION • Ensure air valve cap is securely closed. • Fill up the spa tub with air then make sure the air valve base is tighten, see “Spa Tub Air Valve Fastening” section. • Put liquid soap and water in a squirt bottle and spray on seams. If there is a leak it will bubble.
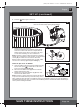
(346PO) SPA ENGLISH 7.5” X 10.3” PANTONE 295U 08/10/2019 English FILTER PUMP MOTOR DISASSEMBLY If there is a need to replace the filter motor (for qualified technician only), follow below steps to disassemble it: IMPORTANT: You must drain out any remaining water inside the piping system of the control base before replacing any parts. Tools required: One adjustable wrench and one Philip screwdriver.
(346PO) SPA ENGLISH 7.5” X 10.3” PANTONE 295U 08/10/2019 English 346 PO WARRANTY Your PureSpa has been manufactured using the highest quality materials and workmanship. All Intex products have been inspected and found free of defects prior to leaving the factory. This Limited Warranty applies only to the PureSpa listed below. The provisions of this Limited Warranty apply only to the original purchaser and is not transferable.