
Product Manual
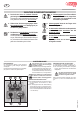
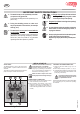
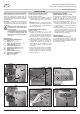

OPERATING FUNCTIONS (Fig. 7):
1 = Main switch (emergency-stop)
This switch turns the machine either on (po-
sition „1“) or off (position „0“).
Note: Each time the machine is switched
on, the multifunction relay is automatically
reinitialised. This is indicated by the control
displays (4 and 5) (g. 7) which blink for a
few seconds.
2 = Rotary switch
a) „Cutting system forward“ („1“)
Turning this switch to position „1“ starts
the cutting system and the conveyor belt.
Material can now be fed to the shredder.
b) „Cutting system reverse“ („R“)
Turning this switch to position „R“ starts
the cutting system and the conveyor belt
in reverse.
c) „Cutting system stop“ („0“)
Turning this switch to position „0“ switches
the shredder off, thereby halting the cutting
system and the conveyor belt.
3 = Pilot lamp „ready“
Lights when the main switch (1) is opera-
ted.
4 = Pilot lamp
„paper jam“ / „motor fault“ /
„Electrical malfunction“
a) Lights up when too much paper is fed to
the cutters (see description „AUTOMATIC
RESPONSE IN CASE OF OVER-LOA-
DING“).
b) Blinks when the shredder motor is overloa-
ded, thereby activating the built-in thermal
protection. This leads to a break in the
circuit necessary for active operation.
For more information please turn to the
section headed „Motor Fault“.
c) Blinks if one of the integrated contactors
fails. At the same time, the control display
(5) lights up. Please refer to the „ELECTRI-
CAL MALFUNCTION“ heading for further
details.
5 = Pilot lamp
„collecting bag full“ / „door open“ /
„Electrical malfunction“
a) Blinks when the collecting bag is full and
needs to be emptied. At the same time the
machine switches off automatically.
b) Lights up when the door is not closed. The
machine then switches off automatically
and it cannot be started as long as the
door is open.
c) Lights up if one of the integrated contactors
fails. At the same time, the control display
(4) blinks. Please refer to the „ELECTRI-
CAL MALFUNCTION“ heading for further
details.
OPERATING THE MACHINE:
The procedure is as follows:
1. Move the main switch (1) to position „1“.
2. Turn the rotary switch „Cutting system forward“
(2) to position „1“. The cutting system and the
conveyor belt now begin to run.
Attention: The machine will only operate when
a) the main switch (1) has been switched on
(position „1“),
b) the rotary switch (2) has been switched on
(position „1“ or ”R“),
c) the discharge door (10) for emptying the bag
is closed.
MATERIAL FEED:
than the machine itself stands, when
feeding paper to the machine!
Standing on an raised platform (such as
pallets or boxes placed in front of the
machine) reduces the distance between
operator and cutting system to a level
which does not meet the required safety
standard.
Feed material for the shredder can consist of
stacks of smooth paper (up to about 190 sheets,
depending on the type and size of paper); and
also crumpled paper and cardboard. Place any
material to be shredded on the moving conveyor
belt which feeds it to the cutting system.
It is advisable to place stacked paper diagonally
on the belt. In this way, the corner of the stack will
be fed to the cutting system rst, thus avoiding a
sudden overload.
-
indicated in the technical data!
Should the machine become overloaded,
-
AUTOMATIC RESPONSE
IN CASE OF „OVERLOADING“:
In case you accidentally overload the shredder,
it will automatically alleviate the problem as
follows:
1. The cutting system becomes jammed. The pilot
lamp (4) (g. 7) lights up.
2. The cutting system runs briey in reverse,
thereby freeing the material to be shredded.
3. The cutting system automatically switches back
to forward mode.
This sequence is automatically repeated by the
machine up to three times. If the machine still
detects “overloading”, the cutting system runs in
reverse once more for a specied period of time
and is then shut down.
Redistribute returned material and continue
shredding with a smaller amount of material. The
machine must rst be switched off with the rotary
switch (2) (g. 7) (position “0”), and then back on
again (position “1”) to this end.
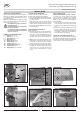
EMPTYING THE COLLECTING BAG (Fig. 8):
When the collecting bag is full, the machine turns
off automatically. The pilot lamp (5) (g. 7) lights
up. Empty the collecting bag as follows:
- Set a pallet or a trolley in front of the discharge
door in order to facilitate removal of the full
bag.
- Open the door only a little bit (10) and level
off the cone of shredded material, which has
accumulated in the bag, with your hand.
- Open the door and swivel the bag frame with
bag out onto the pallet or trolley.
- Remove the rubber band, remove the bag and
dispose of its contents.
- Feed the empty bag through the bag frame
from below, and put the edges of the bag ap-
proximately 10 cm over the frame outwardly.
- Secure the bag to the frame with the help of the
rubber band.
- Close the door, at the same time swivelling the
bag frame and bag into the housing, and lock.
Note: The machine will only run with closed
door!
g. 8
9 11 10
g. 7
12
3 4
5
86434 12 08/16
8
OPERATION
Translation of the Original Operation Manual
Übersetzung der Originalbetriebsanleitung
GB