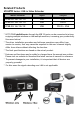
xtraCoN Series: Video+Audio+USB Extender Over LAN (or USB) Model Number Resolution Max.
Related Products xtraViU Series: Video+Audio Extender Over LAN (or USB) Model Number Resolution Max.
Related Products xtraViU Series: USB-to-Video Extender Model Number Input Output VCUA-20/ 60/ 90/ 92 USB VGA VCUD-20/ 60/ 90/ 92 USB DVI-D VCUB-20/ 60/ 90/ 92 USB DVI-D + VGA * UP TO FOUR xtraCoN series through the USB 2.
Table of Content Introduction .............................................................................................. 5 Features ................................................................................................... 6 Packing Checklist ........................................................................... 6 System Requirements .................................................................... 7 Additional Requirements ...............................................................
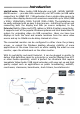
------------------------ Introduction xtraCoN series, Video+ Audio+ USB Extender over LAN : MCNM/ MACND/ MACNA series --- provides LAN connectivity via CAT5 cable (or USB cable connection) for HDMI/ DVI / VGA extension from a single video source to multiple video display devices with maximum resolution up to SXGA(1280 x 1024) / UXGA(1600 x 1200)/ Full HD (1920 x 1080).
------------------------ Features Easily add the extra console(s) via the USB or the exiting LAN system without additional wiring. Add up to 4 extra consoles allowing 4 + 1 users to share one computer at a time; the control power is on first-come, first-serve basis. Unique Multi-users network configuration, negotiable controlling access setting. Enable USB peripherals sharing via network connection. Support HDMI/ DVI/ VGA display.
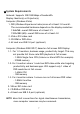
★System Requirements Network: Supports 100/1000 Mbps of bandwidth. Display: Monitor(s) or Projector(s) Computer (Windows Vista): 1. WEI (Windows Experience Index) score of at least 3.0 overall. The recommended hardware depends on the display resolution: 1366x768: overall WEI score of at least 3.5 1920x1080 (HD): overall WEI score of at least 4.0 2. VGA or DVI video card 3. CD-ROM or DVD drive 4. At least one USB 2.0 port (optional) Computer (Windows 2000/XP/7) based on full screen DVD Display: 1.1.
★Additional Requirements The Unit software can be installed on any desktop or laptop system running Windows 2000 SP4, Windows XP SP2 or SP3, Windows Vista SP1/SP2 32-bit and 64-bit editions, Windows 7 and Intel-based Mac OS 10.4/10.5. Any predecessor versions of the Windows or other platforms that are not mentioned here won’t be supported by any drives currently.
------------------- Product Description 1 USB Connector 2 Connect to USB (1.0/ 2.
Figures listed below illustrate typical applications of xtraCoN series. The model you have purchased may be slightly different from those described in the figures.
------------------------Connection Before the Connection 1. Install the software to the computer first BEFORE the physical installation 2. Prior to the installation, ensure to power off all devices that will be connected to this system. 3. Ensure that all devices you will connect are properly grounded. 4. Place cables away from fluorescent lights, air conditioners, and machines that are likely to generate electrical noise. 5.
-------------- Windows 2000/XP/Vista/7 Driver Installation The source computer running Windows 2000/XP/Vista/7 is required to install the appropriate Unit software according to the interconnection deployment method that could be Extending the video via the Local Area Network system or Extending the video via USB. Please follow the instructions below listed step by step for your driver installation. All the prompt screens and dialog boxes shown in this section are for Windows 2000/XP/Vista/7.
Windows z Install the XtraViU_NET driver (Windows 2000/XP/Vista/7) 1. Insert the CD into the CD/DVD-ROM drive, and then browse: X:\ Windows\ XtraViU_NET\ USBServer_XtraViU_NET_xx Double-click the file “USBServer_XtraViU_NET_xx” to begin the Installation (The version of driver may vary, please contact your local dealer for the latest driver). 2. Restart your computer after the installation completed. 3. After Windows has been loaded, users can find a shortcut “Launch USB Server” on the Windows desktop.
Windows 3-3) Confirm that your network is operating normally and keep your computer online 3-4) Connect the xtraCoN Unit RJ-45 Connector to the network by using an Ethernet CAT5 cable 3-5) Connect the xtraCoN Unit to the monitor and switch on each connected monitor 3-6) Power ON the the xtraCoN Unit 4. When the xtraCoN Unit is powered ON, double-click on the shortcut “Launch USB Server”, a Pop-Up Screen indicating the current connecting Status.
Windows Operation Extend the video via USB z Using Menu Bar Control (Windows 2000/XP/Vista/7) Once the software and hardware of the xtraCoN Unit are properly installed and connected, the user can easily find the icon located at the lower right corner of desktop as the snapshot shown below, click on it to bring up the following screen. By default, the xtraCoN Unit is set to Extend mode. (Any of icon selection from this bar will achieve the screen setting to the extra screen-the secondary screen.) 1.
Windows 2. Screen Rotation The user may rotate the extra screen to the desired angle for certain applications. Normal: keeps the extra screen with the same angle as the primary screen. Rotated Left: rotates the extra screen 90 degree clockwise. Rotated Right: rotates the extra screen 90 degree counterclockwise. Upside-Down: rotates the extra screen 180 degree.
Windows Rotated Right Upside-Down 3. Extend To Allows the user to set the extra screen extend to the above, below, left, and right of the primary screen.
Windows In Extend Mode, the monitor attached to the xtraCoN Unit forms part of the extended windows desktop. The extra desktop area is a great productivity aid, allowing more applications or documents to be visible at a time. 4. Set as Main Monitor Allow the user to set the extra screen as the primary screen NOTE: Please check the capability of your extra monitor first before you try to perform this configuration. 5.
Windows 6. Mirror Allow users to set the extra screen as a clone of the primary screen. Primary screen Extra screen 7. Off Allow users to turn off the extra screen. 8. Optimize for Video (Vista and Windows 7 Only) Configure the secondary display for optimum full screen video performance output. Select this option for better movie playback performance on the xtraCoN enabled displays. Only select this option when playing back video content. Note: Text may appear less clear when enabled.
Windows 9. Fit to TV If the Windows desktop does not completely appear on TV, this option can be used to adjust the size of the Windows desktop. However, only on TV screen, users can adjust the size to full screen while this function may not be applicable to some PC monitors. Note: Fit to TV only works in extend mode. If choosing the option while in mirror mode, the screen will change to extend and be placed above the laptop screen in Windows Display Properties. Fit to TV does not support rotated modes.
Windows You will also see a red border on the extend screen The red border shows the size of the new Windows desktop (Extend). Use the “+” and “-” controls on the Fit to TV Screen to change the size of the red border until it fits on the TV screen. Once the red border is at the edges of the TV screen, click “Apply” to resize the Windows desktop. Note: Finer configuration of the size of the border can be achieved by holding down the CTRL key and clicking the “+” and “-”.
Windows 10. Advanced Provide more options for settings as following shown.
Windows Refresh Rate: Click “Advance”Æ”Adapter”Æ”List all mode…”, all valid combinations of resolution, color quality and refresh rate are fully listed here. Flat panel monitors do not flicker and require a low refresh rate. ◆ Windows 7 System On Windows 7, you can configure an xtraCoN device through the use of Windows Display Properties (WDP). WDP provides a simple method to attach, rotate, duplicate or extend screens as well as modify screen resolution.
Windows Portrait Portrait (flipped) Landscape Landscape (flipped) Duplicates these displays: Reproduces the main display on the second display. Extend these displays: Extends the main display onto the secondary display. Show Desktop only on 1: The desktop appears on the display “1”. The display marked 2 becomes blank. Show Desktop only on 2: The desktop appears on the display “2”. The display marked 1 becomes blank.
Windows To control the behavior of an attached xtraCoN display, it is also possible to use Windows Key+P to display a menu (and cycle through it) to switch mode. Select the Windows Key+P. The following menu appears. Click on one of the options. The display updates to reflect your choice.
Windows Operation Extend the Video+Audio via the Local Area Network system z Using USB Server (Windows 2000/XP/Vista/7) The USB Server, a Graphical User Interface (GUI), is a useful tool to set up multi-xtraCoN Units for your computer video output display.
Windows The “Video Device” is now locally used Device Disconnection When finishing the Audio/Video transmission, user may disconnect the device(s) and left the controlling access for the next user.
Windows Audio Configuration (Speakers) After the “Media Device” is locally connected, users can find the Volume control options on the taskbar. Open Volume control options window and check Speakers (USB PnP Sound Device) Audio Configuration (Microphone) Attach the microphone to the xtraCoN Unit. Then users can find “Recording devices” option on the taskbar. Click “Recording devices”. Under Microphone (USB PnP Sound Device), open “Properties” option for volume adjustment.
Windows By default, the xtraCoN Unit gets the IP Address from DHCP server automatically. The PC’s IP Address must be in the same subnet as the xtraCoN Unit’s IP Address for the two devices to communicate. (For example, if xtraCoN Unit’s IP Address is 192.168.1.104, with a subnet mask of 255.255.255.0, then your computer’s IP Address should be 192.168.1.x, where x is a value between 1~254, excluding 104.) NOTE: To add additional xtraCoN Units, simply connect them to the network.
Windows z Network Configuration If your network doesn’t have or support DHCP Server, please assign a unique IP for each connected xtraCoN Unit. Step 1. Right click the device on the list and select “Server Configurations” NOTE: The device status should be on “Free” status Step 2. Uncheck the “Use DHCP” and set a valid IP address for the Unit Step 3.
Windows NOTE: The PC’s IP Address must be in the same subnet as the xtraCoN Unit’s IP Address for the devices to communicate. NOTE: No password is set by factory defaults.
Windows z Network Configuration Multi-users xtraCoN operation is on first-come first-serve basis. Different users cannot access the same xtraCoN unit simultaneously. Three statuses can be found on the USB Server screen as the following figure shown. For the best usability and flexibility of the Audio/ Video transmission in multi-users condition, please un-check the “Connect Device Automatically” item for all devices listed on the USB Server window as the following figure shown.
Windows Request Disconnect Device Under multi-users situation you may send “Request Disconnect Device” message to the current user and ask for accession to the xtraCoN device. Right click on the device you want to access and then select “Request Disconnect Device” As figure shown above. The following Pop-Up screen will then ask for confirmation.
Windows The current user will receive a message indicating the disconnection request, and he/ she can decide whether to yield the controlling access or not. As the figure shown below If the current user is still working on the device operation then your monitor will Pop-Up screen as below. If the current user finish working on the device operation then your monitor will Pop-Up screen as below.
Windows Setup Button: Restore Factory Defaults Users can reset the xtraCoN Unit back to its original state (Factory Default Settings) through a pinhole Setup Button (as the figure shown below). This feature is helpful for some circumstances, such as IP or password lost or forgotten, etc.. The following procedure will guide you through this process: Warning: This is a data-destructive process. It is strongly recommended that you backup any/all data from the Unit before starting the restore.
Windows Standby and Hibernate, Shut down and Restart If a computer/laptop connecting to an xtraCoN Unit is placed into standby or hibernate mode, the display goes blank. When the computer/laptop is again powered up (and unlocked if necessary) the connected monitor returns to the same mode as it was before stand by or hibernate. If the computer/laptop is shut down, restarted and logged in, again the connected display returns to the same mode as it was before shutdown.
------ Intel-based Mac OS 10.4/10.5/10.6 In addition to being compatible with Windows 2000/XP/Vista/7, xtraCoN series provide a better platform flexibility in supporting Intel-based Mac OS 10.4/10.5/ 10.6 for extending video via USB. Please follow the instructions below listed step by step for the driver installation. All the prompt screens and dialog boxes shown in this section are for Intel-based Mac OS 10.5 Some dialog boxes and folders may slightly different in other versions of operating system.
Mac 2. Double-click the “Software Installer” to install the software 3. Once the installation is complete, click the “Restart” button. The computer will reboot automatically 4. After the computer has been restarted, plug in the xtraCoN Unit to an available USB 2.0 port. The xtraCoN Unit should now be ready to use.
Mac Operation Using Menu Bar Control Once software has been installed to the Mac, simply plug each xtraCoN Unit connected with display into the Mac. You can now use up to 4 additional monitors. When attaching a monitor to your Mac, by default, the monitor will be extended to the right of the main display. Configuring Display from the Menu Bar Check the “Show displays in menu bar” in Display Preference then you can configure displays by clicking the display icon in the menu bar.
Mac 1. Screen Resolution To change the resolution for the display preference, select an available resolution by accessing to the path: Menu bar→ Display Preference→ Gather Windows The resolution availability depends on both the xtraCoN Unit and the capabilities of the connected display. 2. Screen Rotation If you wish to rotate the display(s), you can configure the orientation by dropping down the “Rotate”.
Mac 3. Display Positions If your computer is connected to more than two displays, you can specify that some are mirrored displays and others show the extended desktop. A mirrored display shows the same content as the main display whereas an extended display will be an extension to your existing desktop. You can arrange your displays so that they match the physical layout of your displays by selecting the ‘Arrangement’ pane within Display Preferences.
Mac 4. Mirror When in Mirror mode, additional displays will display what is being shown on the primary display. Checking the “Mirror Display” on the ‘Arrangement’ pane enables this feature. 5. Set as Main Monitor You can change the main display by moving the Menu Bar among displays. Changing the main display affects where new windows appearance and the position of the Dock. The ‘Menu Bar’ can be moved so that it is shown on an alternative display.
Mac 6. Use both extended and mirrored displays To work with both extended and mirrored displays, uncheck the box of mirror displays as the circle mark below, then in the Arrangement pane hold down both keys cmd and alt and drag the display you wish to overlay the primary display. Repeat this with each display you wish to mirror, those untouched will remain extending.
Mac Audio Configuration (Speakers) Open the “Sound” control option in System Preference. Select “Output” page and then choose “USB PnP Sound Device.” Audio Configuration (Microphone) Open the “Sound” control option in System Preference. Select “Input” page and then choose “USB PnP Sound Device.
------------------------Specifications Signal Input Signal Output Resolution (Max.) LEDs RJ-45 Connector (In) USB Connector (Out) LAN Enclosure DDC2B Support Max. Power Consumption Dimensions H x W x D (mm) Signal Input Signal Output Resolution (Max.) LEDs Connector RJ-45 (In) USB Connector (Out) LAN Enclosure DDC2B Support Max.
MACNM-H90 MACNM-H92 MACNM-G90 MACNM-G92 Signal Input Signal Output Resolution (Max.) LEDs Connector RJ-45 (In) USB Connector (Out) LAN Enclosure DDC2B Support Max. Power Consumption Dimensions H x W x D (mm) Ethernet + USB HDMI 1920 x 1080 1920 x 1200 1600 x 1200 2048 x 1152 Dual Color x 1 + Blue x 1 Yes Yes, USB 2.0 HDMI (Female), USB-A (2.
Troubleshooting Symptom Possible Cause USB connection might be a issue Solution Make USB A-B cable length not exceed 5 meters. Configurations in the network environment are sophisticated No video on screen(s) or ●please lower the resolution CAT5 connection screen(s) flicker ●use CAT5 cable compliant with might be a issue EIA/TIA 568B industry standard ●CAT5 cable length should not exceed 100 meters.
Limited Warranty IN NO EVENT SHALL THE DIRECT VENDOR'S LIABILITY FOR DIRECT OR INDIRECT, SPECIAL, INCIDENTIAL OR CONSEQUENTIAL DAMAGES, LOSS OF PROFIT, LOSS OF BUSINESS, OR FINANCIAL LOSS WHICH MAY BE CAUSED BY THE USE OF THE PRODUCT EXCEEDS THE PRICE PAID FOR THE PRODUCT.