
Product Manual


Floor Base and Fixed Trapeze 2 Part No 1160803
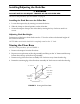
Assembling the Floor Base
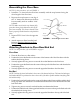
NOTE:Forthisprocedure,refertoFIGURE 1.
1. InstalltheʺAʺframeintothefloorbaseassemblywiththesnapbuttonsfacingthe
shortlengthofthefloorbase.
2. Depressthesnapbuttonononelegof
theʺAʺframeandslideitintothefloor
baseassemblyuntilanaudible“click”
isheard.
NOTE:Makesurethatthesnapbuttonfully
protrudesthroughtheadjustmentholeofthe
floorbaseassembly.ThisensuresthattheFloor
Baseisproperlyinstalledandsecurelylockedin
place.
3. RepeatSTEPS2and3fortheopposite
side.
4. Attachtrapezetofloorbase/bedend.
RefertoAttachingBracketstoFloor
Base/BedEnd.
FIGURE 1 Assembling the Floor Base
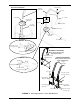
Attaching Brackets to Floor Base/Bed End
NOTE:Forthispr ocedur e,refertoFIGURE 2onpage4.
Floor Base
1. Placethefloorbaseonaflatsurface.
2. P ositionthelowerbe dbracketinthecenterofthebottomrailofthefloorbasewiththe
tubularhookfacingdown.
3. Securelytightenthewingnutstosecurethelowerbe dbrackettothefloorbase.
4. P ositiontheupperbedbracketinthe
centerofthetoprailofthefloorbasewiththetubular
hookfac ingdown.
5. Securelytightenthewingnutstosecuretheupperbedbrackettothefloorbase.
Bed End
NOTE:Positionthelo werbedbracketinthecenterofthebottombedframe.Thelowerbedandupper
bedbracketsMUSTbepositionedasclosetothecenterof thebedaspossiblewithoutinterferingwi th
thebeddriveshaft.
1. P ositionthelowerbedbracketinthecenterofthe
bottombedframewiththetubularhook
facingup.Makesurethatthereisnointerferencebetweenthelow erbe dbracketandthe
beddriveshaft.
2. Tightenwingnutstosecurelowerbedbracketontobottombe dframe.
3. P ositionthetubularhookoftheupperbedbracketsoitrestsonthe
toprailofbedendwith
thetubularhookfacingdown.
4. Securelytightenthewingnutstosecuretheupperbedbrackettothetoprailofthebe d
end.
“A” Frame
Snap Button
Short
Length
Floor Base
Assembly
Leg
Leg
Snap Button