Operator’s Manual HomeFill™II Compressor User: Before using the product, read this manual and save for future reference. Dealer: This manual must be given to the end user. For more information regarding Invacare products, parts, and services, please visit www.invacare.
WARNING WARNING DO NOT OPERATE THIS EQUIPMENT WITHOUT FIRST READING AND UNDERSTANDING THIS MANUAL. IF YOU ARE UNABLE TO UNDERSTAND THE DANGERS, WARNINGS, CAUTIONS, AND INSTRUCTIONS, CONTACT INVACARE TECHNICAL SERVICES BEFORE ATTEMPTING TO USE THIS EQUIPMENT OTHERWISE, SERIOUS INJURY OR PROPERTY DAMAGE MAY RESULT. NOTICE The information contained in this document is subject to change without notice. WARNING Users MUST NOT SMOKE while using this device.
TABLE OF CONTENTS TABLE OF CONTENTS SPECIAL NOTES ............................................... 4 TYPICAL PRODUCT ......................................... 5 PARAMETERS ................................................. 5 LABEL LOCATION ............................................ 6 DEALER INFORMATION ................................... 6 HOMEFILL II INFORMATION ............................. 7 SECTION 1—IMPORTANT SAFETY INSTRUCTIONS ...............................................
SPECIAL NOTES SPECIAL NOTES Check all parts for shipping damage. In case of damage, DO NOT use. Contact Invacare for further instruction. Signal words are used in this manual and apply to hazards or unsafe practices which could result in personal injury or property damage. Refer to the following table for definitions of the signal words. SIGNAL WORD MEANING DANGER Danger indicates an imminently hazardous situation which, if not avoided, will result in death or serious injury.
TYPICAL PRODUCT PARAMETERS Regulatory Listing: Double Insulated Product ETL Certified Complying with UL73 and UL1097 (US) ETL Certified Complying with CAN/CSA C22.2 No. 68 (Canada) For household use only.
LABEL LOCATION ! WARNING Keep all connections free of oil and grease to avoid violent ignition. See Owner's Manual before cleaning. P/N 1075220 Rev C - 10/04 ! WARNING ! WARNING Keep all connections free of oil and grease. See Owner's Manual before cleaning. Cylinders filled on this unit must be labeled "Contents of this cylinder are the product of an oxygen concentrator." P/N 1075238 Rev B - 10/04 DO NOT REMOVE UNIT COVER This unit contains moving and high pressure 1075221 components.
HOMEFILL II INFORMATION HOMEFILL II INFORMATION HomeFill II is an accessory device to the oxygen concentrator that enables the patient to refill custom portable oxygen cylinders for personal use. NOTICE The HomeFill II compressor is for use with specially designed Invacare Platinum™5, 10 and XL HomeFill II compatible oxygen concentrators. The oxygen concentrator can be set to the following maximum flowrates when operating with HomeFill II compressor: Platinum 5 and XL: 3 L/min. or less.
SECTION 1—IMPORTANT SAFETY INSTRUCTIONS SECTION 1—IMPORTANT SAFETY INSTRUCTIONS WARNING SECTION 1 - IMPORTANT SAFETY INSTRUCTIONS contains important information for the safe operation and use of this product. DO NOT use this product or any available optional equipment without first completely reading and understanding these instructions and any additional instructional material such as Owner’s Manuals, Service Manuals or Instruction Sheets supplied with this product or optional equipment.
SECTION 1—IMPORTANT SAFETY INSTRUCTIONS DO NOT allow oil from your hands or other sources to come into contact with the compressor coupling or bottle fittings. These substances may become flammable in the presence of oxygen and cause injury. Avoid touching the bottle fitting whenever possible. Example of items to avoid are hand creams or lotions, cooking oils, suntan oils or sunblocks and similar oily products.
SECTION 1—IMPORTANT SAFETY INSTRUCTIONS DO NOT store filled oxygen cylinders near a furnace, hot water tank, in the trunk of a car or other high temperature area. Storage in areas such as this can result in bursting of the cylinder or fire. The use of this device is limited to the oxygen patient. Cylinders MUST be used ONLY by the oxygen patient and are not to be distributed to any other individual for any purpose.
SECTION 1—IMPORTANT SAFETY INSTRUCTIONS If any leakage of the oxygen cylinder is detected DO NOT attempt to use the cylinder. Turn the flow selector knob on the regulator to Off. If leakage persists, place the cylinder outdoors and notify your Home Health Care Provider or Service Representative of this condition. The HomeFill II is equipped with a high pressure relief valve to ensure the user’s safety. When activated, this safety feature will make an extremely loud noise.
SECTION 2—INITIAL SETUP SECTION 2—INITIAL SETUP NOTE: Dealers Only - Refer to Dealer Information on page 6 before performing this procedure. Initial Set Up of Compressor Compressor Initial Setup Checklist Before operating the HomeFill II Compressor for the first time, complete the following checklist: ❑ Choose a location for the compressor. ❑ Transport the compressor to the desired location. ❑ Connect the power cord to the compressor. ❑ Connect the compressor to the concentrator.
SECTION 2—INITIAL SETUP Transporting the Compressor WARNING NEVER transport a compressor with a cylinder connected to or stored on the compressor, otherwise injury or damage can occur. CAUTION When transporting the compressor, be careful not to bump the compressor or the connectors into obstacles. Otherwise, damage to the compressor may occur. NOTE: For this procedure, refer to FIGURE 2.1. 1. There are two methods to safely transport the compressor: Hand Grip Hand Grip A.
SECTION 2—INITIAL SETUP 4. Plug the opposite end of the power cord into the wall outlet. Compressor (REAR) Wall Outlet Electrical Connection Power Cord NOTE: This product has a polarized plug (one blade is wider than the other). As a safety feature, this plug will fit in a polarized outlet only one way. If the plug does not fit fully in the outlet, reverse the plug. If it still does not fit, contact a qualified electrician. DO NOT attempt to defeat this safety feature. FIGURE 2.
SECTION 2—INITIAL SETUP FIGURE 2.
SECTION 3—CHECKLIST AND CYLINDER INSPECTION SECTION 3—CHECKLIST AND CYLINDER INSPECTION Compressor Operation Checklist Each time the HomeFill II Compressor is used to fill a cylinder, complete the following checklist: ❑ Ensure the concentrator has been On for at least thirty minutes. Refer to the concentrator Owner’s Manual. ❑ Perform the prefill inspection on the cylinder. ❑ Connect the cylinder to the compressor. ❑ Push the compressor power switch to the on ( ) position.
SECTION 3—CHECKLIST AND CYLINDER INSPECTION ! DANGER Improper filling or abuse of this cylinder, or failure to follow these safety instructions may cause serious bodily injury or death. High pressure oxidizing gas vigorously accelerates combustion. DO NOT alter or modify cylinder or related components. DO NOT use Oil or Grease. Keep cylinder, cylinder valve, all equipment and connections free of oil and grease to avoid violent ignition resulting in serious bodily injury or death.
SECTION 3—CHECKLIST AND CYLINDER INSPECTION The Hydrostatic Testing Date Aluminum cylinders MUST undergo testing every five years. WARNING DO NOT fill cylinders that have not been tested in the past five years. Otherwise, serious personal injury may result. Contact your dealer for replacement. External Examination 1.
Please Seal with Tape Before Mailing
REGISTER YOUR PRODUCT! The benefits of registering: 1. 2. 3. 4. 5. Safeguard your investment. Ensure long term maintenance and servicing of your purchase. Receive updates with product information, maintenance tips, and industry news. Invacare can contact you or your provider, if servicing is needed on your product. It will enable Invacare to improve product designs based on your input and needs. Register ONLINE at www.invacare.com - or Complete form and mail.
1. Method of purchase: (check all that apply) ❏ Medicare ❏ Insurance ❏ Medicaid ❏ Other 2. This product was purchased for use by: (check one) ❏ Self ❏ Parent ❏ Spouse ❏ Other 3. Product was purchased for use at: ❏ Home ❏ Facility ❏ Other 4. I purchased an Invacare product because: ❏ Price ❏ Features (list features) 5.
SECTION 4—COMPRESSOR OPERATION SECTION 4—COMPRESSOR OPERATION Connecting/Disconnecting the Cylinder to/from the Compressor Connecting the Cylinder to the Compressor WARNING NEVER use tools of any kind to connect/disconnect the cylinder and the compressor. Otherwise, severe injury and/or damage may occur. DO NOT drop oxygen cylinders. Use two hands when handling/transporting oxygen cylinders. Otherwise, injury or damage may occur. DO NOT use a liquid leak detector to test for leaks.
SECTION 4—COMPRESSOR OPERATION CAUTION DO NOT connect the outlet (cannula) connection to the HomeFill II compressor, otherwise the conserving cylinder will not work properly. 4. Momentarily push DOWN on the outer ring (sleeve) of the connector fillport until GREEN dots are visible to reset the connector (FIGURE 4.1). NOTE: If the outer ring (sleeve) is in the UP position (GREEN dots not visible), the connector fillport will not be able to accept the cylinder fillport.
SECTION 4—COMPRESSOR OPERATION 8. Pull UP on the outer ring (sleeve) of the connector fillport while pushing DOWN on the cylinder/regulator assembly to couple the cylinder fillport into the connector fillport (FIGURE 4.2). NOTE: The cylinder is properly connected when an audible “click” is heard.
SECTION 4—COMPRESSOR OPERATION FIGURE 4.
SECTION 4—COMPRESSOR OPERATION Disconnecting the Cylinder from the Compressor WARNING NEVER use tools of any kind to connect/disconnect the cylinder and the compressor. Otherwise, severe injury and/or damage may occur. NOTE: For this procedure, refer to FIGURE 4.3. 1. Press the compressor power switch to the Off (O) position. 2. Grasp the cylinder/regulator assembly in the area behind the cylinder gauge. 3. With the other hand, grasp the outer ring (sleeve) of the connector fillport and push DOWN. 4.
SECTION 4—COMPRESSOR OPERATION 5. When the cylinder fillport is disconnected from the connector fillport, release the outer ring (sleeve) of the connector fillport and use two hands to remove the cylinder from the compressor cradle. WARNING The fillport cover on the connector fillport and the cylinder fillport MUST be replaced after filling and whenever not in use. If either of the fillport covers are missing contact your healthcare provider before using. 6.
SECTION 4—COMPRESSOR OPERATION Turning the Compressor On NOTE: For this procedure, refer to FIGURE 4.5 on page 30. 1. Make sure the concentrator is On. Refer to the concentrator Owner’s Manual. CAUTION The concentrator flow rate to the patient MUST be set at maximum: 3 L/min. or less for Platinum 5, XL and 5 L/min. for Platinum 10. Otherwise, the oxygen level to the compressor will be <90% and the compressor will not fill the cylinder. 2. Set the concentrator flow rate to the patient to 3 L/min.
SECTION 4—COMPRESSOR OPERATION oxygen level reaches 90%. If light does not go Off within 10 minutes, refer to Troubleshooting/ Cylinder Fill times on page 34. NOTE: If the ATTENTION (RED) light and audible alarm are on. Refer to Troubleshooting/ Cylinder Fill times on page 34. 6. Remove the full cylinder. Refer to Disconnecting the Cylinder from the Compressor on page 27. 7. Push the power switch to the Off (O) position.
SECTION 4—COMPRESSOR OPERATION Setting the Flow Knob to the Prescribed Setting NOTE: For this procedure, refer to FIGURE 4.6. 1. Attach the nasal cannula to the outlet fitting of the cylinder. 2. Turn the flow knob to the L/min. setting prescribed by your physician or therapist. WARNING As changing the L/min. setting on the flow knob will affect the dose of oxygen delivered, DO NOT readjust the L/min. setting unless directed by your physician or therapist. 3.
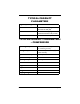
SECTION 5—INDICATOR LIGHTS SECTION 5—INDICATOR LIGHTS INDICATOR LIGHT COLOR COMPRESSOR STATUS EFFECT None Compressor is Off O2 flowing to user if concentrator is on O2 BELOW NORMAL YELLOW Compressor is On and warming up (0-3 minutes after power is On) Cylinder filling not started O2 from concentrator is < 90% (any time after three minute warmup) Cylinder filling stops, will restart when O2 > 90% O2 flowing to user if concentrator is On O2 flowing to user if concentrator is On FILLING - GREEN F
SECTION 5—INDICATOR LIGHTS INDICATOR LIGHT COLOR ATTENTION - RED (Audible Alarm) HomeFill™II Compressor COMPRESSOR STATUS EFFECT Compressor is On.
SECTION 6—TROUBLESHOOTING/ CYLINDER FILL TIMES SECTION 6—TROUBLESHOOTING/ CYLINDER FILL TIMES TROUBLESHOOTING PROBLEM SOLUTION No indicator lights on when compressor turned on. 1. Turn compressor Off. 2. Check that power cord is properly plugged into compressor and wall outlet. 3. Turn the compressor On. 4. Clean air filters. Refer to Maintenance on page 37. 5. If performing STEPS 1-4 does not cause any indicator lights to come on, contact your home health care provider or Invacare for service.
SECTION 6—TROUBLESHOOTING/ CYLINDER FILL TIMES TROUBLESHOOTING PROBLEM SOLUTION O2 BELOW NORMAL (YELLOW) light stays On 1. Ensure the concentrator has warmed up for at least 20 minutes.If it has not been 20 minutes, turn the compressor Off until the concentrator warms up. If the YELLOW light still remains on proceed to STEP 2. 2. Inspect the connection between the compressor and the concentrator for damage or pinching. If damaged, replace. If pinched, straighten tubing.
SECTION 6—TROUBLESHOOTING/ CYLINDER FILL TIMES TROUBLESHOOTING PROBLEM SOLUTION Regulator is On but O2 is not being delivered 1. Refill cylinder 2. Check that cannula is straight and not pinched. If damaged, replace. 3. Call home health care provider or Invacare for service. CYLINDER FILL TIMES Cylinder Filling Times Concentrator Flow Rate to Patient: (Platinum 5 up to 3 L/min.
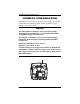
SECTION 7—MAINTENANCE SECTION 7—MAINTENANCE Cleaning the Compressor Filter WARNING Push the power switch to the Off (O) position and unplug the compressor before cleaning. DO NOT operate the compressor without the filter installed. CAUTION DO NOT unplug by pulling on cord. To unplug, grasp the plug not the cord, otherwise damage may occur. NOTE: For this procedure, refer to FIGURE 7.1. NOTE: All compressors have one filter on the back of the cabinet. NOTE: Perform this procedure at least once a week.
LIMITED WARRANTY Cabinet WARNING Push the power switch to the Off (O) position and unplug the compressor before cleaning. To avoid electrical shock, DO NOT remove cabinet. 1. Clean the cabinet with a mild household cleaner and non-abrasive cloth or sponge. LIMITED WARRANTY NOTE: THE WARRANTY BELOW HAS BEEN DRAFTED TO COMPLY WITH FEDERAL LAW APPLICABLE TO PRODUCTS MANUFACTURED AFTER JULY 4, 1975.
For Model Nos. IOH2M6 and IOH2M9, Invacare warrants the HomeFill II regulator (NOT including the cylinder) to be free from defects in materials and workmanship for a period of six (6) years from date of purchase from Invacare or a dealer, with a copy of the seller’s invoice required for coverage under this warranty. For Model Nos.
(INCLUDING, BUT NOT LIMITED TO, MODIFICATION THROUGH THE USE OF UNAUTHORIZED PARTS OR ATTACHMENTS) OR TO PRODUCTS DAMAGED BY REASON OF REPAIRS MADE TO ANY COMPONENT WITHOUT THE SPECIFIC CONSENT OF INVACARE CORPORATION OR TO PRODUCTS DAMAGED BY CIRCUMSTANCES BEYOND INVACARE CORPORATION'S CONTROL.