2.6 Using Notes Notes helps you to quickly capture thoughts, questions, reminders, to-do lists, and meeting notes. You can create handwritten and typed notes, record voice notes, convert handwritten notes to text for easy readability, and send notes to others. Your notes and recordings are displayed in the note list. If you have a long list, tap the sort list (labeled Name by default), and select the option you want. To open a note or play a recording, tap it.
Chapter 2. Basic Operations Creating a Note 1. Either tap > Programs > Notes or press the Voice Record button on the left side of the device. Press the Voice Record button on the left side to launch Notes. 2. Tap New and enter text. 3. Tap to save your note.
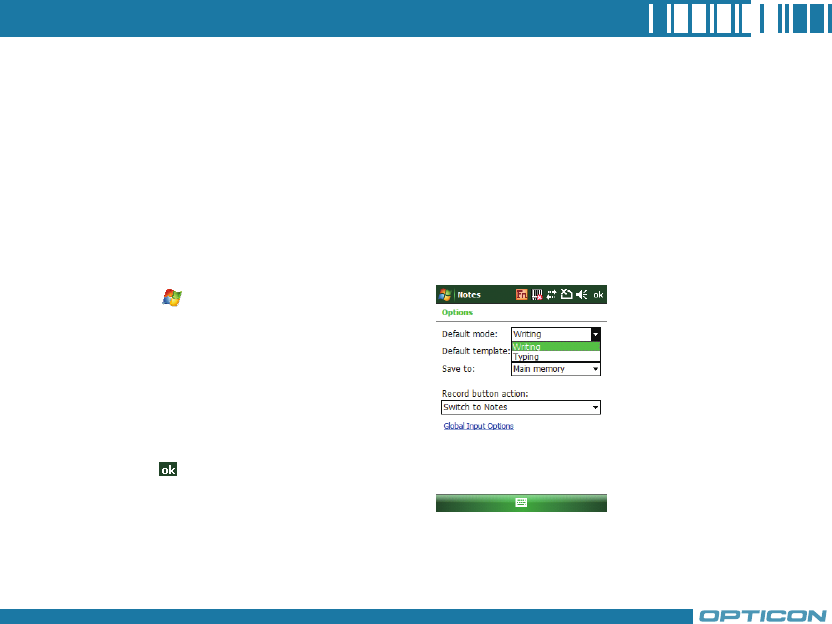
Creating a Stand-alone Voice Recording 1. Tap > Programs > Notes. 2. If the recording toolbar is not shown, tap Menu > View Recording Toolbar. 3. Tap the RECORD button on the recording toolbar and speak into the device’s microphone to record your voice in the notes list. 4. Tap the STOP button on the recording toolbar when finished. Switching between Typing/Writing Modes > Programs > Notes. 1. Tap 2. Create a new note or open an existing note from the notes list. 3.
Chapter 2. Basic Operations While in typing mode, tap Draw to switch to writing mode Editing a Handwritten Note • Tap Menu > Undo/Redo Ink. • Tap Edit > Select All/Clear. While in writing mode, tap Draw to switch to typing mode Ta p U n d o I n k t o c a n c e l o r reverse an action. Re-execute an undone action by tapping Redo Ink.
Adding a Voice Recording to a Note > Programs > Notes. 1. Tap 2. Create a new note or open an existing note from the notes list. 3. If the recording toolbar is not shown, tap Menu > View Recording Toolbar.
Chapter 2. Basic Operations 4. Tap the RECORD button on the recording toolbar and speak into the device’s microphone. 5. Tap the STOP button on the recording toolbar when finished. 6. Tap to return to the notes list if you are adding a voice recording to a note.
Deleting a Note 1. Tap > Programs > Notes. 2. Tap and hold the note and tap Delete. Creating a Default Template 1. Tap > Programs > Notes. 2. Create a note that you would like to save as a template. 3. In the note list, select the new note and tap Menu > Rename/Move. 3. Tap the Yes button to delete the selected note.
Chapter 2. Basic Operations 4. Enter a name for the new template in the Name box. 5. In the Folder list, select Templates. 6. Tap to return to the note list. Creating a Note by Using a Template 1. Tap > Programs > Notes. 2. Tap Menu > Options. 3. Select a template from Default template.
Template Screen Template Blank Meeting Notes Memo Phone Memo Screen To Do 59
Chapter 2. Basic Operations 2.7 Using Tasks Use Tasks to keep track of things you need to do. A task can occur once or repeatedly (recurring). You can set reminders for your tasks and you can organize them by using categories. Your tasks are displayed in a task list. Overdue tasks are displayed in red. If you use Outlook on your PC, you can synchronize tasks between your device and PC so that tasks you create or update on your PC will also be updated on your device and vice versa.
i. Enter or select a subject. iii. Pick the start and due time. ii. Select a completion status.
Chapter 2. Basic Operations iv. Set a reminder date/time and pick a task category. Multi-selection Set reminder date and time. v. Select task sensitivity. You can synchronize information on your device with your PC to keep your task list up to date in both locations. If you create a new task with a reminder on your PC and then synchronize tasks with your device, the reminder will play at the time it was set on your PC.
Deleting a Task 1. Tap > Programs > Tasks. 2. Select the task, and tap Menu > Delete Task. Changing a Task 1. Tap > Programs > Tasks. 2. Select the task, and tap Edit.
Chapter 2. Basic Operations Viewing Task Details > Programs > Tasks. 1. Tap 2. Tap twice on a task to view the details. 64 Sorting/Filtering Your Tasks > Programs > Tasks. 1. Tap 2. Do one of the following: • To sort the tasks, tap Menu > Sort by and select a sorting option. • To filter the tasks by category, tap Menu > Filter and select a category to display.
Setting Tasks Options > Programs > Tasks. 1. Tap 2. Tap Menu > Options, there are 3 options you can set: • Set reminders for new items • Show start and due dates • Show Tasks entry bar Setting Options for Displaying Tasks on the Today Screen You can specify the kind of tasks that show on the Today screen. 1. Tap > Settings > Personal tab > Today > Items tab. 2. Select Tasks, and then tap Options. 3. Under Display number of, select the type of task that you want to show on the Today screen. 4.
Chapter 2.
Chapter 3. Phone Features 3.1 Making a Call 3.2 Configuring the Phone 3.3 In-Call Options 3.4 SIM Manager 3.
Chapter 3. Phone Features You can use your device to make, receive, and keep track of calls, and send text messages (SMS, Short Message Service) and MMS (Multimedia Messaging Service) messages. You can also dial a phone number directly from Contacts, and easily copy SIM contacts to Contacts on the device. 3.1 Making a Call The Phone Screen From the Phone screen, you can open, call, or find a contact, and even save a new number in Contacts. To access the Phone screen, do any of the following: ).
2. Do one of the following after entering the phone number: • If you see the number or contact name to call, select it, then tap or press the TALK ) key. ( • If you do not see the number or contact name, finish entering the number, then tap or ) key. press the TALK ( TALK Key END Key Tap on the screen once to erase one single number; tap and hold it to erase a whole string of numbers.
Chapter 3. Phone Features Making a Call from Call History Call History displays calls you have made, received, and missed. 1. On the Phone screen, tap the Call History button on the Phone keypad. Call History 1.Calls you received 2.Calls you made 3.Calls you missed 2. Select the name or phone number to call. ). 3. Tap Call or press TALK ( Tap a phone number or a contact in the Call History list displays history on all the calls related to the contact or the phone number.
Making a Call from Contacts 1. On the Phone screen, tap on the desired contact in the list. You can quickly search through Contacts by entering the first letter of the contact or the first number of his/her phone number. 2. Do one of the following: • Tap on the number you want to dial; otherwise, you can tap Call on the screen or press TALK ).
Chapter 3. Phone Features • Tap Contacts on the Today screen to open contact list, tap and hold the desired contact, and then select Call Work, Call Home, or Call Mobile from the pop-up submenu. Making a Call from Speed Dial You can create speed dial entries for frequently called numbers or frequently accessed items so you can dial a number by pressing a single key.
3. Tap the contact for whom to create a speed dial. 5. In Location, select the speed dial number to use. 4. Select the phone number for which to create a speed dial. 6. Tap when finished.
Chapter 3. Phone Features The first speed dial location is generally reserved for your voicemail. Speed Dial uses the next available location by default. If you want to place a number in a location that is already used, the new number replaces the existing number. Tap the Speed Dial button on the phone screen to check the success of creating a Speed Dial entry.
3.2 Configuring the Phone Your wireless service provider may provide useful services such as Call Barring, Caller ID, Call Forwarding, Call Waiting, Voice Mail and Text Messages and Fixed Dialing. You can get their settings from the Network and change them. Activating PIN Security Most Subscriber Identity Module (SIM) cards are preset with a personal identification number (PIN) that is provided by your wireless service provider.
Chapter 3. Phone Features If your PIN is entered incorrectly three times, the SIM card will be blocked. If this happens, you can unblock it with the PIN Unblocking Key (PUK) obtained from your wireless service provider. Changing the Ring Type and Ring Tone You can choose how to be notified for incoming calls. 1. Tap > Settings > Phone. 2. In the Ring type list, tap the desired option. 3. In the Ring tone list, select a ring tone. 4. Tap . To use custom .wav, .mid, or .
Select On, Vibrate or Off to quickly change both the ringer and system volume and settings. To adjust the earpiece volume during a call, press the VOLUME control on the device side panel. Adjusting the volume at any other time can affect the ring and notification and MP3 sound levels. Blocking Incoming or Outgoing Calls You will not be able to receive or make calls according to the options you choose. 1. Tap > Settings > Phone > Services tab. 2. Tap Call Barring > Get Settings.
Chapter 3. Phone Features 3. Choose the calls you want to block, and tap . • Block incoming calls: All calls, When roaming, Off. • Block outgoing calls: All calls, International, International except to home country, Off. Displaying Caller ID You can provide a way for people to know your identity when you are calling them. > Settings > Phone > 1 . Ta p Services tab. 2. Tap Caller ID > Get Settings. 3. Select Everyone, No one or Only to contact, and tap .
Call Waiting When you are in another call, you will be notified of an incoming call if this option is selected. > Settings > Phone > Services tab > Call Waiting > Get Settings. 1. Tap 2. Select Notify me or Do not notify me, and tap . To change phone settings alternatively, tap Menu > Options > Services tab from the Phone keypad. Selecting a Network Manually > Settings > Phone > Network tab. Alternatively, you can tap Menu > Options 1. Tap > Network tab from the Phone screen. 2.
Chapter 3. Phone Features 3. Select the network you want to use, then tap 80 .
3.3 In-Call Options Your device provides various options for managing multiple calls at the same time. You are notified when you have another incoming call, and you have the choice of ignoring or accepting the call. If you are already on a call and accept the new call, you can choose to switch between the two callers, or set up a conference call between all three parties. In-Call Options Answering Another Call 1. Tap Answer to take the second call and put the first call on hold. 2.
Chapter 3. Phone Features Conference Call 1. Either put a call on hold and dial a second number; or accept a second incoming call when you have one in progress. 2. Tap Menu and select Conference. If the conference connection is successful, the word “Conference” will appear at the top of the screen. To add additional persons to your conference call, tap Hold, enter the phone number, and then tap Swap to return and continue. Not all service providers support conference calling.
To avoid damage to your hearing, do not hold your device against your ear when the Speakerphone is turned on. Muting the Microphone The device’s microphone can be turned off during a call. If you turn off the microphone the caller cannot hear you. However, you can still hear the caller. • Tap Mute during a call to turn the microphone off. • Tap Unmute to turn the microphone on.
Chapter 3. Phone Features 3.4 SIM Manager The SIM Manager helps you to manage the phonebook in your SIM card. Using the SIM Manager, you can easily transfer phonebook entries from your SIM card to Contacts. Adding a Phonebook Entry to the SIM Card > Programs > SIM Manager. 1. Tap 2. Tap Option > Add Entry and enter the name and phone number you want to add. 3. Tap 84 . Deleting Phonebook Entries from the SIM Card 1. Tap > Programs > SIM Manager. 2.
Saving Phonebook Entries to Contacts 1. Tap > Programs > SIM Manager. 2. Select the entries you want to save to Contacts by checking the checkboxes in front. 3. Tap Option > Add to Contacts. 4. Tap to close the notification dialog box. 3.5 Blocking Unwanted Phone Calls You can set up a blacklist to block incoming calls from certain phone numbers. If a call is received from a blacklisted number, your device will not ring or vibrate. Instead, this call will be blocked automatically.
Chapter 3. Phone Features 2. Select or clear the checkbox in front of Reject anonymous calls to enable or disable this feature. 3. Tap Adding a Phone Number to the Blacklist > Programs > Blacklist. 1. Tap 2. Tap new and do one of the following: • Tap Contact and select a contact to add to the blacklist. • Tap Number to add a phone number directly. . 3. Select the check box of Enable Blacklist to block numbers listed in the Blacklist.
Removing a Phone Number from the Blacklist > Programs > Blacklist. 1. Tap 2. Select the number you want to remove from the blacklist. 3. Tap Menu > Delete. 4. Tap .
Chapter 3.
Chapter 4. Synchronizing Information 4.1 Installing and setting up ActiveSync 4.2 Synchronizing Information 4.3 Changing Settings for an Information Type 4.4 Synchronizing with Exchange Server 4.
Chapter 4. Synchronizing Information ActiveSync synchronizes information on your device with information on your PC such as Outlook content. ActiveSync can also synchronize over a wireless or cellular network with Exchange Server, if your company or service provider is running Exchange Server with Exchange ActiveSync.
• Choose information types to synchronize. When you finish the wizard, ActiveSync synchronizes your device automatically. Once synchronization completes, you can disconnect your device from your PC. 4.2 Synchronizing Information To synchronize using ActiveSync, you must install ActiveSync on your PC before connecting your device to the PC. Starting and Stopping Synchronization Manually 1. Turn on the device. 2. Connect your device to your PC using a USB cable or Bluetooth.
Chapter 4. Synchronizing Information Changing Which Information is Synchronized You can change this setting only if your device already has a sync relationship with a PC. Please disconnect your device from your PC before changing this setting. > Programs > ActiveSync. 1. Tap 2. Tap Menu > Options. 3. Do one or more of the following: • Select the check box for the items you want to synchronize.
4.3 Changing Settings for an Information Type Before changing settings for an information type on the device, disconnect it from your PC. 1. Tap > Programs > ActiveSync > Menu > Options. 2. Select one of the information types. 3. Do one of the following: • To view or change settings for an information type (when available), tap Settings. • To view or change settings for a computer or Exchange Server, tap Settings. 4. Change the amount of information to be synchronized or other settings. 5.
Chapter 4. Synchronizing Information connecting, select the Save password check box. 5. Select the check boxes for the types of information items that you want to synchronize with Exchange Server. 6. To change available synchronization settings, select the type of information, and tap Settings. 7. To change the rules for resolving synchronization conflicts, tap Advanced. 8. Tap Finish. You can also use the Sync Setup Wizard to set up the device to synchronize remotely with the Exchange Server.