BUILT IN DISHWASHER inbouw vaatwasser IVW6033A • gebruiksaanwijzing • instruction manual
•
Nederlands 1. 2. 3. 4. 5. 6. 7.
1 veiligheidsvoorschriften • Lees eerst de gebruiksaanwijzing en de installatievoorschriften aandachtig en geheel door voordat u het apparaat gaat gebruiken en bewaar deze zorgvuldig voor latere raadpleging. AFLEVERING • Controleer onmiddelijk of de verpakking en de vaatwasmachine tijdens het transport beschadigd zijn. Een beschadigd apparaat niet in gebruik nemen maar contact opnemen met uw leverancier. • Het verpakkingsmateriaal volgens de bestaande milieuvoorschriften (laten) afvoeren.
• Plaats de machine in de buurt van een waterkraan, waterafvoer en stopcontact. Plaats de machine zodanig dat de aansluitingen niet meer gewijzigd hoeven te worden. • Pak om de machine te verplaatsen niet de deur of het paneel vast. • Zorg ervoor dat de aan- en afvoerslangen niet klem komen te zitten tijdens de plaatsing van de machine. • Draai de stelvoeten van de machine in of uit zodat deze waterpas en stevig op de vloer staat.
Waarschuwing: Bij gebruik van een afvoerslang langer dan 4 m, wordt de vaat mogelijk niet schoon. In dat geval accepteert Inventum geen aansprakelijkheid. ELEKTRISCHE AANSLUITING • De aansluitstekker met randaarde van de machine moet worden aangesloten op een geaard stopcontact dat de juiste spanning en stroom levert. Als er geen stopcontact met randaarde aanwezig is, laat dat dan door een bevoegde elektricien aanleggen.
• Het apparaat mag niet door kinderen worden gereinigd of onderhouden, tenzij dit onder toezicht gebeurt. • Het apparaat nooit gebruiken met onderdelen die niet door de fabrikant zijn aanbevolen of geleverd. • Dit toestel moet worden geaard! Aarding verkleint de kans op een elektrische schok bij storingen en defecten. Dit toestel is uitgerust met een geaard snoer en stekker.
• Gebruik de vaatwasser uitsluitend voor het doel waarvoor deze ontworpen is. Gebruik het toestel alleen in een vorstvrije ruimte! • Verwijder de deur van de vaatwasser of maak het slot onklaar wanneer u het toestel afdankt. Het is wel eens gebeurd dat kinderen zichzelf opgesloten hebben in een oud toestel. Om dit te voorkomen, maakt u het slot onklaar en verwijderd u de aansluitkabel. • Laat kinderen niet met het toestel spelen.
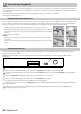
Nederlands 2 productomschrijving 4 5 1 6 7 8 9 2 3 1. Handgreep - trek aan de handgreep om de deur van de vaatwasmachine te openen en sluit de deur door deze dicht te duwen. met indicatielampjes 2. Knop met duo functie: - Uitgestelde start-knop - Halve belading keuze-knop met indicatielampje met indicatielampjes - druk op deze knop om de start van het wasprogramma 3, 6 of 9 uur uit te Uitgestelde start-knop stellen.
3 voor het eerste gebruik Voordat u de machine voor de eerste keer gebruikt, moet u controleren of de elektriciteits- en watertoevoerspecificaties in het huis overeenkomen met de waarden zoals weergegeven in de veiligheids- en installatieinstructies. Verwijder alle verpakkingsmaterialen om en in de machine. Vul het zoutreservoir met zout en voeg water toe totdat het bijna overloopt en stel het zoutverbruik in. Vul het glansspoelmiddelreservoir.
Tabel instelling waterhardheid Niveau waterhardheid Duitse hardheid dH Franse hardheid dF Britse hardheid dE 1 0-5 0-9 0-6 ● Wassen aan o Klaar uit o Start/Pauze uit 2 6-11 10-20 7-14 o Wassen uit ● Klaar aan o Start/Pauze uit 3 12-17 21-30 15-21 o Wassen uit o Klaar uit ● Start/Pauze aan 4 18-22 31-40 22-28 ● Wassen aan ● Klaar aan o Start/Pauze uit 5 23-31 41-55 29-39 ● Wassen aan o Klaar uit ● Start/Pauze aan 6 32-50 56-90 40-63 o Wassen uit ● Klaar aan ● Start/Pauze aan
VAATWASMIDDELGEBRUIK Gebruik een vaatwasmiddel dat speciaal bedoeld is voor gebruik in huishoudelijke vaatwasmachines. Vaatwasmiddel is verkrijgbaar in poedervorm, tabletten of gelcapsules. Het vaatwasmiddel moet in het reservoir worden geplaatst voordat u de machine start. Bewaar het afwasmiddel op een koele, droge plaats en houdt het buiten bereik van kinderen. Bij inslikken direct een arts raadplegen en de verpakking meenemen.
4 het laden van de vaatwasmachine Als u de vaatwasmachine correct laadt dan heeft dit een positieve werking op het energieverbruik en het was- en droogproces. De onderste korf is voor ronde en diepe voorwerpen, zoals pannen met lange stelen, deksels, borden, schalen en het bestekmandje. De bovenste korf is voor kopjes, schotels, mokken, kommen en glazen.
VERSCHILLENDE MANIEREN VAN HET LADEN VAN DE KORVEN Bovenste korf Onderste korf Bovenste en onderste korf verkeerd geladen WAARSCHUWING: zorg bij het plaatsen van het vaatwerk dat de sproeiarmen vrij rond kunnen blijven draaien. Let op dat er niets door de bodem van het bestekmandje steekt.
5 de vaatwasmachine instellen DE VAATWASMACHINE AAN EN UIT ZETTEN 3 2 ● 1 • Selecteer het gewenste programma met de programmakeuzeknop (1). Het lampje in de Start/Pauze-knop gaat aan. • Kies eventueel een extra functie, zoals halve belading en/of uitgestelde start. • Zet de machine aan door op de Start/Pauze-knop te drukken. Het lampje in de Start/Pauze-knop gaat uit en het indicatielampje bij de functie Wassen (3) gaat aan.
PROGRAMMAKEUZETABEL Programma Programma informatie Voorspoelen en inweken van etensresten in afwachting van een volle vaatwasmachine. 16 • Nederlands Programmaverloop Tijd in minuten Voorspoelen Klaar 15 Kort programma voor niet erg vuile vaat die niet gedroogd hoeft te worden. 40°C wassen Koud spoelen Warm spoelen Klaar 30 Dagelijks programma voor normaal vuile vaat.
6 reiniging & onderhoud Als u de vaatwasmachine regelmatig reinigt, verlengt u de levensduur van de machine. Controleer voordat u de vaatwasmachine gaat reinigen of de machine uit staat. Verwijder de stekker uit het stopcontact en draai de waterkraan dicht. Reinig de buitenkant van de vaatwasmachine met een vochtige doek. Om nare luchtjes van etensresten te voorkomen, reinig de deurrubbers regelmatig met een vochtige doek of spons.
7 storingen FOUTCODE CONTROLE Onvoldoende watertoevoer. • Controleer of de waterkraan volledig open gedraaid is en dat de watertoevoer niet wordt belemmerd. • Draai de waterkraan dicht, verwijder de aanvoerslang van de kraanaansluiting en controleer of deze niet verstopt zit. • Start de machine opnieuw. Neem contact op met de servicedienst als de storing blijft bestaan. Watertoevoer stopt niet. • Draai de waterkraan dicht. • Neem contact op met de servicedienst. Afvalwater kan niet worden afgevoerd.
WAT TE DOEN ALS ... ...een van de lampjes voor het programmaverloop gaat branden en het Start/Pauze-lampje knippert? De deur van de vaatwasmachine is open. Maak hem dicht. ...het programma niet wil starten? • Controleer of de stekker in het stopcontact zit. • Controleer de zekering in de meterkast. • Controleer of de waterkraan open gedraaid is. • Zorg dat de deur van de vaatwasmachine goed gesloten is. • Controleer of de vaatwasmachine ingeschakeld is met de Aan/uit-knop.
PRODUCTKAART INVENTUM Typenummer IVW6033A Standaard couverts 12 couverts Energie-efficiëntieklasse * A++ Energieverbruik [Aec] in kWh per jaar ** 258 Energieverbruik standaard cyclus [Et] 0,90 Opgenomen vermogen in uitstand [Po] 0,50 Opgenomen vermogen in standby stand [Pl] 1,00 Jaarlijks waterverbruik ** 3360 Droog efficientieklasse *** Standaard programma Programmaduur standaard **** [min] Geluidsemissie dB(A) Type apparaat A ECO 50°C 165 47 inbouw Uitvoering Geïntegreerd Kleur bediening
Technische gegevens Afmetingen [mm] (bxdxh) IVW6033A 598 x 570 x 820 Netto gewicht [kg] 41 Bruto gewicht [kg] 43 Elektrische aansluitwaarde [W] Netspanning [V] / netfrequentie [Hz] Lengte aansluitsnoer [m] Stekkertype Aansluiting toevoerslang Positie toevoerslang Lengte toevoerslang [m] Positie afvoerslang Lengte afvoerslang [m] * ** *** **** 1900 220-240/ 50 1,8 EU/TR 3/4 inch binnendraad rechtsachter 1,47 rechtsachter 2,00 A+++ (hoogste efficiëntie) tot D (laagste efficiëntie).
algemene service- en garantievoorwaarden Hoe belangrijk service is, hoeven we je niet te vertellen. We ontwikkelen onze producten zodat je er jarenlang onbezorgd plezier van kan hebben. Ontstaat er toch een probleem, dan vinden we dat je direct een oplossing mag verwachten. Daarom bieden we je op onze producten een omruilservice, bovenop de rechten en vorderingen die je op grond van de wet toekomen. Door een product of onderdeel om te ruilen, besparen we je tijd, moeite en kosten.
Storingen of defecten buiten de garantieperiode 1. In geval van storingen of defecten aan klein huishoudelijke apparatuur of groot huishoudelijke apparatuur buiten de garantieperiode, kan hiervan melding worden gemaakt bij de consumentenservice via het contactformulier www.inventum.eu/ service-aanvraag of door te bellen met de consumentenservice. 2. De consumentenservice kan je vragen het product voor onderzoek of reparatie op te sturen. De kosten van verzending zijn voor jouw rekening. 3.
English 1. 2. 3. 4. 5. 6. 7.
1 safety and installation instructions • Please read these instructions before operating the appliance and retain for future use. DELIVERY • Check for any damage to the packaging or the appliance during transportation. Never use a damaged appliance, but contact your supplier. • Dispose the packing materials according to local regulations. • Keep the material out of reach of children. Danger of suffocation.
CONNECTING TO THE WATER TAP AND DRAINAGE Make sure that the indoor plumbing is suitable for installing a dishwasher. Also, we recommend that you fit a filter at the beginning of the water supply in your house to avoid any damage to your appliance because of any contamination (sand, clay, rust, etc.) that might occasionally carried in through the mains water supply. • Always use the new water inlet hose supplied with your appliance.
• When disconnecting your appliance from the mains supply, always pull from the plug. Never pull the cord itself. IN DAILY USE • This appliance is intended to be used in household and similar applications such as: - in shops, offices or other working environments; - farm houses; - by client in hotels, motels and other residental type environments; - bed & breakfast type environments. • An electrical appliance is not a toy, and should therefore always be placed outside the reach of children.
• • • • • • • • • • • • • • • appliance. If swallowed, consult a doctor immediately and take the packaging with you. Keep the door closed. You can trip over an open door. Do not bend the inlet and drainage hoses or power lead excessively during installation. Take care to ensure they do not become stuck. Avoid contact with the skin and eyes. Keep children away from the dishwasher when the door is open. Make sure that all loose components in the dishwasher have been fitted correctly.
English 2 description of the appliance 4 5 1 6 7 8 9 2 3 1. Handle - use the door handle to open and close the door of the dishwasher. with indicator lights 2. Button with double function: - Delayed start button - Half load button with control light Delayed start button with indicator lights - press this button to delay the start of the program by 3, 6 or 9 hours. Each press of the button changes the delay time with 3 hours. The indicator light at the selected time lights up.
3 before first use Prior to using the machine for the first time please check whether the electricity and supply water specifications match the values indicated by the installation instructions for the appliance. Remove all packaging materials inside the machine. Fill the salt reservoir and fill up with water until it almost overflows. Set the water hardness setting. Fill the rinse aid reservoir. FILLING THE SALT RESERVOIR For a good washing result, the dishwasher needs soft, i.e. less calcareous water.
Table of water hardness level settings Water hardness level German hardness dH French hardness dF British hardness dE 1 0-5 0-9 0-6 ● Wash on o Ready off o Start/Pause off 2 6-11 10-20 7-14 o Wash off ● Ready on o Start/Pause off 3 12-17 21-30 15-21 o Wash off o Ready off ● Start/Pause on 4 18-22 31-40 22-28 ● Wash on ● Ready on o Start/Pause off 5 23-31 41-55 29-39 ● Wash on o Ready off ● Start/Pause on 6 32-50 56-90 40-63 o Wash off ● Ready on ● Start/Pause on Hardness le
DISHWASHER DETERGENTS Use a detergent specifically designed for use in domestic dishwashers. You can find it in a powder, gelcapsules and tablets. Detergent must be placed into the reservoir before starting the dishwasher. Keep the detergents stored in a cool, dry place and out of reach of children. If swallowed, consult a doctor inmmediately and take the packaging with you.
4 loading your dishwasher Properly placing your dishes into the dishwasher has a positive effect on the energy consumption and the washing and drying performance. The lower basket can be loaded with large items such as pots with long handles, pans, lids, plates, salad bowls and the cutlery basket. The upper basket is for cups and saucers, mugs, small bowls and glasses.
DIFFERENT WAYS OF LOADING THE BASKETS Upper basket Lower basket Upper and lower basket faulty loading WARNING: place your dishes into your dishwasher in a way that they will not prevent the upper and lower spray arms from spinning. Make sure that no objects are sticking through the bottom of the cutlery basket.
5 setting the dishwasher SWITCHING THE DISHWASHER ON AND OFF 3 2 ● 1 • Select the desired program with the program selector knob (1) . The light in the Start/Pause button turns on. • If you prefer, you can choose an additional function, like half load and/or delay timer. • Press the Start/Pause button to activate the dishwasher. The light in the Start/Pause button turns off and the indicator light of Washing (3) switches on.
PROGRAM SELECTION TABLE Program 36 • English Program information Program process Time in minutes PRE-WASH - Pre-wash and soaking of leftover foods that you plan to wash later. Pre-wash Ready 15 FAST 30 MIN - A short program for lightly soiled dishes that do not need drying. 40°C wash Cold rinse Warm rinse Ready 30 ECO - Daily program for normally soiled dishes. (The program takes a little longer, but uses less water and heats slower which decreases the energy consumption).
6 cleaning & maintenance Cleaning the dishwasher regularly, prolongs the dishwasher’s service life. Check before cleaning the dishwasher if it’s is turned off. Unplug the dishwasher and turn off the tap. Clean the outside of the dishwasher with a damp cloth. To prevent odors from forming within the dishwasher, clean the seals of the door regularly with a soft damp cloth. To prevent the dishwasher from getting clogged, we advise to clean the dishwasher regularly with a special cleanser.
7 troubleshooting FAULTCODE CHECK Inadequate water supply. • Check whether the tap is fully open and there nothing blocking the water mains. • Close the tap, remove the input hose and check whether it is clogged. • Start the dishwasher again. Contact the service department of Inventum when the error remains. Water supply is not stopping. • Close the tap. • Contact the service department of Inventum. The waste water can not be discharged. • The water discharge hose is clogged.
WHAT TO DO IF... ...one of the program indicator lights light up and the Start/Pause light flashes? The door of the dishwasher is open. Close the door. ...the program won’t start? • Check if the plug is connected. • Check the fuse in the fuse box. • Make sure the water tap is open. • Make sure the door of the dishwasher is closed properly. • Check whether the dishwasher is turned on with the On/off button. • Check whether the water inlet hose and filters aren’t clogged. ...
PRODUCT FICHE INVENTUM Model IVW6033A Number of place settings 12 place settings Energy efficiency class * A++ Annual energy consumption [Aec] kWh ** 258 Energy consumption standard cycle [Et] 0,90 Power consumption in OFF mode [Po] 0,50 Power consumption in standby mode [Pl] 1,00 Annual water consumption ** 3360 Drying efficiency class *** Standard program Program duration standard **** [min] A ECO 50°C 165 Noise level dB(A) 47 Type of appliance built in Execution Integrated Color of
Technical specifications IVW6033A Dimensions [mm] (bxdxh) 598 x 570 x 820 Nett weight [kg] 41 Gross weight [kg] 43 Power consumption [W] Rated voltage [V] / frequency [Hz] Length of power cord [m] Type of plug Type of supply hose connection Position supply hose Lenght of supply hose [m] Position of outlet hose Length of outles hose [m] * ** *** **** 1900 220-240/ 50 1,8 EU/TR 3/4 inch inner thread right rear 1,47 right rear 2,00 A+++ (highest efficiency) to D (lowest efficiency).
general terms and conditions of service and warranty We do not need to remind you of the importance of service. After all, we develop our products to a standard so that you can enjoy them for many years, without any concerns. If, nevertheless, there is a problem, we believe you are entitled to a solution straight away. Hence our products come with an exchange service, on top of the rights and claims you are entitled to by law. By exchanging a product or part, we save you time, effort and costs.
Breakdowns or faults outside the warranty period 1. Breakdowns or faults in small or large domestic appliances outside the warranty period, can be reported to the costumer services department via the form at www.inventum.eu/service-aanvraag or by calling the costumer services department. 2. The costumer services department may ask you to send the product for inspection or repair. The costs of dispatch will be at your expense. 3. The inspection to establish whether repair is possible involves a charge.
klein huishoudelijk witgoed vrijstaand witgoed inbouw persoonlijke verzorging Inventum Huishoudelijke Apparaten B.V. Meander 861 6825 MH Arnhem Tel: 0800-4583688 info@inventum.eu www.inventum.eu twitter.com/inventum1908 facebook.com/inventum1908 youtube.com/inventum1908 IVW6033A/02.