Quick Start Guide Bluetooth Serial Adapter GBC232A PART NO. Q1375 www.iogear.
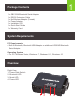
1 Package Contents 1 x GBC232A Bluetooth Serial Adapter 1 x RS232 Extension Cable 1 x Null Modem Adapter (Female) 1 x Power Adapter 1 x Installation CD 1 x Quick Start Guide 1 x Warranty Card System Requirements PC Requirements • Built-in Bluetooth, Bluetooth USB Adapter or additional IOGEAR Bluetooth Serial Adapter Operating System • For PC: Windows Vista®, Windows® 7, Windows® 8.1, Windows® 10 Overview Right View: 1. Power Slide Switch 2. Bluetooth LED 3. Mode LED 4.
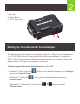
2 Left View: 5. Mode Button 6. DC Power Jack oo C CFG T / RS 5 6 Setting Up Your Bluetooth Serial Adapter The Bluetooth Serial Adapter is compatible with DTE – Data Terminal Equipment (i.e. PC) RS-232 devices. Use the provided Null Modem Adapter to connect to DCE – Data Communications Equipment serial devices (i.e. modem). Follow the steps below to configure the adapter for initial use. Configuring the Bluetooth Serial Adapter on Your PC 1. Windows® Vista: Press the and select Control Panel.
3 2. Windows Vista: Select Hardware and Sound Windows 7 / Windows 8.1 / Windows 10: Change view to Category. Select View devices and printers under Hardware and Sound.
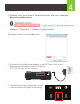
4 3. Windows Vista: Scroll down to “Bluetooth Devices” and click on Set up a Bluetooth enabled device. Windows 7 / Windows 8.1 / Windows 10: Skip to step 5. 4. Windows Vista: Click the Add button. 5. Connect the included power adapter to the DC Power Jack on the Bluetooth Serial Adapter. Push and hold the CFG / RST button for one second. CFG / RST 6. The device will enter Configuration mode when the Mode LED lights solid orange.
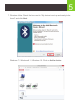
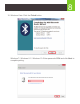
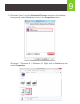
5 7. Windows Vista: Check the box next to “My device is set up and ready to be found” and click Next. Windows 7 / Windows 8.1 / Windows 10: Click on Add a device.
6 8. Windows Vista: Select Serial when it appears and click Next. Windows 7 / Windows 8.1 / Windows 10: Select Serial when it appears and click Next.
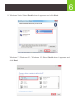
7 9. Windows Vista: Click on Use the passkey found in the documentation and enter 1234. Press the Next button. Windows 7: Click on Enter the device’s pairing code. Windows 8.1 / Windows 10: Skip to Step 10.
8 10. Windows Vista: Click the Finish button. Windows 7 / Windows 8.1 / Windows 10: Enter passcode 1234 and click Next to complete pairing.
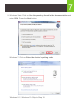
9 11. Windows Vista: From the Bluetooth Devices window in the desktop background, select Serial and click on the Properties button. Windows 7 / Windows 8.1 / Windows 10: Right click on Serial icon and select Properties.
10 12. Windows Vista: Select the Services tab to identify which COM port is being used. Press the OK button. Windows 7 / Windows 8.1 / Windows 10: Select the Hardware tab to identify which COM port is being used. Press the OK button.
11 13. Insert Installation CD. When an explorer window pops up, right click on the GBC232A Bluetooth Serial Adapter Configurator file and select “Run as administrator”. 14. Select the COM Port identified in Step 12 from the COM Port dropdown menu and 19200 from the Baud Rate menu. Next, click on the Connect button. 15. The connection is successful when the MAC address and Firmware version appear at the bottom of the configuration window and the Bluetooth LED lights solid blue.
12 16. Select “UART Configuration” and confirm that Baud Rate is set to 19200, Stop Bit is set to one, and Parity Bit is set to None. Click the Save button to save your settings. 17. Click on the Disconnect button and close the IOGEAR Bluetooth Serial Adapter Configuration tool. 18. Push the CFG / RST button for one second and release. The orange Mode LED light will turn off. You have successfully completed configuration of the Bluetooth Serial Adapter. 19.
Compliance Statement FCC Statement This equipment has been tested and found to comply with the limits for a Class B digital device, pursuant to Part 15 of the FCC Rules. These limits are designed to provide reasonable protection against harmful interference in a residential setting. This product generates, uses, and can radiate radio frequency energy and, if not installed and used as directed, it may cause harmful interference to radio communications.
Limited Warranty Warranty Information This product carries a 1 Year Limited Warranty. For the terms and conditions of this warranty, please go to http://www.iogear.com/support/warranty Register online at http://www.iogear.
Contact WE’RE HERE TO HELP YOU! NEED ASSISTANCE SETTING UP THIS PRODUCT? Make sure you: 1. Visit www.iogear.com for more product information 2. Visit www.iogear.com/support for live help and product support IOGEAR iogear.custhelp.com support@iogear.com www.iogear.