Wireless-G USB 2.0 Flex Adapter GWU513 Quick Start Guide Read this guide thoroughly and follow the installation and operation procedures carefully to prevent any damage to the unit and/or any of the devices it connects to. GWU513 package contains: 1 802.
1. Welcome ® Thank you for choosing IOGEAR to serve your wireless needs. In no time you will be sharing files ® or surfing the Internet wirelessly. We hope you will have as much fun using your IOGEAR Wireless-G USB 2.0 Flex Adapter, as we had designing it. ® Rest assured, your IOGEAR Wireless-G USB 2.0 Flex Adapter is built rock-solid to ensure maximum up-time for you to stay up-and-running.
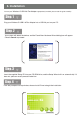
. Installation To have your Wireless-G USB 2.0 Flex Adapter appropriately installed, please read this guide carefully. Step. 1 Plug your Wireless-G USB 2.0 Flex Adapter into a USB 2.0 port on your PC. Step. 2 Your system will detect the device, and the Found New Hardware Wizard dialog box will appear. Choose Cancel to proceed. Step. 3 Insert the supplied Setup CD into your CD-ROM drive, and the Setup Wizard will run automatically. If it does not, please manually execute Index.htm. Step.
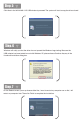
Step. 5 Click Next in the WLAN 802.11G USB window to proceed. The system will start to copy the drivers found. Step. 6 Windows will notify you that the driver has not passed the Windows Logo testing. Because the USB adapter has been tested to work with Windows XP, please choose Continue Anyway in the Hardware Installation dialog box. Step. 7 On the Reboot screen, you may choose either Yes, I want to restart my computer now or No, I will restart my computer later.
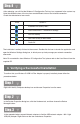
Step. 8 After rebooting, you will find the Wireless-G Configuration Tool tray icon, appeared in the system tray. Note that different colors of the tray icon reveal different status of the Internet connection. Check the table below to learn more: ICON QUALITY Excellent Link Quality 100% Data Frame Errors – Check WEP Settings Fair Link Quality Poor Link Quality or Not Linked Radio Off The installation is entirely finished at the moment.
Step. 4 From the opened dialog box, on the General tab, find the descriptions under the Device Status pane to learn if the module is working properly. However, if there’s an error message shown, please choose Uninstall from the opened menu while right-clicking over the USB Adapter item, to which a red or yellow icon is attached beside, in the Device Manager dialog box. Then restart your system and go through the installation procedures again.
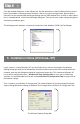
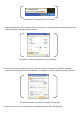
The Wireless-G Configuration Tool Tray Icon a) Right-click the Network Connections icon at the task bar to open the Wireless Network Connection Status dialog box, and then select Properties. The Wireless Network Connection Status Dialog Box b) Choose the Wireless Networks tab in the Wireless Network Connection Properties dialog box, and remove the check from the Use Windows to configure my wireless network settings checkbox. The Wireless Network Connection Properties Dialog Box c) Click OK.
6. Radio and TV Interference This equipment has been tested and found to comply with the limits for a Class B digital device, pursuant to Part 15 of the FCC Rules. These limits are designed to provide reasonable protection against harmful interference in a residential installation. This equipment generates, uses and can radiate radio frequency energy and if not installed and used in accordance with the instructions, may cause harmful interference to radio communications.