Internal ATAPI Drive Owner’s Manual • Installation Guide • User’s Guide • Troubleshooting • How to Get Help IMPORTANT! Before installing the hardware for your Zip® Internal drive, insert the Owner’s Manual CD and click the button that says “Watch Installation Video” to give you an overview of the installation process. http://www.iomega.
Table of Contents Installation Guide Getting Started ................................................................................ 4 Identifying the IDE Configuration ................................................. 6 Installing the Zip® drive as the Slave Device ................................ 11 Installing the Zip® drive as the only device on the secondary IDE channel .............................................................. 17 Installing the IomegaWare™ Software ................................
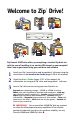
® Welcome to Zip Drive! ® ® Zip Internal ATAPI drive offers you everything a standard Zip drive has with the ease of installing to an existing IDE channel on your computer! Here’s how to get started using your new drive and software: 1 2 3 ® Install your Zip Internal drive and IomegaWare software using the instructions in the Installation Guide (pages 4-26 of this manual). ™ Check the User’s Guide (pages 27-37 of this manual) for information on using your Zip drive and IomegaWare software.
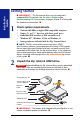
Installation Guide Getting Started M IMPORTANT! The Zip Internal drive uses the computer’s onboard IDE/ATA interface. See the User’s Guide section Understanding IDE Connections on pages 36 and 37 of this guide for important information. M 1 Check system requirements. • • • • • Pentium 100 MHz or higher IBM-compatible computer Empty 31⁄2” or 51⁄4 “ drive bay with front panel access Embedded IDE interface or IDE controller card Windows NT , Windows 95/98, or Windows 3.
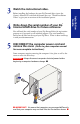
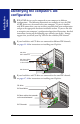
3 Watch the instructional video. 4 Write down the serial number of your Zip Internal ATAPI drive for future reference. 5 DISCONNECT the computer power cord and remove the cover. (Refer to your computer manual ® Installation Guide Before installing the hardware for your Zip Internal drive, insert the Owner’s Manual CD and click the button that says “Watch Installation Video” to give you an overview of the installation process.
Installation Guide Identifying the computer’s IDE configuration IDE/ATAPI devices can be connected to your computer in different configurations. The following illustrations are examples of ways the IDE/ ATAPI devices may be connected to your computer. If you are familiar with IDE connections, you can use these to quickly find your configuration and go to the appropriate hardware installation section.
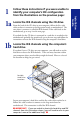
1a Locate the IDE channels using the CD drive From the back of the CD drive in your computer, follow the flat, wide cable to where it connects to the large main board, or motherboard. The area where it connects is called the IDE channel. If the cable leads to the motherboard, go to step 2 on the next page.
Installation Guide 1c Possible IDE channel locations There are usually two IDE channels, called the primary and secondary IDE channel, which are either side-by-side or end-to-end as shown in the illustrations below. Look for “pri IDE” and “sec IDE,” written on the motherboard to identify which channel is the primary and which is the secondary. The hard drive is usually connected to the primary IDE channel.
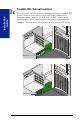
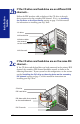
2a If the hard drive is the only IDE device connected... Once you have located the IDE channels, determine the configuration of the IDE/ATAPI devices that are connected to your computer. Steps 2a through 2c show some possible ways that your computer might be configured. The hard drive is usually connected to the primary IDE channel. If the hard drive is the only IDE device connected, the secondary IDE channel will be unused, as shown in the illustration below.
Installation Guide 2b If the CD drive and hard drive are on different IDE channels... Follow the IDE interface cable to find out if the CD drive is the only device connected to the secondary IDE channel. If it is, see Installing the Zip Drive as the Slave Device starting on page 11 of this manual for instructions on installing your Zip drive. ® CD drive IDE hard drive IDE data cables that extend to the motherboard IDE Channels 2c If the CD drive and hard drive are on the same IDE channel...
® M IMPORTANT! The Zip Internal drive uses the computer’s onboard IDE/ATA interface. If you are not familiar with how devices connect to the IDE interface, please see Understanding IDE Connections section on pages 36 and 37. M ® M NOTE: Iomega recommends that you connect your Zip drive to the secondary IDE channel and not on the same channel as your hard drive. M ® 1 ® Check the jumper setting on the Zip drive.
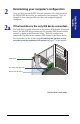
® To install your Zip drive in a 3 1/2” drive bay, remove the mounting screws as illustrated and slide the drive out of the sled. Installation Guide 2a 3 1/2” drive bays ONLY. 3 Check mounting requirements. Your drive bay may require side rails. M HINT: Check other drives in the system (such as a CD drive) to see if they use mounting rails. If so, you may need similar mounting rails for the Zip Internal drive.
4 ® Slide the Zip drive into the drive bay. Installation Guide M NOTE: If it makes it easier to connect cables on your computer, you can secure the Zip® drive in the drive bay now. (See step 9 for instructions on securing the drive.) M 5 Remove the IDE Interface cable that is currently connected to your CD drive. Find the flat, wide cable connected to the back of the CD drive.
Installation Guide 6 Verify that the jumper on your CD drive is set to “Master.” 7 Connect the CD drive and the Zip Internal drive to the motherboard. ® In order for the CD drive and Zip drive to work together properly, ensure that the jumper on the CD drive is set to the “master” setting. A chart indicating the jumper setting should be located on the CD drive. If you are unsure of the setting or how to change it, refer to the documentation that came with your CD drive or computer.
8 Connect an internal computer power supply cable to the Zip drive. ® Zip Internal drive Power Supply Cable from Computer CAUTION Make sure the power supply cable is securely connected to the Zip® drive. M 9 Secure drive in drive bay. ® Align the front of the Zip drive with other drives installed in the computer. If there is not clear access to the drive bay mounting holes, refer to your computer manual for additional instructions.
Installation Guide 10 Check the following items before replacing the computer cover: PIN 1 on the IDE interface cable matches the PIN 1 connector on your Zip Internal drive. ® ® The IDE interface cable is securely connected to all pins on your Zip drive. An internal power supply cable from the computer has been connected to your Zip drive. ® ® Your Zip drive has been securely mounted to your computer.
® M IMPORTANT! The Zip Internal drive uses the computer’s onboard IDE/ATA interface. If you are not familiar with how devices connect to the IDE interface, please see Understanding IDE Connections on pages 36 and 37. M ® 1 Change the jumper setting to “Master”. The Zip Internal drive is set to the slave configuration as the factory default at shipping. In order to connect the Zip Internal drive as the only device on the secondary IDE channel, you will need to change the jumper setting on the drive.
® To install your Zip drive in a 3 1/2” drive bay, remove the mounting screws as illustrated and slide the drive out of the sled. Installation Guide 2a 3 1/2” drive bays ONLY. 3 Check mounting requirements. Your drive bay may require side rails. M HINT: Check other drives in the system (such as a CD drive) to see if they use mounting rails. If so, you may need similar mounting rails for the Zip® Internal drive.
4 ® Slide the Zip drive into the drive bay. Installation Guide M NOTE: If it makes it easier to connect cables on your computer, you can secure the Zip® drive in the drive bay now. (See step 9 for instructions on securing the drive.) M 5 Locate the data cable that comes packaged with the Zip drive. Find the colored stripe or print on one side of the data cable showing PIN 1. ® Stripe or printing shows the PIN 1 side of the data cable. Locate the PIN 1 connection on the IDE channel.
6 Connect the data cable to the secondary IDE channel on the motherboard. (Be sure PIN 1 on Installation Guide the cable is connected to PIN 1 on the motherboard.) PIN 1 to PIN 1 7 Connect the other end of the data cable to the Zip drive. ® CAUTION Make sure PIN 1 on the cable connects to PIN 1 on the Zip Internal drive. All IDE interface cable connections must maintain correct PIN 1 orientation in order for the Zip drive to be recognized by the system.
8 Connect an internal computer power supply cable to your Zip drive. ® Zip Internal drive Power Supply Cable from Computer CAUTION Make sure the power supply cable is securely connected to the Zip drive. M ® 9 Secure drive in drive bay. ® Align the front of the Zip drive with other drives installed in the computer. If there is not a clear access to the drive bay mounting holes, refer to your computer manual for additional instructions.
Installation Guide 10 Check the following items before replacing the computer cover: PIN 1 on the IDE interface cable matches the PIN 1 connector on your Zip Internal drive and the motherboard. ® ® The IDE interface cable is securely connected to all pins on your Zip drive. An internal power supply cable from the computer has been connected to your Zip drive. ® ® Your Zip drive has been securely mounted to your computer.
™ Installing the IomegaWare Software M No CD Drive? If you want to install the Zip Internal drive on a computer that does not have a CD drive, you can download Iomega software from the Internet. You can also create an install floppy diskette for installing only the critical software drivers. Refer to How to Install Without a CD drive on page 25 for additional information.
Additional instructions for your system... Windows 95/98 Users ® ™ Installation Guide Your Zip drive and IomegaWare software should now be ready to use. Open My Computer to see if you have an icon for your Zip drive. Windows NT Users The Iomega installation software will try to install and update the necessary drivers on your system.
11. Click the “Install” button. Windows NT will copy the driver file and add the Iomega Zip driver to the list of installed adapters found by the system. ® 13. Click “OK” at the message box and reboot the system. ® 14. Your Zip drive and Iomega software should now be ready to use. ® If your drive letters change after installing the Zip Internal drive: Refer to the Troubleshooting section starting on page 38 for instructions on how to assign a specific drive letter for your Zip drive.
Installation Guide 4. Double click the Diskette icon, and follow the screen instructions. 5. To install software drivers for your Zip drive, run setup.exe from the install diskette you created. ® Congratulations! When the software installation is complete, your Zip drive will be ready to use. ® ® Your Zip drive will have its own drive letter just like any other drive on your computer. Store and copy files to and from the Zip drive like you do on other drives.
Operating Your Zip Drive ® ® To use the Zip drive, insert a 250MB* Zip disk, then select the drive letter assigned to the Zip drive in My Computer (Windows 95/98; Windows NT 4.0) or File Manager (Windows NT 3.51; Windows 3.1). You can store and copy files to and from the Zip drive using the same methods you use for other drives on your system. (If you need instructions on how to copy files, refer to the help file for your operating system.) ® *250MB or 100MB capacity where 1MB = 1 million bytes.
® Ejecting Zip Disks Windows 95/98 systems: Push the disk eject button or use the Iomega software eject command. Windows NT systems: command. Use the Iomega software eject Windows 3.1 systems: Push the disk eject button. ® When your Zip drive is not in use, remove the disk from the drive. Always remove the Zip disk before moving your computer. ® Disk Eject in Case of Power Loss The computer must be powered on for normal disk insertion and removal.
® Compatibility with 100MB Zip Disks ® The 250MB Zip drive features backward compatibility that allows you to read and write to 100MB Zip disks. However, because of the higher capacity of the 250MB Zip drive, performance when writing to a 100MB Zip disk is significantly reduced. This means that a large file that takes 10 seconds to write to a 250MB Zip disk could take about a minute-and-ahalf to write to a 100MB Zip disk (using your 250MB Zip ATAPI drive to write both disks).
® Zip Tips Here are a few tips you’ll want to keep in mind to care for your Zip drive and disks! ® Always turn on power to your computer before inserting a Zip disk. ® CAUTION If a disk is inserted without the power on, and power is then applied, it could damage the drive. M ® Never force a Zip disk into or out of the drive. Never use ordinary 3.5" diskettes or floppy head-cleaning disks in your Zip drive. They will damage your drive. Only use 250MB or 100MB Zip disks with the Zip logo on them.
™ IomegaWare Software The IomegaWare software package* includes tools and programs designed to help you take advantage of all the features of your Zip drive. You can use Iomega software to format, copy, and protect your Zip disks, back up your hard drive, set options for your Zip drive, and more.
Drive Shortcuts ® Create Drive Shortcuts puts a Zip drive icon directly on your Desktop and in the “Windows\SendTo” and “My Documents” folders, making it easier to use your Zip drive. You can use these icons much like you would the Zip drive icon that is available in My Computer – double click the icon to open a window for your Zip disk or right mouse click the icon to access Iomega Tools. Create Drive Shortcuts runs automatically during setup to provide easy access to your Zip drive.
® Using Zip Disks ® Use only genuine 250MB* or 100MB* Zip disks with your Zip drive. This section describes just some of the things you can do with Zip disks. The help files contained in your IomegaWare software package include additional information on using Zip disks. ™ ® Backing Up with Zip Disks It’s important to always keep current backups of your valuable data – whether the primary data is stored on your hard drive or Zip disks! And you can use Zip disks to back up both.
® Installing Applications to Zip Disks On a PC, some applications and games will only install to, or run from, a fixed disk such as a hard drive. In order to install these programs to a Zip disk, use the Make Nonremovable tool in your IomegaWare software package to make the Zip disk appear as a fixed disk to the system. After the software installation is complete, use Make Removable to restore disk removability.
® Read/Write Protecting Zip Disks TM IomegaWare software includes a special read/write protect feature that allows you to: • Write Protect a disk through software instead of with a mechanical write protect switch. • Write Protect a disk and assign a password that must be used to remove the write protect. • Read Protect a disk so that it cannot be read from, or written to, unless the user enters the password you assign. ® Setting Zip Disk Protection under Windows 95/98 and NT 4.
Understanding IDE/ATAPI Connections What is IDE? IDE (Integrated Drive Electronics) is the built-in system a PC computer uses to connect drives to the computer. You may have also heard it called ATA (Advanced Technology Attachment)—they mean the same thing. How IDE Works User’s Guide There are usually two places on the motherboard for the IDE cables to connect. These are the primary and secondary IDE channel connections. The hard drive usually uses the primary connection.
Zip Internal drive Jumper block Slave (Drive 1) (Factory Setting) Cable Select Master (Drive 0) Reserved (do not use) Slave (Drive 1) ® Use this setting if you’re connecting the Zip Internal drive on the same cable as your CD drive or another ATAPI device that is configured as the master. Master (Drive 0) Cable Select Use this jumper setting if your computer features “Cable Select.” On a Cable Select system, the master/slave configuration is automatically determined by the system.
Troubleshooting ® If you encounter a problem while installing or using your Zip drive, check this section for help. CAUTION To avoid damage to your computer, disconnect all electrical connections before connecting or disconnecting cables. M ® The green activity light on the Zip drive does not turn on. (a) Make sure the computer is receiving power. ® (b) Make sure the power cable connection to the Zip Internal drive is secure. (c) Make sure there is a disk in the drive.
® If you are unable to disable BIOS support for the Zip drive in the CMOS setup and the Zip Internal drive does not appear on the system, the computer may have an incompatible BIOS that does not correctly understand removable internal drives. You may be able to solve the problem by obtaining an updated BIOS from the computer manufacturer. If an updated BIOS is not available, it may be possible to install the Zip Internal drive using an add-on IDE card.
Computer fails to boot correctly or hangs while booting after the Zip Internal drive is installed. ® ® Make sure BIOS support for the Zip Internal drive is disabled in the computer’s CMOS setup. Note that this may require turning off autodetection for the Zip Internal drive. Refer to the Owner’s Manual for the computer if you need instructions on getting into the CMOS setup and disabling autodetection.
® You want to change the drive letter assigned to the Zip drive. Windows 95/98 Users: If your computer is running Windows 95/98, you can change drive letters as desired for any of your removable drives (including your Zip drive and CD drive) by running the Guest program (guest9x.exe). Use the instructions below: ® ™ (a) Open the IomegaWare folder on your Desktop. (b) Double click on the Guest icon. (c) Guest will display the current drive letter assignments on your system.
® You can’t change the drive letter assigned to your Zip drive. ® Make sure BIOS support for the Zip Internal drive is disabled in the computer’s CMOS setup. This may require turning off autodetection for the Zip Internal drive. Refer to the Owner’s Manual for the computer if you need instructions on getting into the CMOS setup and disabling autodetection.
® You want to use Windows 95/98 DOS mode with your Zip drive. M NOTE: This section describes how to switch in and out of the MS-DOS mode which is a start option for Windows 95/98. It does not apply to the DOS box (or window) that opens when you double click the MS-DOS Prompt icon within Windows 95/98. Use of the DOS box with the Zip® drive works the same as it does with any other drive under Windows 95/98.
How to Get Help Iomega’s goal is to provide state-of-the-art support for its customers. Over time, our support options and pricing policies may change in light of evolving technology and global changes across the computer industry. This section of the manual contains information on the support options available at the time this manual was prepared. For up-to-date support information, contactIomega’s Home Page on the World Wide Web or call our automated FAX-back help system at 1-801-778-5763.
Automated FAX-back Help: (801) 778-5763 (U.S. & Canada) Our FAX-back automated help system allows you to use any touch-tone phone to instantly retrieve detailed support information to your FAX machine. When you call our FAX-back help number, you can order a catalog listing the FAXback documents available for your Iomega product, or any document listed in the catalog. Just follow the voice instructions to order what you need.
Return or Repair ® For information on returning your Zip drive or other Iomega product for warranty service (or repair after the warranty period), please call the Iomega Customer Satisfaction Hotline at 1-888-4-IOMEGA (1-888-446-6342). Because many returns are found to be due to a technical problem rather than a defective product, you may want to check with Iomega Technical Support before returning your drive – our trained support personnel can often resolve the problem over the phone.
Regulatory Information ® Product Name: Iomega Zip Internal ATAPI 250MB drive Model Number: Z250ATAPI FCC (United States) The computer equipment described in this guide generates and uses radio frequency (RF) energy. If the equipment is not installed and operated in strict accordance with the manufacturer’s instructions, interference to radio and television reception may result.
Visit our web site! http://www.iomega.com • Free software updates* and cool free software • Online Customer Support • Purchase Iomega products at BuyIt Online • Product information and specifications • Customer solutions for educators, businesses, and home • Special promotions and contests • News releases and company information • The latest and greatest from Iomega! * The software that shipped with your drive may be updated over time.