StorCenter Pro 300r ™ Quick Start Guide Guide de démarrage rapide Schnellstart-Handbuch Guía de instrucciones rápidas Guia de uso rápido クイック スタート ガイド 快速入门指南 빠른 시작 설명서
If you have a problem, we can help. Please do NOT return this product to the store! Your answer is on the web. Visit our award-winning web support site www.iomega.com. Select your region, then select Support. Si vous avez un problème, nous pouvons vous aider. NE RENVOYEZ PAS ce produit au magasin ! Votre réponse est sur le Web. Site Web d’assistance primé www.iomega.com. Sélectionnez votre région, puis sélectionnez Support. Wenn Sie ein Problem haben, können wir Ihnen helfen.
Contents • Matières • Inhaltsverzeichnis • Contenido • Conteúdo • 目録 • 目录 • 목차 Quick Install . . . . . . . . . . . Installation rapide . . . . . . . . Instalação rápida . . . . . . . . クイック インストール ガイド Schnellstart. . . . . . . . . . . . Instalación rápida . . . . . . . . 快速安装指南 . . . . . . . . . . 빠른 설치 설명서 . . . . . . . . . . . . . . . . . . . . . . . . . . . . . . . . . . . . . . . . . . . . . . . . . . . . . . . . . . . . . . . . . . . . . . . . . . . . . . . . . . . . . . . . . . . . . . . . . .
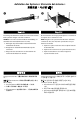
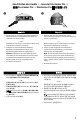
System Placement • Mise en place du système • Posicionamento do sistema • システムの配置 • The Iomega® StorCenter™ Pro can be stacked or mounted in most rack systems. Iomega StorCenter Pro peut être empilé ou monté dans la plupart des systèmes de baies. NOTE: Make sure the StorCenter Pro has sufficient airflow (6" or 127 mm) both in front of and behind the unit. REMARQUE : Faites-en sorte que StorCenter Pro dispose d’un débit d’air suffisant (127 mm) à l’avant et à l’arrière de l’unité. 1.
Aufstellen des Systems • Ubicación del sistema • 系统安放 • 시스템 배치 Das Iomega StorCenter Pro-Gerät lässt sich in den meisten Racksystemen einlegen oder fest montieren. El StorCenter Pro de Iomega puede apilarse o montarse en la mayoría de los sistemas de rack. HINWEIS: Lassen Sie ausreichend Platz zur Belüftung vor und hinter dem Gerät (mindestens 127 mm). NOTA: Asegúrese de que StorCenter Pro tiene suficiente corriente de aire (127 mm) tanto por delante como por detrás de la unidad. 1.
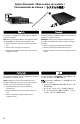
Connect the StorCenter Pro • Connexion de StorCenter Pro • Conexão do StorCenter Pro • StorCenter Pro の接続 • 1. Use the included gray network cable between the Ethernet connector on the rear of the StorCenter Pro and a hub or switch. — or — Use the included red (crossover) cable to connect the StorCenter Pro directly to a computer. 2. Connect the included power cord to the back of the StorCenter Pro and an Uninterruptible Power Supply (UPS).
Anschließen des Geräts • Conectar StorCenter Pro • 连接 StorCenter Pro • StorCenter Pro를 연결합니다 ID ID 1. Verbinden Sie das enthaltene graue Netzwerkkabel mit der Ethernet-Buchse an der Rückseite des Geräts und einem Hub oder einem Schalter. — oder — Verwenden Sie das rote (Crossover-) Kabel, um das Gerät direkt mit dem Computer zu verbinden. 2. Schließen Sie das im Lieferumfang enthaltene Netzkabel an der Geräterückseite und an einer unterbrechungsfreien Stromversorgung (USV) an.
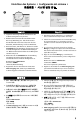
System Setup • Configuration du système • Configuração de sistema • システム設定 • 1. Insert the Solutions CD then launch the Iomega Discovery Tool Pro Software. 1. Insérez le CD Solutions, puis lancez le logiciel Iomega Discovery Tool Pro. 2. Select your StorCenter Pro in the Discovery window. If your StorCenter Pro is not listed, see the Troubleshooting section of this guide. 2. Sélectionnez votre système StorCenter Pro dans la fenêtre Discovery.
Einrichten des Systems • Configuración del sistema • 系统设置 • 시스템 설정 완료 1. Legen Sie die Lösungs-CD ein und starten Sie die Software Iomega Discovery Tool Pro. 1. Introduzca el CD de Soluciones y, a continuación, lance el software Discovery Tool Pro de Iomega. 2. Wählen Sie Ihr StorCenter Pro-Modell im Fenster Discovery (Erkennung) aus. Falls Ihr StorCenter Pro-Modell nicht in der Liste steht, lesen Sie den Abschnitt „Fehlerbehebung“ in diesem Handbuch. 2.
Hard Drive Replacement Hot-Swappable Hard Drive Replacement Thank you for purchasing an Iomega® StorCenter™ Pro appliance. Your StorCenter Pro has hot-swappable hard drives for increased data accessibility and ease of maintenance. To enhance your experience with your StorCenter Pro, it is very important to become familiar with the basics of drive handling.
and wait for the system to restore the OS as well as any RAID volumes that were configured on the original drive. It is very important that the system is NOT shutdown and that no other drives are removed until this restoration is complete. Failure to follow these steps could result in system failure and loss of data! For more information on all of the above items, please refer to the user’s manual located on the Solutions CD.
Remplacement du disque dur • Ersetzen von Festplatten • Reemplazo de la unidad de disco duro • Substituição do disco rígido • Hard Drive の交換 • 更换 IomegaStorCenter Pro 硬盘驱动器 • Iomega StorCenter Pro 하드 드라이브 교체 Visitez www.iomega.com pour plus d’informations sur le remplacement du disque dur de votre serveur StorCenter Pro. Weitere Informationen zum Ersetzen von Festplatten im StorCenter Pro finden Sie unter: www.iomega.com.
Troubleshooting Enabling eTrust The StorCenter Pro ships with a full version of Computer Associates eTrust Antivirus software preinstalled; however, the software is disabled by default. As with other third-party applications, enabling eTrust may degrade system performance. To enable the eTrust software: 1. Log into the StorCenter Pro as an administrator using Terminal Services. 2. Right-click on the eTrust icon 3. Select either the Monitor Outgoing Files Only or Monitor Outgoing and Incoming Files.
• Use the web-based administration tool (Maintenance l Terminal Services). Web-based Terminal Services requires Microsoft Internet Explorer and ActiveX. • Use the Remote Desktop Connection application built-in to Microsoft Windows XP (Start l All Programs l Accessories l Communications l Remote Desktop Connection). If you are using an OS other than Windows XP, download the Remote Desktop Connection application from www.microsoft.com.
Je ne parviens pas à accéder à l’outil d’administration du serveur StorCenter Pro 1. Connectez-vous au système StorCenter Pro à l’aide de l’adresse IP du système StorCenter Pro. Dans la barre d’adresse du navigateur, supprimez le nom du serveur StorCenter Pro et remplacez-le par l’adresse IP du système StorCenter Pro. 2. Connectez-vous à l’aide des services Terminal Services (reportez-vous aux instructions ci-dessous). 3.
Weitere Hilfe zu diesem Thema erhalten Sie unter www.iomega.com. ACHTUNG! Versuchen Sie nicht, die Fehler zu beheben oder Änderungen am StorCenter Pro-Gerät vorzunehmen, bevor Sie sich an unseren Kundendienst gewandt haben. Iomega Discovery Tool Pro findet StorCenter Pro nicht 1. Vergewissern Sie sich, dass die Strom-LED nun grün leuchtet. 2. Stellen Sie sicher, dass sich das StorCenter Pro-Gerät im selben Subnetz oder Netzwerksegment befindet wie der Computer, auf dem das Discovery Tool ausgeführt wird.
Iomega recomienda encarecidamente que realice copias de seguridad de los datos y apague cualquier aplicación que se esté ejecutando en StorCenter Pro antes de realizar una instalación o actualización de software. Asimismo recomienda que cargue los archivos requeridos en StorCenter Pro y que se instalen a través de los servicios de terminal. Consulte el sitio Web de actualizaciones de Microsoft si desea conocer información adicional y recomendaciones sobre cómo instalar las actualizaciones.
Para ativar o software eTrust: 1. Faça login no StorCenter Pro como administrador usando a ferramenta Terminal Services. 2. Clique com o botão direito do mouse no ícone do eTrust 3. Selecione Monitor Outgoing Files Only ou Monitor Outgoing and Incoming Files. na barra de tarefas. NOTA! Consulte o sistema de ajuda do eTrust para obter mais informações sobre a configuração do eTrust. Atualização do StorCenter Pro A Iomega NÃO recomenda a instalação dos Service Packs da Microsoft no StorCenter Pro.
um sistema operacional que não seja o Windows XP, faça o download do aplicativo Conexão de área de trabalho remota a partir do site www.microsoft.com. トラブルシューティング eTrust の有効化 StorCenter Pro は、Computer Associates eTrust アンチウィルス ソフトウェアがあらかじめインストールされた状態 で出荷されますが、デフォルトでは、このソフトウェアが無効になっています。他のサードパーティ アプリケーシ ョンの場合と同様、eTrust を有効にすると、システムパフォーマンスが低下することがあります。 eTrust ソフトウェアを有効化する手順: 1. ターミナル サービスを使用して、管理者として StorCenter Pro にログインします。 2. タスク バーの eTrust 3.
3.
我无法访问 StorCenter Pro Server 管理工具 1. 使用 StorCenter Pro 的 IP 地址登录 StorCenter Pro 设备。 在浏览器的地址栏中,删除 StorCenter Pro 服务器名并将其替换为 StorCenter Pro 的 IP 地址。 2. 使用“终端服务”登录(请参见以下说明)。 3.
Iomega Discovery Tool Pro가 StorCenter Pro를 찾을 수 없습니다 1. 전원 LED가 녹색으로 바뀌었는지 확인합니다. 2. StorCenter Pro가 Discovery Tool을 실행하는 컴퓨터와 동일한 서브넷 또는 네트워크 세그먼트에 있는지 확인합 니다. 잘 모를 경우, 네트워크 관리자에게 문의하십시오. 3. 터미널 서비스를 사용하여 로그인합니다(아래 지시사항 참조). 4. 문제 해결 단계에 대한 자세한 내용은 Solutions CD에 동봉된 사용 설명서를 참조합니다. StorCenter Pro 서버 관리 도구에 접근할 수 없습니다 1. StorCenter Pro의 IP 주소를 사용하여 StorCenter Pro에 로그인합니다. 브라우저의 주소 표시줄에서 StorCenter Pro 서버 이름을 삭제하고 StorCenter Pro의 IP 주소로 바꿉니다. 2. 터미널 서비스를 사용하여 로그인합니다(아래 지시사항 참조). 3.
Customer Support • Assistance clientèle • Kundenunterstützung • Asistencia técnica • Assistência ao cliente • カスタマ サポート • 客户支持 • 客戶支援 • 고객 지원 For service and support for your Iomega product, visit us at http://www.iomega.com. Pour obtenir du service et de l’assistance pour votre produit Iomega, visitez notre site à l’adresse suivante : www.iomega.com. Servicedienstleistungen und Kundendienst für Ihr Iomega Produkt finden Sie unter www.iomega.com.
Copyright © 2005 Iomega Corporation. All rights reserved. Iomega, the stylized “i” logo, StorCenter, and all Iomega brand blocks are either registered trademarks or trademarks of Iomega Corporation in the United States and/or other countries. Microsoft and Windows are either registered trademarks or trademarks of Microsoft Corporation in the United States and/or other countries. Certain other product names, brand names, and company names may be trademarks or designations of their respective owners.