Portable Hard Drive USB 2.
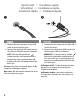
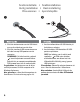
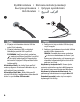
Quick Install • Installation rapide Schnellstart • Installazione rapida Instalación rápida • Instalação rápida 1. Connect the mini connector on the USB cable to the back of the drive. 2. Connect the standard USB connectors on the cable to USB ports on your computer. NOTE: The line labeled with the symbol provides auxiliary power and is needed only if your computer does not provide sufficient USB power through the other line. PC Users: The drive icon should appear in My Computer or Windows Explorer.
1. Schließen Sie den Ministecker des USBKabels an der Rückseite des Laufwerks an. 2. Schließen Sie die Standardstecker des USB-Kabels an den USB-Anschlüssen des Computers an. HINWEIS: Der Kabelstrang mit dem Symbol liefert zusätzlichen Strom. Es wird nur dann benötigt, wenn der Computer nicht genügend Spannung über die andere USBLeitung liefert. PC-Benutzer: Das Laufwerksymbol sollte im Arbeitsplatz oder im Windows-Explorer angezeigt werden. Mac-Benutzer: Sie müssen das Laufwerk neu formatieren.
Snelle installatie • Snabbinstallation Hurtig installation • Rask installering Pika-asennus • Gyors telepítés 1. Sluit de miniconnector van de USB-kabel aan op de achterkant van de drive. 1. Anslut minikontakten till USB-kabeln på baksidan av enheten. 2. Sluit de standaard USB-connectoren van de kabel aan op USB-poorten van de computer. 2. Anslut kabelns USB-kontakter till USBportarna på datorn.
1. Tilslut ministikket på USB-kablet på drevets bagside. 1. Koble til minikontakten på USB-kabelen på baksiden av stasjonen. 2. Slut USB-standardstikkene på kablet til USB-portene på computeren. 2. Koble USB-standardkontaktene på kabelen til USB-porter på datamaskinen. BEMÆRK! Linjen med symbolet giver ekstra strøm og er kun nødvendigt, hvis computeren ikke leverer tilstrækkelig USBstrøm gennem den anden linje. Pc-brugere: Drevikonet bør vises i Denne computer eller Windows Stifinder.
Rychlá instalace • Skrócona instrukcja insalacji Быстрая установка • Γρήγορη εγκατάσταση Hızlı Kurulum • 1. Připojte mini konektor kabelu USB do zadní části jednotky. 2. Připojte konektory USB na kabelu k libovolným portům USB v počítači. POZNÁMKA: Vodič označený symbolem poskytuje přídavné napájení a využívá se jen tehdy, pokud počítač neposkytuje dostatečné napájení USB prostřednictvím jiného vodiče.
1. Подключите мини-разъем кабеля USB к задней стороне диска. 1. Συνδέστε το μίνι βύσμα του καλωδίου USB στο πίσω μέρος της μονάδας δίσκου. 2. Подключите стандартные разъемы кабеля USB к USB-портам компьютера. 2. Συνδέστε τα τυπικά βύσματα USB του καλωδίου σε υποδοχές USB στον υπολογιστή. ПРИМЕЧАНИЕ. Провод с символом обеспечивает дополнительное питание и необходим только в том случае, если питание от компьютера через другой провод USB является недостаточным. Пользователи ПК.
Using the Drive Disconnecting the Drive CAUTION! To prevent data loss, do not disconnect the drive during data transfer (activity light flashing). PC Users: Use the Safely Remove Hardware icon in the Windows taskbar before disconnecting. Mac Users: Drag the disk icon to the Trash (Eject) icon on the Mac Desktop. Backing Up with Your Drive Iomega recommends periodic system backups and more frequent data backups to ensure that your critical data is always protected.
Troubleshooting Drive not detected Try the following suggestions if the drive does not appear in My Computer, Windows® Explorer, or on the Mac® Desktop. • Try restarting your computer. • Make sure you are using the USB cable that came with the drive. Make sure both lines of the USB cable are connected to the computer. • Try changing the connections to different USB ports. See the support area on www.iomega.com for additional troubleshooting help.
Formatage du disque pour Mac OS Le disque dur est livré formaté NTFS. Utilisez l’utilitaire de disque pour reformater le disque dur Mac OS étendu (journalisé). REMARQUE : les instructions suivantes fonctionnent pour Mac OS X, version 10.4 ou ultérieure. Pour les versions Mac OS X versions 10.1 à 10.3.9, utilisez Utilitaire de disque, puis Effacer pour reformater le disque. Consultez l’Aide Mac si vous souhaitez des instructions plus détaillées. 1.
Guide complet de l’utilisateur Un guide de l’utilisateur complet est disponible au format HTML dans la section Support sur le site www.iomega.com. Das Laufwerk verwenden Trennen des Laufwerks vom System ACHTUNG! Um Datenverluste zu vermeiden, trennen Sie das Laufwerk während der Datenübertragung (wenn Aktivitätsanzeige blinkt) nicht vom Computer. PC-Benutzer: Klicken Sie vor dem Herausziehen der Stecker auf das Symbol Hardware sicher entfernen in der Windows-Taskleiste.
6. Klicken Sie auf die Schaltfläche Optionen. 7. Wählen Sie den für Mac erforderlichen Partitionstyp aus: GUID Partition Table für Bootfunktion auf einem Intel-basierten Macintosh-Computer. Apple Partition Map für einen PowerPC-basierten Mac. 8. Klicken Sie auf OK. 9. Klicken Sie auf die Schaltfläche Partition. Sobald die Formatierung abgeschlossen ist, können Sie das Laufwerk verwenden.
Esecuzione di backup con l’unità Iomega consiglia di eseguire backup di dati più frequenti per garantire la protezione dei dati critici. La frequenza di esecuzione dei backup dovrebbe dipendere dall’importanza dei dati. Per proteggere i dati, è sufficiente trascinare sull’unità le copie dei dati più importanti. ATTENZIONE! Tutti i dispositivi per la memorizzazione di dati possono guastarsi.
Per ulteriore assistenza nella risoluzione dei problemi, visitare l’area del supporto tecnico all’indirizzo www.iomega.com. Il computer non si avvia Se il PC non si avvia quando l’unità è collegata, è possibile che esista un conflitto tra il BIOS del computer e i dischi rimovibili a elevata capacità. Per risolvere il problema, spegnere l’unità quando si accende il computer. Accendere l’unità dopo l’avvio del computer.
3. 4. 5. 6. 7. Seleccione la ficha Partición. Cambie el esquema de volúmenes de Actual a 1 partición. Seleccione Mac OS Extended (Journaled) del menú desplegable Formato. Haga clic en el botón Opciones. Seleccione el tipo de partición necesaria para su Mac: Tabla de partición GUID para tener capacidad de arranque en un sistema Macintosh con base Intel. Mapa de partición de Apple para un sistema PowerPC con base Mac 8. Haga clic en Aceptar. 9. Haga clic en el botón Partición.
Utilização da unidade Desconexão da unidade CUIDADO! A fim de evitar a perda de dados, não desconecte a unidade durante a transferência de dados (luz de atividade da unidade piscando). Usuários de PC: Utilize o ícone Remover hardware com segurança na barra de tarefas do Windows antes de desconectar. Usuários de Mac: Arraste o ícone do disco até o ícone Lixeira (Ejetar) na mesa do Mac.
9. Clique no botão Partição. A unidade estará pronta para uso quando a formatação estiver concluída. Solução de problemas A unidade não aparece em Meu computador, no Windows Explorer ou na mesa do Mac. • Tente reiniciar seu computador. • Certifique-se de estar usando o cabo USB fornecido com a sua unidade. Certifique-se de que ambas as linhas do cabo USB estejam conectadas ao computador. • Tente alterar as conexões para portas USB diferentes. Visite a área de suporte do site www.iomega.
WAARSCHUWING! Elk apparaat voor gegevensopslag kan defect raken. Zorg daarom altijd voor minstens twee kopieën van al uw belangrijke gegevensbestanden op verschillende schijven! De drive formatteren voor Mac OS Bij de levering is de drive geformatteerd als een NTFS-drive. Gebruik Disk Utility (Schijfhulpprogramma) om de drive opnieuw te formatteren met de indeling Mac OS Extended (Journaled). OPMERKING: de volgende instructies werken voor Mac OS X, versie 10.4 of hoger. Voor Mac OS X versie 10.
PC wilt niet opstarten Als u de computer niet kunt opstarten wanneer de drive is aangesloten, is er wellicht een conflict opgetreden tussen de BIOS van de computer en de verwisselbare drive met grote capaciteit. U kunt dit probleem oplossen door de drive uit te schakelen wanneer u de computer opstart. Schakel de drive weer in wanneer de computer volledig is opgestart. Gebruikershandleiding Een volledige gebruikershandleiding in HTML-indeling is beschikbaar via het gedeelte Support op www.iomega.com.
1. Выберите Приложения → Служебные программы → Disk Utility 2. В левом столбце выберите значок жесткого диска Iomega. Убедитесь в том, что выбран оранжевый значок диска, а не значок тома. 3. Выберите вкладку Раздел. 4. Измените структуру томов со значения Текущая на значение 1 раздел. 4. Выберите пункт Mac OS Extended (Journaled) в раскрывающемся меню Формат. 5. Нажмите кнопку Параметры. 6.
Limited Warranty • Garantie Limitée Eingeschränkte Garantie • Garanzia limitata Garantía limitada • Garantia limitada • Beperkte garantie Ограниченная гарантия Iomega warrants this hardware product to be free from defects in materials and workmanship for the warranty period. This non-transferable, limited warranty is only to you, the first end-user purchaser.
specific legal rights and you may also have other rights that vary from jurisdiction to jurisdiction. Any suit for breach of any warranty on your Product must be filed within one (1) year of the first date the suit could have been brought. Iomega garantit que ce produit est exempt de tout vice de fabrication ou de malfaçon pendant toute la période de garantie. Cette garantie limitée n’est pas transférable et ne s’applique qu’à l’utilisateur final.
énoncées ci-dessus peuvent ne pas être applicables dans votre cas. Cette garantie vous donne certains droits spécifiques, mais vous pouvez également bénéficier de droits supplémentaires en fonction de la législation de votre état. Toute poursuite pour défaut de garantie sur votre produit devra être déposée dans un délai d’un an à compter du premier jour à partir duquel la poursuite peut être engagée.
Einschränkungen BEI DER OBIGEN GARANTIE HANDELT ES SICH UM EINE AUSSCHLIESSLICHE GARANTIE, DIE ANSTELLE ALLER WEITEREN GARANTIEN, AUSDRÜCKLICHER ODER STILLSCHWEIGENDER NATUR, GÜLTIGKEIT HAT. Innerhalb des gesetzlich zulässigen Rahmens SCHLIESST IOMEGA AUSDRÜCKLICH JEGLICHE STILLSCHWEIGENDEN GARANTIEN AUS, EINSCHLIESSLICH JEGLICHER STILLSCHWEIGENDER GARANTIE HINSICHTLICH DER MARKTGÄNGIGKEIT BZW. DER EIGNUNG FÜR EINEN BESTIMMTEN ZWECK.
1900 West, Roy, UT 84067. Le informazioni sui contatti dell’Assistenza clienti di Iomega in Europe sono disponibili sul sito Web del Supporto tecnico all’indirizzo www.iomega.com/europe/support.
de Iomega en Europa, visite nuestra página Web de asistencia: www.iomega.com/europe/support. Si tiene derecho a que su producto reciba servicio de garantía, se le pedirá que lo devuelva a Iomega, junto con la identificación adecuada, un número de autorización de devolución obtenido del sitio Web de Iomega o proporcionado por el representante, y una prueba de compra. Iomega no protegerá, recuperará o devolverá datos durante el servicio de garantía, por lo que debe duplicarlos antes del envío.
South 1900 West, Roy, UT 84067. Informações de contato para o atendimento ao cliente da Iomega na Europa podem ser obtidas em nosso website de Suporte em www.iomega.com/europe/support. Caso o produto tenha direito ao serviço de garantia, será necessário devolvê-lo à Iomega, acompanhado da identificação apropriada: o número da autorização de retorno obtido no website da Iomega ou fornecido pelo representante da Iomega e uma comprovação de aquisição.
aangepast aan de veranderende technologie en marktsituatie. Bezoek Iomega op www.iomega.com/supportpolicy.html voor meer informatie over het huidige beleid van Iomega of schrijf naar: Iomega Customer Service, 4059 South 1900 West, Roy, UT 84067, VS. U vindt de contactinformatie voor de klantenservice van Iomega in Europa via onze website voor ondersteuning: www.iomega.com/europe/support.
ВОЗМОЖНОСТИ ТАКИХ ПОВРЕЖДЕНИЙ ИЛИ ПОТЕРЬ. Ни при каких обстоятельствах ответственность компании Iomega не может превышать продажной стоимости проигрывателя или диска. Законодательство некоторых стран не допускает исключения или ограничения на ответственность за случайные или последующие повреждения, поэтому вышеназванные ограничения могут быть не применимы в вашей стране.
Begrænset garanti Kunder, der registrerer deres nye produkter på www.iomegareg.com maks. 90 dage efter købet, vil få en forlænget garanti, så den samlede garantiperiode bliver tre (3) år i alle regioner. BEMÆRK: Du skal registrere med et tilgængeligt sprog. Forlængelse af garantiperioden gælder ikke for istandsatte produkter. Besøg www.iomega.com/support for at se en komplet beskrivelse af garantibetingelserne. Begrenset garanti Kunder som registrerer sine nye produkter på www.iomegareg.
POZNÁMKA: Registraci musíte provézt v jednom z dostupných jazyků. Repasované výrobky nemají nárok na prodloužení záruky. Úplné záruční podmínky naleznete na stránce www.iomega.com/support. Gwarancja ograniczona Klienci, którzy w ciągu 90 dni od nabycia dokonają rejestracji nowego produktu pod adresem www.iomegareg.com otrzymają przedłużenie gwarancji; w związku z tym całkowity okres gwarancyjny dla tych produktów we wszystkich powyższych regionach będzie obejmował trzy (3) lata.
Regulatory Information Informations relatives à la réglementation Gesetzliche Bestimmungen • Informazioni sulle regolamentazioni Información reglamentaria • Regulatieve informatie Сведения о нормативных требованиях Manufacturer/Responsible Party Iomega Corporation 4059 South 1900 West Roy, UT 84067 USA This equipment complies with Part 15 of the FCC Rules.
Canadian Verification This Class B digital apparatus meets all requirements of the Canadian Interference-Causing Equipment Regulations (ICES003, Class B). CE (Union européenne) Ce produit Iomega est certifié conforme aux normes et directives européennes suivantes : Application de la directive du Conseil : 2004/108/EC. Conformité déclarée pour les normes suivantes : EN55022, EN55024, EN61000-3-2, EN61000-3-3. Nom de l’importateur : Iomega International, S.A. Type d’équipement : matériel informatique.
Waste Electrical and Electronic Equipment (WEEE) In conformità a quanto sancito dalla Direttiva europea 2002/96/EC, nota anche come WEEE (Waste Electrical and Electronic Equipment), la presenza di questo simbolo sul prodotto o sulla confezione indica che il prodotto non deve in alcun modo essere smaltito nei normali cassonetti di raccolta.
de recyclage van afgedankte elektrische en elektronische apparatuur. De gescheiden inzameling van dit afval helpt de eventuele te recupereren materialen terug te winnen of te recycleren en vermindert de impact ervan op het milieu en de gezondheid van de mens. Voor meer informatie betreffende de juiste afvoermethode voor dit product, neemt u contact op met de plaatselijke overheid of de winkelier bij wie dit product is gekocht.
English For service and support for your Iomega product, visit us at www.iomega.com. Français Pour obtenir du service et de l’assistance pour votre produit Iomega, visitez notre site à l’adresse suivante : www.iomega.com. Deutsch Servicedienstleistungen und Kundendienst für Ihr Iomega Produkt finden Sie unter www.iomega.com. Italiano Per ottenere assistenza e supporto per il prodotto Iomega in uso, visitare il sito Web all’indirizzo www.iomega.com.