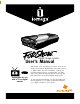
TM ® TM ® Digital Image Center User’s Manual TM Instructions for use with a TV or digital camera! This manual covers everything you need to know about using your FotoShow™ Digital Image Center with a TV set or digital camera. For more information on using your FotoShow Image Center as an external Zip® 250 USB drive, please view the Zip drive Manual on the Zip disk that came with your FotoShow Digital Image Center. To view the Zip Drive Manual, you must have Microsoft® Internet Exlplorer® 4.
Limited Warranty (Drives and Media) Coverage Iomega warrants this hardware product to be free from defects in materials and workmanship for the warranty period. This non-transferable, limited warranty is only to you, the first end-user Purchaser.
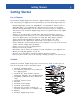
Table of Contents Limited Warranty . . . . . . . . . . . . . . . . . . . 2 Getting Started . . . . . . . . . . . . . . . . List of Features. . . . . . . . . . . . . . . Contents . . . . . . . . . . . . . . . . . . . Accessories . . . . . . . . . . . . . . . . . Front Panel Controls and Indicators . Back Panel Controls and Connectors . . . . . . . . . . . . . . . . . . . . . . . . 5 5 5 6 7 7 Connecting Your FotoShow™ Image Center . . 8 Typical Connection . . . . . . . . . . . . . . . .
Ejecting Disks Without Power . . . . . . Ejecting CompactFlash™ Cards and IBM® Microdrives™ . . . . . . . . . Ejecting SmartMedia™ Cards . . . . . . . Ejecting Memory Cards Without Power Using FotoShow™ Zip® Disks on a Computer. . . . . . . . . . . . . . . . . Drive Sleep . . . . . . . . . . . . . . . . . . Compatibility with 100MB Zip® Disks . JPEG Guidelines . . . . . . . . . . . . . . . Using FotoShow™ Media . . . . . . . . . . Backing up With Zip® Disks. . . . . . . . Formatting Zip® Disks. . . . . . .
Getting Started Getting Started List of Features The FotoShow™ Digital Image Center provides a digital workspace where you can organize, edit, and present your digital photos and presentations. Your FotoShow Image Center can: • Transfer digital film content (3.3v SmartMedia™ or CompactFlash™ memory cards or IBM® Microdrives™) to inexpensive Zip® disks that can be read by your computer.
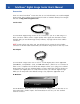
FotoShow™ Digital Image Center User’s Manual Accessories There are several FotoShow™ accessories that are not included with your FotoShow Digital Image Center. The FotoShow accessories listed below are available directly from Iomega’s web site at http://www.iomegadirect.com. S-Video Cable Your FotoShow™ Digital Image Center can be connected to your TV or VCR using an SVideo connector.
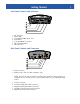
Getting Started Front Panel Controls and Indicators 1. 2. 3. 4. 5. 6. 7. Zip® Disk Slot Power Light CompactFlash™/Microdrive™ Slot Copy Button 3.3v SmartMedia™ Card Slot Zip® Disk Eject Button Infrared Sensor Back Panel Controls and Connectors 1. Power Connector 2. USB Connector (For use with computers only) NOTE: This port is only used when connecting the FotoShow™ Image Center to a computer. Do not use this port to connect other devices to your FotoShow Image Center. 3.
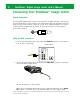
FotoShow™ Digital Image Center User’s Manual Connecting Your FotoShow™ Image Center Typical Connection Your FotoShow™ Digital Image Center can be hooked to an NTSC* TV, VCR, or AV receiver. Your FotoShow Image Center includes a set of RCA cables. Most TVs have RCA connectors. Check your TV’s user’s manual or the back of your TV to determine whether your TV has an RCA connector (pictured below). If your TV does not have the connector pictured below, skip to page 10. Using the RCA Connectors 1.
Connecting Your FotoShow™ Image Center device you are connecting to has stereo sound you will also find a red (right) AUDIO IN connector. The red connector is optional. TELEVISION BACK AUDIO/VIDEO SVIDEO VIDEO LEFT AUDIO RIGHT AUDIO IN OUT VHF/UHF 4. Connect the RCA audio cable to the audio connectors on the back of your FotoShow™ Image Center. Make sure you match the white cable connector with the white (left, mono) AUDIO OUT connector on the back of your FotoShow™ Image Center.
FotoShow™ Digital Image Center User’s Manual 6. Turn on your TV set and set it to the appropriate video input. Adjust the volume level of your TV or stereo. Most TVs will have either AUX (auxiliary) or VIDEO input channels. Many TV remote controls have either a TV/VCR or a TV/VIDEO button that changes the video input. Refer to the manual that came with your TV for more information on choosing the appropriate video input channel. If you hooked the audio channel to a stereo or AV receiver, turn it on.
Connecting Your FotoShow™ Image Center Some TVs do not have either RCA or S-Video connectors. You will need an RF modulator (not included with your FotoShow™ Image Center) to connect to some TVs. In many cases you can use your VCR instead of an RF modulator. Please check Iomega’s web site at http://www.iomegadirect.com for recommendations on purchasing an RF modulator. Follow the instructions included with the RF modulator to connect your FotoShow™ Image Center to your TV.
FotoShow™ Digital Image Center User’s Manual TELEVISION BACK AUDIO/VIDEO SVIDEO VIDEO LEFT AUDIO RIGHT AUDIO IN OUT VHF/UHF 4. Connect the RCA audio cable to the audio connectors on the back of your FotoShow Image Center. Make sure you match the white cable connector with the white (left, mono) AUDIO OUT connector on the back of your FotoShow™ Image Center.
Connecting Your FotoShow™ Image Center appropriate video input channel. If you hooked the audio channel to a stereo or AV receiver turn it on. NOTE: If you are connecting the FotoShow™ Image Center to a VCR or AV receiver, you will need to turn on the VCR or receiver as well as the TV. You may also need to adjust the video input on the VCR or receiver. See the user’s manual that came with the VCR or AV receiver for more information. 7.
FotoShow™ Digital Image Center User’s Manual If the tutorial does not start: 1. Press the SLIDESHOW button on the FotoShow™ remote control. 2. Use the right and left arrow buttons to select Open/Create Slideshow, then press GO. 3. Use the right and left arrow buttons to select Open Slideshow, then press GO. 4. Use the up and down arrow buttons to select the slideshow titled Auto, then press GO. 5. Use the right and left arrow buttons to select Start Show Manual/Auto, then press GO. 6.
Copying Files to the FotoShow™ Image Center Copying Files to the FotoShow™ Image Center Your FotoShow™ Digital Image Center provides a simple way to copy your digital photos from expensive digital film (SmartMedia™, CompactFlash™ and, Microdrive™) to inexpensive, portable Zip® disks. You can do selective copies when hooked to a TV set or copy the entire contents of your digital film when you are away from home.
FotoShow™ Digital Image Center User’s Manual The Copy Grid is used to view and select those pictures you would like to copy. It will display photos from your specified digital source—SmartMedia™, CompactFlash™, or Microdrive™. It may take a moment for all of your photos to appear on the screen. By default, all photos are selected for copying. For more information on the Copy Grid, see “Understanding Grids.” 8. Press the arrow buttons to move between photos.
Copying Files to the FotoShow™ Image Center 9. When the data transfer is complete the Copy will glow green if the transfer was successful, red if there was a disk or drive error, or flash red if your disk is full. This copy may take a few moments. Your FotoShow™ Image Center is not only copying your digital film, but also preparing your photos to be viewed on the TV. CAUTION! Your FotoShow™ Image Center is compatible with 3.3v SmartMedia™ memory cards only.
FotoShow™ Digital Image Center User’s Manual CAUTION! Your FotoShow™ Image Center is compatible with 3.3v SmartMedia™ memory cards only. Using a 5v SmartMedia card with your FotoShow™ Image Center may cause irreparable damage to either the SmartMedia card or the FotoShow Image Center. CAUTION! Like video tapes and floppy disks, your Zip® disks and digital film are sensitive to light and heat. Keep your FotoShow™ Image Center and media out of heat and direct sunlight.
FotoShow™ Image Center at a Glance Move Photos In pg. 29 Move Photos In/Out pg. 29 Full Screen pg. 28 Move Photos Out pg. 30 View As pg. 28 Create Album Tool pg. 29 Slideshow pg. 28 Open/Create Album pg. 29 Open Album Tool pg. 29 Arrange Photos pg. 30 Add Effect pg. 34 Choose Theme pg. 31 Crop pg. 35 Delete Photos pg. 30 Save pg. 36 Delete Albums pg. 31 Undo Changes pg. 35 Undo Last Change pg. 35 Remove Red-Eye pg. 34 Save Over pg. 36 Revert to Original pg. 35 Auto Fix pg.
Start Show Auto pg. 39 Start Show Manual pg. 39 Create Slideshow pg. 37 Open Slideshow pg. 38 Remove Photos pg. 39 Add Photos pg. 39 Add/Remove Photos pg. 39 Flashing Green—Copy in progress. Solid Green—Copy successful. Flashing Red—Not enough space on the Zip® disk (no files copied). Solid Red—Copy failed. Verify all media and try again. Flashing Yellow—Reading your digital film. Wait until the flashing stops before pressing the COPY button.
Using the FotoShow™ Image Center Using Your FotoShow™ Image Center Remote Control Buttons 1. Power Button—activates the FotoShow™ software. 2. A, B, and C Buttons—perform various tasks in the FotoShow™ software (depending on the screen). 3. Back Button—Cancels the current task and returns to the previous screen. 4. PHOTO GRID Button—accesses the Photo Grid screen or marks all photos when in the Photo Grid screen. 5. Directional Navigation (arrow) Buttons—used to make on-screen selections. 6.
FotoShow™ Digital Image Center User’s Manual Using the FotoShow™ Remote Control 1. To open the battery compartment, press down on the latch on the back cover and pull the door towards you. 2. Insert the two AAA batteries as shown in the picture below. NOTE: Make sure the positive (+) symbol on each battery lines up with the (+) symbol inside the battery compartment. 3. Replace the battery compartment door. Your FotoShow™ remote control can be used up to 10 m. (≈ 30 ft.) from the FotoShow Image Center.
Using the FotoShow™ Image Center Using the FotoShow™ Software The FotoShow™ software is divided into three easy-to-use sections: the Album Gallery, the Editing Room, and the Slideshow Organizer. Each of these “rooms” has a unique set of tools to help you organize, enhance, and view your photos. These icon-based toolbars are intuitive to use, and this manual will explain the special features of each.
FotoShow™ Digital Image Center User’s Manual and operate in basically the same way. The main grid is the Photo Grid. It displays miniatures of your photos arranged in columns, and can be accessed easily from any of the three sections of FotoShow™ software by pressing the PHOTO GRID button on your FotoShow remote control. The Photo Grid is a browsing tool that allows you to get an overall view of the current set of photos, and can be invoked from each of the three rooms: Album, Edit, and Slideshow.
Using the FotoShow™ Image Center Understanding System Folders Another basic part of the FotoShow™ software structure is the System Folders. These are vital components of the software, so you should be aware of what they do when you see them. • All My Photos contains all the photos you have saved to the current Zip® disk. You can view the photos in All My Photos, but you cannot change them in any way. This is where your viewable digital negatives are stored.
FotoShow™ Digital Image Center User’s Manual Using the Keyboard: When you create photo albums and slideshows you will need to use the on-screen keyboard to enter a name. You will also use the on-screen keyboard to edit album and slideshow names, captions, and file names. Consult the table below for help using the on-screen keyboard with your remote control. Button arrows A B C GO BACK Action moves the cursor over letters and symbols on the keyboard Backspace Space Brings up the keyboard.
Using the FotoShow™ Image Center The Album Room The Album room allows you to view and organize your digital images and photos. You can create an individual look and feel for each of your albums using the Choose Theme tool. Your photo album will also display custom photo captions (added by using the Photo Info tool in the Edit Room. For more information, see “Using Album Info to Customize Your Albums” on pg 32). Albums are organized on your Zip® disk by the date they were created.
FotoShow™ Digital Image Center User’s Manual Alternate Photo Album Views There are a number of ways you can view the pictures in your album. When you open an album, you can use the A and B buttons to flip through the pages. You can change the background pattern and color using the Select Theme tool on the Album room toolbar. For other viewing options, select the View As icon in the Album room toolbar, Press GO, and then make one of the following choices from the submenu.
Using the FotoShow™ Image Center Opening an Existing Album Use this tool to open an existing album and view or work with its contents. When an album is opened, the album name, the first picture, and the album date will appear on the screen. This information may be edited using the Album Info tool on the Album room toolbar. 1. If the Album room toolbar is not visible, press the ALBUM button on your FotoShow™ remote control to toggle on the toolbar. 2.
FotoShow™ Digital Image Center User’s Manual 1. Open or create an album (see instructions above). This will be the album that your photos will be added to. 2. Use the Left and Right buttons to highlight the Move Photos In/Out icon. 3. Press GO. 4. Highlight the Photos In icon in the submenu and press GO to automatically bring up the Album List. 5. Select the album you want to take photos from and press GO. This will bring up the Browse Grid showing all the pictures in that album. 6.
Using the FotoShow™ Image Center 5. Press the arrow buttons to move between pictures. Press C to mark (or pick up) the photo you would like to move. 6. Press the arrow buttons to move the photo. Press C to reposition (or drop) the photo. Repeat these steps for each photo you would like to move. 7. Press GO when you are finished rearranging your photos. Press BACK to cancel and return photos to their original order. Choosing a Theme for Your Album Use this tool to change the background theme for your album.
FotoShow™ Digital Image Center User’s Manual Deleting an Entire Album Use this tool to delete an entire album from FotoShow. When you delete an album that contains photos, you also delete those photos. A confirmation dialog box will automatically ask you if you are sure about deleting the album. 1. Open the album you want to delete. 2. If the Album room toolbar is not visible, press the ALBUM button on your FotoShow™ remote control to toggle on the toolbar. 3.
Using the FotoShow™ Image Center Editing your pictures The Edit room is where you can fix, change, or play around with your photos. It’s simple, and it’s fun! Find the photo you want to modify in one of your digital albums, press the EDIT button on your FotoShow™ remote control, and you’re ready to begin. When working in the Edit room, remember: • You can always revert to the original image if you don’t like your changes.
FotoShow™ Digital Image Center User’s Manual 1. Select the photo you would like to edit. 2. If the Edit room toolbar is not visible, press the EDIT button on your FotoShow™ remote control to toggle on the toolbar. 3. Press the Left and Right buttons to highlight the Auto Fix icon. 4. Press GO to toggle Auto Fix on and off. 5. If you want to keep your changes, select the Save icon, the press GO.
Using the FotoShow™ Image Center Available Photo Effects Black & White Posterize Orange Tint Sepia Green Tint Magenta Tint Turquoise Blue Tint Yellow Tint Cropping a Photo The Crop tool provides a quick way to remove unwanted portions of your image. It uses a fixed aspect ratio that is optimized for viewing photos on your TV. The Crop tool allows you to change the final orientation of your photo. You can crop vertical, portrait-style images out of horizontal, landscape-style photos or vice-versa. 1.
FotoShow™ Digital Image Center User’s Manual Saving Your Photo The FotoShow™ software makes it difficult to accidentally lose or delete your photos, but it’s still important to save your photos. Whether you’re saving a photo after removing the red-eye or saving a copy of an edited photo to a new album, the process is quick and easy. Use the Save Over option when you have made changes to a photo and would like to replace the original photo in the album.
Using the FotoShow™ Image Center 3. Press the Left and Right buttons to highlight the Photo Info icon. 4. Press GO to bring up the Photo Info box. 5. Use the arrow buttons to select the tab that contains the information you wish to edit: date, caption, and file name. 6. Press the C button to start editing. See “Using the Keyboard” on page 26. 7. When you have finished making all of your changes to the album, press GO to save the changes. If you wish to undo all of your changes, press BACK.
FotoShow™ Digital Image Center User’s Manual 6. Enter the name and Press C to continue. Press the Back button to cancel. 7. You are now ready to add photos to your slideshow. For more information, see “Adding Photos to a Slideshow” on page 39. NOTE: If you name your slideshow “Auto,” your FotoShow™ Digital Image Center will run the slideshow automatically on startup.
Using the FotoShow™ Image Center Running Your Slideshow The FotoShow™ software allows you to run slideshows in either Manual or Automatic modes. In the Manual mode, use the Right or Down button to advance to the next slide and the Left or Up button to show the previous slide. In the Automatic mode, use the GO button to pause/resume the slideshow. Press BACK stop a slideshow and return to the Slideshow room toolbar. 1. Press the Right and Left buttons to highlight the Start Show Manual/Auto icon. 2.
FotoShow™ Digital Image Center User’s Manual 5. Highlight the Remove Photos icon in the submenu and press GO to automatically bring up the Photo Grid. 6. Press the arrow buttons to move between photos. Press C to mark the photos you would like to remove from this album. 7. Press GO when you have finished marking the photos. This will automatically remove the photos from the slideshow, but not delete them from their album on your Zip® disk.
Using the FotoShow™ Image Center Deleting an Entire Slideshow Use this tool to eliminate a slideshow from the Slideshow List. Deleting a slideshow will not delete the photos within it. Those photos will still exist in their original albums. 1. Open the slideshow you would like to delete. 2. Press the Left and Right buttons to highlight the Delete Slideshow icon. 3. Press GO to delete the current slideshow. A dialog box will appear, asking if you really want to delete the slideshow. 4.
FotoShow™ Digital Image Center User’s Manual Making Microsoft® PowerPoint® Presentations Using Your FotoShow™ Image Center to Give PowerPoint® Presentations You can use your FotoShow™ Digital Image Center as a replacement for expensive PC screen or overhead projectors. Your FotoShow™ Image Center can be used to give business presentations anywhere there is a TV. 1. Create your Microsoft® PowerPoint® presentation.
Making Microsoft® PowerPoint® Presentations 10. Press the SLIDESHOW button on the remote control. 11. Use the right and left arrow buttons to select Open/Create Slideshow, then press GO. 12. Use the right and left arrow buttons to select Create Slideshow, then press GO. 13. Enter the name of your slideshow. Use the arrow buttons on the remote control to move the cursor over the on-screen keyboard. Press the GO button to add the current character to the slideshow’s name. Use A button to backspace.
FotoShow™ Digital Image Center User’s Manual FotoShow™ Image Center Essentials To use the FotoShow™ Image Center, insert a 250MB or 100MB* Zip® disk, SmartMedia™ card, or CompactFlash™ Card and begin organizing, editing, and presenting your digital photos. This section of the manual will discuss some basic features of the FotoShow Image Center. For information on using the software that came preinstalled on your FotoShow Image Center, see “Using the FotoShow™ Software” on page 23.
FotoShow™ Essentials NOTE: Zip® disks with formats other than PC (i.e., Mac® or Linux) will be automatically ejected when inserted into your FotoShow™ Image Center unless it is hooked to a computer. Inserting CompactFlash™ Cards or IBM® Microdrives™ Insert the CompactFlash™ card or Microdrive™ into your FotoShow™ Image Center’s CompactFlash/Microdrive reader slot with the arrow facing up. When your digital film is properly seated in the reader the COPY button will start flashing yellow.
FotoShow™ Digital Image Center User’s Manual CAUTION! Your FotoShow™ Image Center is compatible with 3.3v SmartMedia™ memory cards only. Using a 5v SmartMedia card with your FotoShow Image Center may cause irreparable damage to either the SmartMedia card or the FotoShow Image Center. Ejecting Zip® Disks To eject a Zip® disk when your drive has power, press the Eject/Activity button on the front right side of your FotoShow™ Image Center.
FotoShow™ Essentials Ejecting SmartMedia™ Cards Make sure that the SmartMedia™ card reader is not busy before ejecting. If you are transferring files while your FotoShow™ Image Center is connected to a TV, you should see a dialog box on the TV screen that will show you when the transfer is complete. When the copy completes, you can safely remove your SmartMedia card.
FotoShow™ Digital Image Center User’s Manual Drive Sleep The FotoShow™ Image Center has an automatic sleep mode that spins down a Zip® disk after several minutes of inactivity. This feature minimizes power consumption when the Zip drive is not being accessed. During drive sleep, the green power light remains on, and the Zip disk automatically spins up again when accessed. Compatibility with 100MB Zip® Disks The Zip® 250 drive is compatible with both 100MB and 250MB Zip disks.
FotoShow™ Essentials • Make sure your JPEG images always end with the extension .JPG. Your FotoShow™ Image Center will not recognizes valid JPEGs with a missing or wrong extension. NOTE: JPEG is the most common file format used by digital cameras. The FotoShow™ Image Center is compatible with most JPEG formats; however, some less common JPEG formats such as CMYK JPEG, progressive JPEG, motion JPEG, and JPEG 2000/JBIG are incompatible.
FotoShow™ Digital Image Center User’s Manual NOTE: The Iomega CopyDisk tool cannot copy any files that are open or in use at the time the copy is made. If you are using a Macintosh® or do not want to use CopyDisk, you can duplicate a Zip® disk by following these steps: 1. 2. 3. 4. Copy the contents of your Zip® disk to a folder on your computer’s hard drive. Eject your Zip® disk. Insert a new Zip® disk. Copy your files from the folder on your hard drive onto the new Zip® disk.
FotoShow™ Essentials automatically ejected when inserted into your FotoShow Image Center unless it is hooked to a computer. Formatting Instructions for Windows® PC Users: NOTE: You can use any Zip® 250 drive that is connected to a computer to format your Zip disk. If your computer does not already have a Zip drive, follow the instructions on the the purple side of the FotoShow™ Digital Image Center QuickStart Guide to use your FotoShow Image Center with your computer. 1.
FotoShow™ Digital Image Center User’s Manual Removing Zip® Disk Protection under Windows®: 1. Follow the instructions on the purple side of the QuickStart Guide to connect your FotoShow™ Image Center to your computer. 2. Insert the disk you want to unprotect into your Zip® drive. 3. Open My Computer and right mouse click on the Zip® drive icon. 4. Select Protect… from the drive shortcut menu. 5. Choose the protection option you want to use.
FotoShow™ Tips FotoShow™ Image Center Tips Working with the Zip® Drive Here are a few tips you’ll want to keep in mind to care for your FotoShow™ Digital Image Center, disks, and digital film! • Always make sure the power supply is connected to the FotoShow™ Image Center before inserting a Zip® disk. CAUTION! If a disk is inserted without the power supply connected, and power is then applied, it could damage the drive.
FotoShow™ Digital Image Center User’s Manual CAUTION! Remove disks from the FotoShow™ Image Center drive before disconnecting from the computer to avoid losing data. Disconnecting the FotoShow Image Center from the computer while it is busy transferring data may cause damage or loss of data. • When connecting your FotoShow™ Image Center to a computer, use only the USB data cable that came with the drive. CAUTION! Do not use USB extension cables with your FotoShow™ Image Center. Data loss may result.
FotoShow™ Tips formats such as CMYK JPEG, progressive JPEG, motion JPEG, and JPEG 2000/JBIG are incompatible. If you would like to view non-JPEG images (such as BMP, PICT, GIF, PNG, EPS, or TIFF) on your FotoShow Image Center, you will need to use a computer to convert them to a compatible JPEG format. For more information on converting JPEG images on a computer, see “JPEG Guidelines” section on pg. 48.
FotoShow™ Digital Image Center User’s Manual Troubleshooting Why Don’t I Get a Picture on My TV After I connect the FotoShow™ Image Center? There are several things that could cause your TV not to properly display images from your FotoShow™ Digital Image Center. 1. Check all of the cables between your FotoShow™ Image Center and your TV. Make sure that the colored connectors match on both the TV and FotoShow Image Center. 2.
Troubleshooting Why Does My Digital Photo Look Different When It is Printed Than on the Computer or TV Screen? Digital Cameras, TVs, Computers, and color printers use different technologies to create colors. The colors of your digital photo or scanned image should look pretty close to the actual subject of the picture; however, when you transfer an image from one technology to another there will be slight color differences.
FotoShow™ Digital Image Center User’s Manual Why Does My FotoShow™ Image Center Automatically Eject a Zip Disk as Soon as I Insert It? There are several things that might cause your FotoShow™ Digital Image Center to eject your Zip® disks. 1. If the Zip® disk you are using was formatted on a Macintosh®, it may be a Mac®formatted disk. See the instructions on formatting disks on a Macintosh for use with the FotoShow Image Center on page 50. 2.
Troubleshooting Why Can’t I Locate a Photo I Saved in the Edit Room yesterday? The Edit room is a work area and is not designed to store saved pictures. Your edited photo is most likely in the same album as the original photo. After you open the album that contains the original photo, you will find both photos displayed in the Photo Grid, accessible from the Album room.
FotoShow™ Digital Image Center User’s Manual Where Do Pictures Go When I Save Them? By default, your photos are saved into the album from which they came. When you edit and save a photo, you have a choice between saving over the original or keeping the original and saving a copy of the edited version. If you choose Save A Copy, the copy will be placed in the same album as the original.
Troubleshooting What is the Difference Between Zoom and Crop? The Zoom tool was designed to help you examine portions of your photo in greater detail. The amount you have zoomed in on your photo is displayed in the upper right corner of your screen, and depends on the original resolution of your photo. Lower resolution photos may show a slightly limited final zoom percentage—somewhere around 1000-1200 percent. The Crop tool allows you to reframe your photo.
FotoShow™ Digital Image Center User’s Manual all of the changes you have made while using the Album Info Tool. Pressing the BACK button will cancel all of the changes. Why Do Only Some of My Photos Have Captions? Although you have turned on the captions, some of your photos will not automatically appear with captions. Your FotoShow™ Image Center will only add captions automatically to files that have custom file names.
How to Get Help How to Get Help Iomega is committed to providing a first class technical support service. To meet this goal, Iomega offers a variety of support options designed to meet the needs of a wide range of users, including an award-winning web support site, automated FaxBack help, e-mail, and live technical support service. Iomega’s specific customer support policies (including fees for services) and procedures change as technology and market conditions dictate.
FotoShow™ Digital Image Center User’s Manual E-mail Tech Support Send an e-mail to our Technical Support team via the web. Just go to our support site at http://www.iomega.com/support, select your product and click e-mail. Calling Iomega Technical Support Iomega also offers live technical support for all your troubleshooting needs. Before calling Iomega Technical Support, please have the following information available. Also, please turn on your computer and call from a phone near your computer. 1. 2.
How to Get Help Product Information Call 1-800-MY-STUFF* (1-800-697-8833) or visit our web site at http://www.iomega.com for information on new Iomega products, promotions, and rebates. Purchasing Iomega Products You can purchase Iomega products: • Online at http://www.iomegadirect.com (U.S. Only). • Calling 1-800-MY-STUFF (1-800-697-8833) (U.S. Only). • Visiting your local computer store.
FotoShow™ Digital Image Center User’s Manual Regulatory Information Product Name: Iomega FotoShow™ Digital Image Center Model Number: FotoShow FCC (United States) The computer equipment described in this manual generates and uses radio frequency (RF) energy. If the equipment is not installed and operated in strict accordance with the manufacturer’s instructions, interference to radio and television reception may result. This equipment complies with Part 15 of the FCC Rules.
USB Guidelines Continued from back cover Do not... • Do not connect or disconnect any USB device while the Zip® USB drive is transferring information—data loss will result! NOTE: If the activity light is on, the Zip® drive is transferring information. Wait to connect or disconnect any USB device until the activity light goes out and stays out. • Do not use any USB cable with your Zip® USB drive other than the cable that came with the drive.
TM ® USB Guidelines USB (Universal Serial Bus) is an interface designed to make it easy to connect mice, keyboards, joysticks, printers, and other devices to your computer. Because of its ease of use, USB has become a means for connecting high speed storage devices, such as the FotoShow™ Zip® 250 drive. CAUTION! Windows NT® 4.0 users—Always turn off the computer to connect or disconnect the Zip® 250™ drive.