CD DIRECT QUICKSTART GUIDE ENGLISH ( 3 - 9 ) GUÍA DE INICIO RÁPIDO ESPAÑOL ( 10 – 17 ) GUIDE D'UTILISATION RAPIDE FRANÇAIS ( 18 - 24 ) GUIDA RAPIDA ITALIANO ( 25 - 31 ) KURZANLEITUNG DEUTSCH ( 32 – 38 ) SNELSTARTGIDS NEDERLANDS (39 - 45 )
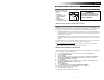
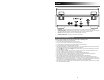
QUICKSTART GUIDE (ENGLISH) BOX CONTENTS Make sure that the items listed below are included in the box: ATTENTION: • CD DIRECT • EZ Vinyl Software Disc • Software Quickstart Guide • USB Cable • Quickstart Guide • Safety Instructions & Warranty Information Booklet Before using the turntable, loosen the "transport screw" (at the far end of the platter, near the tonearm) by turning it CLOCKWISE.
Windows XP Audio Setup Procedure: Once the EZ Converter is installed on your computer, connect the CD DIRECT using the included USB cable to an available USB port on your computer. 1. Select the Windows Start menu. 2. Select Settings then Control Panel. 3. Double-click the Sounds and Audio Devices control panel. If you do not see a choice called Sounds and Audio Devices, choose the Switch to Classic View option. 4. Select the Audio tab. 5.
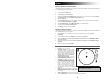
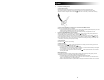
FRONT PANEL 17 16 1 11 12 1. 2. 3. 4. 5. 6. 7. 8. 9. 10. 11. 12. 13. 14. 15. 16. 17. 3 6 7 8 9 10 13 14 4 5 2 16 15 LCD – Displays information about CD DIRECT's functions. POWER ON/OFF – Turns CD DIRECT on or off. PLAY MODE SELECTORS – Selects what media format you want to use. Press this button to cycle through and set CD DIRECT to be in turntable (PHONO), LINE IN jack (AUX), computer (USB), or CD player (CD) mode.
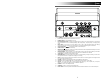
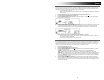
BACK PANEL 4 1 1. 2. 3. 4. 2 3 USB PORT – Connect a USB cable from the CD DIRECT to a computer to record or listen to audio. GAIN ADJUSTMENT – Before recording through a USB connection, use this knob to adjust the recording gain. The level should be high enough so that the loudest part of the song does not distort or "clip". AUX OUT – RCA Audio outputs to connect to external speakers or an amp. POWER CONNECTION – The built-in power cable is located here.
RECORDING Recording audio from the turntable or AUX sources on the CD recorder: 1. 2. 3. 4. Press the PHONO/AUX/USB button repeatedly to select which source is to be recorded, either PHONO or AUX. Press the OPEN/CLOSE s button and place a recordable CD-R or CD-RW disc into the disc tray with the printed label side up, and then press the OPEN/CLOSE s button to close the disc tray. Note: Make sure “NO TOC” and “CD-R” (or “CD-RW“) indicators lights on the display, or the RECORD button will not work.
6. Prepare the recording source. To record from a record: Please ensure that the white protective cover has first been removed from the turntable stylus. Then move the tonearm to the edge of the record or a position on the record and slowly put it down. While the turntable is stopped, the PLAY/PAUSE f button will not work and you cannot start recording. 7. To record a sound played by an audio device connected to the LINE IN terminal: Play the unit connected to the Line In terminal.
FINALIZING A CD In order for a disc to become a standard CD, it must have a Table of Contents (TOC) written to it. This process is known as finalizing. Once finalized, no more tracks can be recorded on CD-R discs. However CD-RW discs can be “unfinalized“ and if there is space, further material can be recorded on them. • You cannot finalize a blank disc. • When the disc has reached its maximum recordable time, it will automatically finalize even if recording is still in progress. 1. 2. 3.
GUÍA DE INICIO RÁPIDO (ESPAÑOL) CONTENIDO DE LA CAJA Asegúrese de que todos los elementos abajo indicados estén incluidos en la caja: Antes de usar el giradiscos, afloje el "tornillo de transporte" (en el extremo más alejado del plato, cerca del brazo) girándolo EN SENTIDO HORARIO.
Procedimiento de configuración de audio para Windows XP: Una vez instalado EZ Converter en su computadora, conecte el CD DIRECT mediante el cable USB incluido a un puerto USB disponible de la misma. 1. Seleccione el menú Start (Inicio) de Windows. 2. Seleccione Settings (Configuración) y luego Control Panel (Panel de control). 3. Haga doble clic en el panel de control Sounds and Audio Devices (Sonidos y dispositivos de audio).
PANEL FRONTAL 17 16 1 11 12 1. 2. 3. 4. 5. 6. 7. 8. 9. 10. 11. 12. 13. 14. 15. 16. 17. 3 6 7 8 9 10 13 14 4 5 2 16 15 PANTALLA LCD – Muestra información acerca de las funciones de CD DIRECT. ENCENDIDO/APAGADO – Enciende y apaga CD DIRECT. SELECTORES DE MODO DE REPRODUCCIÓN – Seleccionan el formato del medio que desea usar.
PANEL TRASERO 4 1 1. 2. 3. 4. 2 3 PUERTO USB – Conecte aquí un cable USB desde CD DIRECT a una computadora para grabar o escuchar el audio. AJUSTE DE GANANCIA – Antes de grabar por una conexión USB, utilice esta perilla para ajustar la ganancia de grabación. El nivel debe ser lo suficientemente alto para que la parte de mayor volumen del tema no se distorsione ni “recorte”. SALIDA PARA AUXILIARES – Salidas de audio RCA para conectar a altavoces o un amplificador externos.
CÓMO GRABAR Cómo grabar audio desde el giradiscos o fuentes AUX en el grabador de CD: 1. 2. 3. 4. Pulse el botón PHONO/AUX/USB (Fonógrafo/Auxiliar/USB) varias veces para seleccionar la fuente a grabar, ya sea FONÓGRAFO o AUXILIAR. Pulse el botón de ABRIR/CERRAR s coloque un disco CD-R o CD-RW grabable en la bandeja con el lado de la etiqueta impresa hacia arriba y pulse el botón de ABRIR/CERRAR s para cerrar la bandeja portadisco.
6. Preparación de la fuente de grabación. Para grabar desde un disco: Asegúrese de que se haya retirado la cubierta protectora blanca de la púa del giradiscos. Luego lleve el brazo al borde del disco o a una posición en el mismo, y bájelo lentamente. Cuando se detiene el giradiscos, el botón de REPRODUCIR/PAUSA f no funciona y no se puede comenzar a grabar. 7.
1. 2. 3. Pulse el botón del CD para seleccionar “CD” y abra la bandeja pulsando el botón de abrir/cerrar s . Cargue un disco no finalizado (grabable) en la bandeja. Presione el botón de FINALIZAR en modo de parada. Aparece “FINAL” en la pantalla. Para cancelar el proceso de finalización, pulse el botón de PARAR. 4. Pulse el botón ENTER para comenzar la finalización. Los indicadores “NO TOC” y “REC” parpadean y aparece en la pantalla el tiempo remanente para la operación de finalización.
GUIDE D’UTILISATION SIMPLIFIÉ (FRANÇAIS) CONTENU DE LA BOÎTE Assurez-vous que tous les articles énumérés dans le contenu de la boîte de ce guide sont inclus dans la boîte : MISE EN GARDE : Avant d'utiliser la platine, desserrer • CD DIRECT la "vis de transport" (à l'extrémité • Logiciel EZ vinyle du plateau, à proximité du bras de • Guide de démarrage lecture) en la tournant vers la rapide de logiciel • Câble USB droite.
Configuration audio Windows XP : Une fois le logiciel EZ Converter installé sur votre ordinateur, branchez le CD DIRECT au port USB de votre ordinateur à l’aide du câble USB inclus. 1. Cliquez sur le bouton Démarrer dans le coin inférieur gauche de la fenêtre. 2. Sélectionnez Panneau de configuration. 3. Sélectionnez Sons et périphériques audio. Si vous ne voyez pas Sons et périphériques audio, choisissez l'option Basculer vers l'affichage classique. 4. Sélectionnez l'onglet Audio. 5.
PANNEAU AVANT 17 16 1 11 12 1. 2. 3. 4. 5. 6. 7. 8. 9. 10. 11. 12. 13. 14. 15. 16. 17. 3 6 7 8 9 10 13 14 4 5 2 16 15 ÉCRAN ACL – Écran permettant l’affichage les informations concernant le fonctionnement du CD DIRECT. INTERRUPTEUR D’ALIMENTATION – Cet interrupteur permet de mettre l’appareil sous et hors tension. SÉLECTEURS DU MODE DE LECTURE – Sélectionne le format de support que vous souhaitez utiliser.
PANNEAU ARRIÈRE 4 1 1. 2. 3. 4. 2 3 PORT USB – Cette sortie permet d’enregistrer ou d’écouter de l'audio via un ordinateur à l’aide d’un câble USB. RÉGLAGE DU GAIN – Avant de lancer l'enregistrement via une connexion USB, utilisez ce bouton pour ajuster le gain d'enregistrement. Le niveau doit être suffisamment élevé sans que les parties plus fortes de la chanson se déforment ou s'écrêtent. AUX OUT – Sorties audio RCA pour brancher des haut-parleurs externes ou un amplificateur.
ENREGISTREMENT Enregistrement d’audio provenant de la platine ou des sources auxiliaires sur le graveur de CD : 1. 2. 3. 4. Appuyez sur la touche PHONO/AUX/USB à plusieurs reprises pour sélectionner la source à enregistrer, soit PHONO ou AUX. Appuyez sur la touche OUVRIR/FERMER s et placer un CD-R ou CD-RW sur le plateau du disque avec l'étiquette imprimée vers le haut, puis appuyez sur la touche OUVRIR/FERMER pour refermer le plateau du CD.
6. Préparez la source d'enregistrement. Enregistrement d’un disque vinyle : Veuillez vous assurer que le couvercle protecteur blanc a été retiré du stylet de la platine tourne-disque. Déplacez ensuite le bras de lecture sur le rebord du disque ou à l’endroit désiré, puis relâchez-le doucement. Lorsque le plateau est arrêté, la touche de LECTURE/PAUSE f ne fonctionne pas et il n’est pas possible de lancer l’enregistrement. 7.
FINALISATION D'UN CD Pour qu’un CD soit considéré standard, il doit contenir une table des matières (TOC). Ce processus est connu sous le nom de finalisation. Une fois finalisé, aucune piste ne peut être enregistrée sur un disque CD-R. Cependant, même lorsque les CD-RW sont finalisés, s'il y reste de l'espace, d'autres données peuvent être ajoutées. • Vous ne pouvez pas finaliser un disque vierge.
GUIDA RAPIDA (ITALIANO) CONTENUTI DELLA CONFEZIONE Assicurarsi che gli elementi elencati di seguito siano contenuti nella confezione: prima di utilizzare il giradischi, allentare la "vite di trasporto" (in fondo al piatto, vicino al braccio) girandola in senso ORARIO.
Procedura di configurazione audio per Windows XP: Una volta installato EZ Converter sul computer, collegare il CD DIRECT servendosi del cavo USB in dotazione ad una porta USB disponibile del computer. 1. Selezionare il menu Start. 2. Selezionare Impostazioni e quindi Pannello di controllo. 3. Fare doppio clic sul pannello di controllo Suoni e periferiche audio. Se non compare una scelta denominata Suoni e periferiche audio, scegliere l'opzione Passa alla visualizzazione classica . 4.
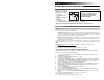
PANNELLO ANTERIORE 17 16 1 11 12 3 6 7 8 9 10 13 14 4 5 2 16 15 1. 2. 3. LCD – Mostra a display informazioni circa le funzioni del CD DIRECT. POWER ON/OFF (accensione / spegnimento) – Accende e spegne il CD DIRECT SELETTORI MODALITÀ DI RIPRODUZIONE – Seleziona il formato che si desidera utilizzare. Premere questo pulsante per girare tra una funzione e l'altra e impostare il CD DIRECT in modalità giradischi (PHONO), jack LINE IN (AUX), computer (USB), o lettore CD (CD). 4.
PANNELLO POSTERIORE 4 1 1. 2. 3. 4. 2 3 PORTA USB – Collegare un cavo USB dal CD DIRECT al computer per registrare o ascoltare audio. GAIN ADJUSTMENT (regolazione del guadagno) – Prima di registrare tramite un collegamento USB, servirsi di questa manopola per regolare il guadagno della registrazione. Il livello deve essere sufficientemente alto da impedire che la parte più rumorosa della canzone non provochi distorsione o "taglio".
REGISTRAZIONE Registrazione di audio dal giradischi o da fonti AUX sul registratore CD: 1. 2. 3. 4. Premere il tasto PHONO/AUX/USB ripetutamente per selezionare quale fonte registrare, PHONO o AUX. Premere il tasto OPEN/CLOSE e collocare un disco CD-R registrabile o CD-RW nel vassoio porta-disco con il lato recante l'etichetta rivolto verso l'alto, quindi premere il tasto OPEN/CLOSE per chiudere il vassoio stesso.
6. Preparare la fonte di registrazione. Per registrare da un disco: Assicurarsi che il coperchio bianco di protezione sia stato rimosso dalla puntina del giradischi. Quindi portare il braccio sul bordo del disco o in una posizione specifica sul disco e abbassarlo lentamente. Quando il giradischi è fermo, il tasto PLAY/PAUSE f non funzionerà e non è possibile iniziare la registrazione. 7.
FINALIZZAZIONE DI UN CD Affinché un disco diventi un CD standard, deve contenere un indice (TOC). Questo procedimento è noto come finalizzazione. Una volta finalizzato, sul disco CD-R non è possibile aggiungere altre tracce. Nel caso di dischi CDRW, invece, è possibile annullare la finalizzazione e registrare altro materiale. • Non è possibile finalizzare un disco vuoto.
SCHNELLSTART-ANLEITUNG (DEUTSCH) LIEFERUMFANG Vergewissern Sie sich, dass alle hier angeführten Komponenten in der Schachtel enthalten sind: ACHTUNG: Bevor Sie den Plattenspieler, lösen Sie die "transport Schraube" (am Ende der Platte, in der Nähe der Tonarm) durch Drehen im Uhrzeigersinn.
Windows XP Audio-Setup: Sobald die EZ Converter Software auf Ihrem Computer installiert ist, verbinden Sie CD DIRECT mit dem mitgelieferten USBKabel an einen freien USB-Anschluss Ihres Computers. 1. Klicken Sie auf das Windows-Startmenü. 2. Wählen Sie Einstellungen und Systemsteuerung. 3. Doppelklicken Sie auf das Bedienfeld Sounds und Audiogeräte . Wenn Sie das Feld Sounds und Audiogeräte nicht sehen, wählen Sie Zur klassischen Ansicht wechseln. 4. Wählen Sie die Registerkarte Audio. 5.
VORDERSEITE 17 16 1 11 12 1. 2. 3. 4. 5. 6. 7. 8. 9. 10. 11. 12. 13. 14. 15. 16. 17. 3 6 7 8 9 10 13 14 4 5 2 16 15 LCD – Zeigt Informationen über die Funktionen des CD DIRECT. EIN-/AUS-SCHALTER – Schaltet CD DIRECT ein oder aus. MODUSWAHLTASTE - Wählt aus, welches Medienformat Sie verwenden.
RÜCKSEITE 4 1 1. 2. 3. 4. 2 3 USB-PORT – Um Audiodateien aufzunehmen oder wiederzugeben, verbinden Sie CD DIRECT über ein USBKabel mit dem Computer. GAIN-REGLER - Verwenden Sie diesen Regler bevor Sie über eine USB-Verbindung aufnehmen, um den Gain-Wert für die Aufnahme anzupassen. Der Pegel sollte so eingestellt werden, dass der lauteste Teil des Songs nicht verzerrt oder "clippt". AUX OUT - RCA-Audioausgänge für den Anschluss von externen Lautsprechern oder einem Verstärker.
AUFNAHME Audiodaten vom Plattenspieler oder von AUX-Quellen mit dem CD-Recorder aufnehmen: 1. 2. 3. 4. Drücken Sie wiederholt die Taste PHONO/AUX/USB, um auszuwählen, von welcher Quelle aufgezeichnet werden soll: PHONO oder AUX. Drücken Sie die Taste ÖFFNEN/SCHLIESSEN s , legen eine beschreibbare CD-R oder CD-RW-Disk mit der bedruckten Seite nach oben in das CD-Fach und drücken die Taste ÖFFNEN/SCHLIESSEN s , um das Fach zu schließen.
6. Bereiten Sie die Aufnahmequelle vor. Aufnehmen einer Schallplatte: Stellen Sie sicher, dass zuerst die weisse Schutzkappe von der Plattennadel entfernt wurde. Dann bewegen Sie den Tonarm an den Rand der Platte oder an eine bestimmte Position auf der Platte und setzen die Nadel vorsichtig auf. Solange der Plattenspieler stillsteht, funktioniert die Taste WIEDERGABE/PAUSEf nicht und Sie können folglich nicht mit der Aufnahme beginnen. 7.
1. 2. 3. 4. Drücken Sie die CD-Taste, um "CD" auszuwählen und öffnen Sie das CD-Fach, indem Sie die s -Taste drücken. Legen Sie eine noch nicht finalisierte (bespielbare) Disk in das Fach ein. Drücken Sie die Taste FINALISIEREN im Stopp-Modus. Auf dem Display erscheint "FINAL". Um den Finalisierungsprozess abzubrechen, drücken Sie die Taste STOPP. Drücken Sie die ENTER-Taste, um die Finalisierung zu starten.
SNELSTARTGIDS (NEDERLANDS) INHOUD VAN DE DOOS Controleer of de doos de onderstaande onderdelen bevat: LET OP: Draai voor het gebruik van de draaitafel de “transportschroef” (aan het uiteinde van de draaitafel, vlakbij de toonarm) RECHTSOM los.
Instelprocedure audio in Windows XP: Van zodra de EZ Converter-software op uw computer is geïnstalleerd kunt u met de meegeleverde USBkabel CD DIRECT aansluiten op een beschikbare USB-poort op uw computer. 1. Selecteer het Windows Start-menu. 2. Selecteer Instellingen en daarna Configuratiescherm. 3. Dubbelklik op het configuratiescherm Geluiden en Audioapparaten. Als u de keuze Geluiden en Audioapparaten niet kunt zien, selecteer dan de optie Omschakelen naar klassieke weergave. 4.
VOORPANEEL 17 16 1 11 12 3 6 7 8 9 10 13 14 4 5 2 16 15 1. 2. 3. LCD: Geeft informatie weer over de functies van CD DIRECT. AAN/UIT-SCHAKELAAR: zet CD DIRECT aan of uit. KEUZESCHAKELAARS AFSPEELMODUS: selecteert het mediaformaat dat u wenst te gebruiken. Druk op deze knop om te bladeren en CD DIRECT in te stellen in afspeelmodus draaitafel (PHONO), lijningang (AUX), computer (USB) of cd-speler (CD). 4.
ACHTERPANEEL 4 1 1. 2. 3. 4. 2 3 USB-POORT: sluit een USB-kabel aan van CD DIRECT naar een computer om audio op te nemen of er naar te luisteren. AANPASSEN GAIN: pas vóór opname via een USB-verbinding met deze knop de opnameversterking aan. Het niveau moet voldoende hoog zijn, zonder dat het luidste deel van het nummer vervormd raakt of 'weggeknipt' wordt. AUX UIT: RCA-audiouitgangen om aan te sluiten op externe luidsprekers of een versterker.
OPNEMEN Audio opnemen van de draaitafel of AUX-bronnen op de cd-recorder: 1. 2. 3. 4. Druk herhaaldelijk de knop PHONO/AUX/USB in om de op te nemen bron te selecteren, PHONO of AUX. Druk de knop OPENEN/SLUITEN s in en plaats een opneembare cd-r of cd-rw in de invoerlade met het bedrukte label naar boven. Druk daarna op de knop OPENEN/SLUITEN s om de invoerlade te sluiten. Opmerking: Zorg ervoor dat de indicatoren “NO TOC” en “CD-R” (of “CD-RW”) op het scherm oplichten. Anders werkt de RECORD-knop niet.
6. De opnamebron voorbereiden. Om van een vinylplaat op te nemen: Zorg ervoor dat eerst het witte beschermkapje van de naald is verwijderd. Verplaats daarna de toonarm naar de rand van de plaat of op een bepaalde positie op de plaat en laat hem traag zakken. Zolang de draaitafel stilstaat, zal de knop AFSPELEN/PAUZEREN f niet werken en kunt u niet beginnen opnemen.
EEN CD FINALISEREN Een cd is pas een standaard-cd als hij een inhoudstafel (TOC) bevat. Dit proces staat bekend als finaliseren. Eens de cd is gefinaliseerd, kunnen er op cd-r's geen nummers meer worden opgenomen. Cd-rw's kunnen echter 'geontfinaliseerd' worden, en als er nog ruimte beschikbaar is, kunnen er bijkomende nummers op worden opgenomen. • Een lege cd kan niet worden gefinaliseerd.
TECHNICAL SPECIFICATIONS POWER OUTPUT • 2W x 2@ 4 ohm • 2" Speaker EXTERNAL CONNECTION • 1/8” (3.5mm) Phones jack • 1/8” (3.5mm) AUX In jack • RCA stereo jack • USB port POWER SUPPLY • AC Operated DIMENSIONS (WxDxH) • 15” x 14.5” x 6”; 381mm x 368mm x 152mm (with the cover closed) WEIGHT • 12.1lb (5.46kg) www.ionaudio.com/supporthome www.ionaudio.
www.ionaudio.com MANUAL VERSION 1.