
Manual


6
EDITING CONTROLS
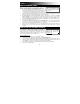
1 1 2 3 4 4 5 6 6 7 8 8 9 10 11 12 13
1. Previous/Next – Moves to the previous/next image.
2. Best View – Adjusts the image so the entire image is seen in the editing window.
3. Actual Size – Adjusts the image so it is seen at its actual size in the editing window.
4. Zoom Out/In – Zooms out of or into the image.
5. Preview Mode – Maximizes the window so you can preview the image at its largest size. Press "Esc" to
exit this mode.
6. Rotate Left/Right – Rotates the image left/right 90º.
7. Image Size – Allows you to adjust the image's dimensions.To scale the image without changing its
proportions, check the "Keep Proportion" box.
8. Undo/Redo – Cancels the last edit or redoes the edit that was just cancelled.
9. Print – Prints the image.
10. Print Preview – Previews the image to pint.
11. Save As – Allows you to save the file under a new name.
12. Save – Saves the file.
13. Delete – Deletes a file selected from the list in the left-hand pane.
14 15 16 17 22 23 24 28 29 30
18 19 20 21 25 26 27 31 32 33
14. Select – Click and drag a box around an area of the image to select it.
15. Color Adjustment – Click and drag the sliders to adjust the image's definition, brightness, contrast,
saturation, and RGB (red, green, and blue) sliders.
16. Cut – Click and drag a box around an area of the image to crop it.
17. Negative – Click to create a negative image of the original.