
Specifications


14
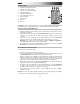
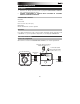
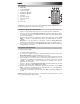
Panneau arrière
1. Link : Appuyez sur cette touche sur
les deux enceintes pour relier les
deux Flash Cube. Veuillez consulter
la section Installation >
Raccordement de deux enceintes
pour plus de détails.
2. DEL Link : Lors du raccordement de
deux Flash Cube, cette DEL clignote
sur chaque Flash Cube pendant le
processus de connexion. Une fois
raccordées, les DEL Link sur les
deux Flash Cube demeurent
allumées.
3. Connexion Bluetooth : Appuyez
cette touche pour jumeler l’enceinte
à votre périphérique Bluetooth. Pour
plus de détails, veuillez consulter la
section Installation > Connexion
d’un appareil Bluetooth.
4. DEL Bluetooth : Ce DEL clignote lors du jumelage d’un périphérique Bluetooth. Une fois
connectée, la DEL reste allumée.
5. Entrée auxiliaire : Cette entrée stéréo 3,5 mm (1/8 po) permet de brancher un lecteur
multimédia, un smartphone ou autres sources audio.
6. Câble d’alimentation : Ce câble d’alimentation est câblé au Flash Cube.
7. Évent : Cet évent permet d’ajouter un niveau accru des graves.
AUX IN
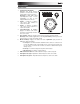
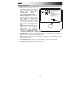
Connecting to one Flash Cube:
1. Power on Flash Cube.
2. Press and Release the Bluetooth Connect button to enter Connecting Mode.
3. Navigate to your device’s Bluetooth setup screen, nd Flash Cube, and connect.
4. To disconnect, hold the Bluetooth Connect button on Flash Cube.
Note: The Bluetooth LED will be blinking if not yet connected.
Once connected, the LED will be solid.
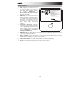
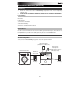
Linking two Flash Cube units:
1. Power on each Flash Cube.
2. If necessary, disconnect previous Bluetooth connections by holding down
the Bluetooth Connect button for 3 seconds.
3. Press and Release the Link button on each Flash Cube.
4. Press and Release the Bluetooth Connect button on the Flash Cube
that you want to be the "master" (left channel).
5. Navigate to your device’s Bluetooth setup screen, nd Flash Cube, and connect.
The speakers will relink automatically the next time they are both powered on.
6. To disconnect linking, hold the Link button on the
“master” Flash Cube for 5 seconds.
For detailed instructions, please see the included Quickstart Guide.
1
23456
8
9
5
6
7
1
2
4
7
3