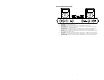
Quick Start Owner’s Manual BOX CONTENTS • iDJ • POWER SUPPLY • (2) iPod® DOCKING ADAPTERS Manual de inicio rápido para el usuario (ESPAÑOL) CONTENIDO DE LA CAJA • iDJ • FUENTE DE ALIMENTACIÓN • (2) ADAPTADOERS DE ACOPLAMIENTO iPod® Kurzbedienungsanleitung (DEUTSCH) INHALT DER VERPACKUNG • iDJ • NETZTEIL • (2) iPod® DOCK ADAPTER Manuel d’utilisation du propriétaire (FRANÇAIS) CONTENU • • • DE LA BOÎTE iDJ BLOC D’ALIMENTATION (2) ADAPTATEURS POUR SOCLE iPod® Manuale rapido di utilizzazione (ITALIANO) CON
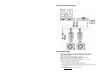
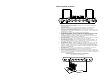
Quick Connection Diagram Quick Setup Guide 1. 2. 3. 4. 5. 6. 7. 8. 9. Make sure all items listed on the front of this guide are included in the box. READ SAFETY INSTRUCTION BOOKLET BEFORE USING THE PRODUCT Study this setup diagram. Place the mixer in an appropriate position for operation. Make sure all devices are turned off and all faders are at zero. Connect all input sources as indicated in the diagram. Connect the outputs to the power amplifier(s), monitors and/or projectors.
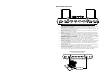
Rear Panel Overview 1. 2. 3. 4. 5. 6. 7. 8. 9. 10. Power Jack and Power Switch: Always use the included power adapter with your product. USB 2.0 Connection to iPOD: This connection is used to access information on the respective iPod. The iDJ does not need to be powered on to use the USB 2.0 connection. See computer data connection diagram below. Phono/Line Switch: Each respective line input has the option of using a Line Level input or a Phono level input used for turntables.
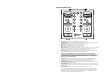
Top Panel Overview 1. 2. 3. 4. 5. 6. 7. 8. Play/Pause: This button plays and pauses music from the iPod. Control Wheel**: This control duplicates the functionality of the control wheel on the iPod. Previous Track: This button selects the previous track on the iPod. Enter**: This duplicates the “Enter” button on the iPod. Next Track: This button goes to the next track on the iPod. Menu**: This duplicates the “Menu” button on the iPod. Input Selector: This toggles what input source is routed to the channel.
Front Panel Overview 1. 2. 3. 4. 5. 6. 7. MIC Input: 1/4” microphone input. MIC GAIN: This knob controls the level of the microphone into the mixer. MIC TONE: This knob controls the tone of the microphone. Use this control to improve sound quality and to eliminate feedback. FADERSTART: In the ON position, the crossfader activates the PLAY and PAUSE function between one or two iPods (the iPod(s) must be connected via the docking connector).
Troubleshooting Guide 1. 2. 3. 4. 5. 6. 7. 8. 9. I can’t hear any audio. a. Check to make sure that your source device (iPod, Turntable, CD Player) is playing. b. Check to make sure that your INPUT SELECTOR SWITCH (top panel #7) is set to the appropriate setting (iPod or Phono/Line) c. Move the Crossfader (top panel #9) to the middle d. Move both LINE FADERS (top panel #10) to 70% or 75% of the way up. e. Make sure that your CUE MIX switch (Front Panel #5) is set to MIX f.
Diagrama de conexión rápida CD Burner OR OR Guía de instalación rápida 1. 2. Asegúrese que todos los artículos incluidos al inicio de este manual estén incluidos en la caja. LEA EL FOLLETO DE INSTRUCCIONES DE SEGURIDAD ANTES DE UTILIZAR EL PRODUCTO. 3. Estudie este diagrama de instalación. 4. Coloque el mezclador en una posición adecuada para su funcionamiento. 5. Asegúrese que todos los dispositivos estén apagados y que todos los faders estén en la posición «cero». 6.
Vista del panel posterior 1. 2. 3. 4. 5. 6. 7. 8. 9. 10. Enchufe e interruptor de encendido: Use siempre con este producto el adaptador de alimentación incluido. Conectores USB: Cada conector USB se usa para acceder a la información del iPod respectivo. Vea más abajo el diagrama de conexión de datos de la computadora.
Vista del panel superior 1. 2. 3. 4. 5. 6. 7. 8. 9. 10. 11. 12. 13. Reproducción/Pausa: Este botón permite reproducir y hacer pausas en la música proveniente del iPod. Rueda de control**: Este control duplica la función de la rueda de control del iPod. Pista anterior: Este botón selecciona la pista anterior del iPod. Entrar**: Duplica el botón “Enter” del iPod. Pista siguiente: Este botón avanza a la pista siguiente del iPod. Menú**: Duplica el botón “Menu” del iPod.
Vista del panel frontal 1. 2. 3. 4. 5. 6. 7. Entrada “Mic”: Entrada de micrófono. Ganancia de micrófono: Esta perilla controla el nivel de micrófono en el mezclador. Tono de micrófono: Esta perilla ajusta el volumen del micrófono. Use este control para mejorar la calidad sonora y eliminar la realimentación. Arranque del fader: En la posición ON, moviendo el crossfader a cada extremo arranca automáticamente el iPod de dicho extremo. (El o los iPod se deben conectar mediante el conector de acoplamiento).
Guía de solución de problemas 1. 2. 3. 4. 5. 6. 7. 8. 9. No puedo oír ningún audio. a. Revise para asegurarse que su dispositivo fuente (iPod, giradiscos, reproductor de CD) esté reproduciendo. b. Revise para asegurarse de que su CONMUTADOR SELECTOR DE ENTRADA (panel superior, Nº 7) esté en la posición apropiada (iPod o Phono/Line) c. Mueva el crossfader (panel superior, Nº 9) a la posición central d. Mueva ambos FADERS DE LÍNEA (panel superior, Nº#10) al 70% o 15% del recorrido hacia arriba. e.
Anschlussübersicht CD Brenner ODER ODER ODER Aufbauanleitung 1. Überprüfen Sie, dass sich alle auf dem Deckblatt der Anleitung genannten Bestandteile in der Verpackung befinden. LESEN SIE DIE SICHERHEITSHINWEISE, BEVOR SIE DIESES PRODUKT VERWENDEN Sehen Sie sich die Aufbauabbildung an. Stellen Sie den Mixer in einer für den Betrieb geeigneten Position auf. Vergewissern Sie sich, dass alle Geräte ausgeschaltet sind und dass alle Fader auf “Null” stehen. 6.
Anschlüsse der Rückseite 1. 2. 3. 4. 5. 6. 7. 8. 9. 10. Netzbuchse und Netzschalter: Benutzen Sie zum Betrieb des Produktes ausschließlich das beigelegte Netzteil. USB Anschlüsse: Jeder USB Port wird verwendet, um auf die Informationen des jeweiligen iPods zuzugreifen. Beachten Sie das untere Computer Aufbaudiagramm.
Bedienelemente der Oberseite 1. 2. 3. 4. 5. 6. 7. 8. Play/Pause: Dieser Button startet und stoppt die Wiedergabe des iPods. Control Rad**: Dieses Element dupliziert die Funktionsweise des Click Wheels des iPods. Vorheriger Track: Dieser Button wählt den vorherigen Track des iPods aus. Enter**: Dieser Button dupliziert die Funktionsweise des “Enter” Buttons am iPod. Nächster Track: Mit diesem Button wählen Sie den nächsten Track des iPods an.
Bedienelemente der Voderseite 1. 2. 3. 4. 5. 6. 7. Mic Eingang: Mikrofoneingang. Mic Gain: Dieser Regler justiert den Mikrofonpegel zum Mixer. Mic Tone: Hiermit regeln Sie den Klang des Mikrofons. Verwenden Sie ihn, um den Klang zu verbessern und um Rückkopplungen des Mikrofons zu vermeiden. Fader Start: In der ON Position bewirkt diese Funktion, dass beim Bewegen des Crossfaders zu einer Seite automatisch der betreffende iPod mit der Wiedergabe beginnt.
Fehlerhilfe 1. 2. 3. 4. 5. 6. 7. 8. 9. Ich höre kein Audiosignal. a. Überprüfen Sie, ob die Signalquelle wiedergibt (iPod, Schallplattenspieler, CD Player). b. Überprüfen Sie, dass der INPUT SELECTOR SWITCH (Oberseite #7) auf die richtige Signalquelle (iPod oder Phono/Line) gesetzt ist. c. Bewegen Sie den Crossfader (Oberseite #9) in die Mitte d. Schieben Sie beide LINE FADER (Oberseite #10) auf 70% des Regelwegs. e. Überprüfen Sie, dass der CUE MIX Schalter (Vorderseite #5) auf MIX steht f.
Schéma de connexion Graveur CD OU OU OU Guide d'installation rapide 1. Assurez-vous que tous les articles énumérés sur la page couverture de ce guide sont inclus dans la boîte. VEUILLEZ LIRE LE LIVRET DES CONSIGNES DE SÉCURITÉ AVANT D'UTILISER LE PRODUIT. Examinez bien le schéma d'installation. Placez la console de mixage en position de fonctionnement. Assurez-vous que tous les appareils sont hors tension et que tous les atténuateurs sont réglés à « zéro ». 6.
Caractéristiques du panneau arrière 1. 2. 3. 4. 5. 6. 7. 8. 9. 10. Prise et interrupteur d’alimentation : N’utilisez que l’adaptateur fourni avec le produit. Prises USB : Chaque prise USB permet d'accéder les données sur le iPod respectif. Examiner le schéma d’installation ci-dessus pour effectuer le branchement à un ordinateur. Sélecteur Phono/Ligne : Ce sélecteur permet de choisir entre une entrée niveau ligne pour un lecteur de disques compacts ou une entrée phono pour un tourne-disque.
Caractéristique du panneau supérieur 1. 2. 3. 4. 5. 6. 7. 8. 9. 10. 11. 12. 13. Touche de Lecture/Pause : Cette touche permet de faire la lecture ou la pause de la musique du iPod. Molette de commande** : Cette commande permet de reproduire la fonction de la molette du iPod. Piste précédente : Cette touche permet de sélectionner la piste précédente du iPod. Touche Retour (Enter)** : Cette touche reproduit la fonction de la touche Retour (Enter) du iPod.
Caractéristiques du panneau avant 1. 2. 3. 4. 5. 6. 7. Entrée micro : Entrée microphone. Gain du micro : Ce bouton permet de régler le niveau du microphone entrant dans la console de mixage. Tonalité du micro : Ce contrôle permet le réglage de la tonalité du microphone. Utilisez ce contrôle pour améliorer la qualité sonore et pour éliminer l’effet Larsen. Commande à distance : Activée, cette fonction permet d'actionner le iPod relié à l'une ou à l'autre extrémité du crossfader.
Guide de dépannage 1. 2. 3. 4. 5. 6. 7. 8. 9. Je n'étends aucun signal audio. a. Assurez-vous que l’appareil source (iPod, tourne-disque, lecteur de disques compacts) est en cours de lecture. b. Assurez-vous que le commutateur du sélecteur d’entrée (nº 7 du panneau supérieur) est réglé à la position appropriée pour l'appareil source (iPod ou Phono/Line). c. Déplacez le crossfader (nº 9 du panneau supérieur ) au milieu. d.
Schema rapido dei collegamenti Masterizzatore O O O Guida di impostazione rapida 1. Verificare che tutti gli elementi elencati sul frontespizio di questa guida siano inclusi nella confezione. PRIMA DI UTILIZZARE IL PRODOTTO LEGGERE IL LIBRETTO DELLE ISTRUZIONI DI SICUREZZA 3. Esaminare attentamente lo schema di montaggio. 4. Posizionare il mixer in maniera adeguata all’uso. 5. Assicurarsi che tutti i dispositivi siano spenti e che tutti i fader si trovino su zero. 6.
Pannello posteriore 1. 2. 3. 4. 5. 6. 7. 8. 9. 10. Jack e interruttore di alimentazione: servirsi sempre dell’adattatore di alimentazione in dotazione con il prodotto. Jack USB: ognuno dei jack USB serve per l’accesso alle informazioni del rispettivo iPod. Vedi lo schema sottostante di collegamento dati del computer. Interruttore Phono/Linea: servirsi di questo interruttore per scegliere tra un ingresso a livello di linea (un lettore CD ad esempio) o uno a livello phono quale quello di un giradischi.
Pannello superiore 1. 2. 3. 4. 5. 6. 7. 8. Play/Pause: questo tasto riproduce e interrompe momentaneamente la riproduzione di musica dall’iPod. Rotella di controllo**: questo comando duplica la funzione della rotella di controllo dell’iPod. Traccia precedente: questo tasto seleziona la traccia precedente sull’iPod. Invio (Enter)**: duplica il tasto “Enter” dell’iPod. Traccia successiva: questo tasto passa alla traccia successiva dell’iPod. Menu**: duplica il tasto “Menu” dell’iPod.
Pannello anteriore 1. 2. 3. 4. 5. 6. 7. Ingresso mic: ingresso microfono. Mic Gain: questa manopola regola il livello del microfono nel mixer. Mic Tone: questa manopola regola il tono del microfono. Servirsi di questo comando per migliorare la qualità del suono e per eliminare risposta. Fader Start: su ON, spostando il crossfader a ciascun capo inizierà a riprodurre automaticamente l’iPod situato a quel capo. (L’iPod (o gli iPod) deve essere collegato tramite il connettore docking).
Guida per la risoluzione di problemi 1. 2. 3. 4. 5. 6. 7. 8. 9. Non percepisco alcun audio. a. Assicurarsi che il dispositivo sorgente (iPod, giradischi,lettore CD) stia suonando. b. Assicurarsi di aver impostato l’INTERRUTTORE SELETTORE D’INGRESSI (pannello superiore #7) correttamente (iPod o Phono/Linea) c. Spostare il Crossfader (pannello superiore #9) al centro d. Spostare entrambi i FADER DI LINEA (pannello superiore #10) al 70% o a ¾ verso l’alto. e.
This page intentionally left blank.
Specifications Product Dimensions (including knobs): 11.5” x 10.75” x 2.5” (29cm x 27cm x 6cm) Power Adapter: • AC-AC Class 2 Transformer • Input: 120VAC 60Hz 32.4W • Output: 9V AC 2800mA Weight: • • iDJ: 4.5lbs (2Kg) Power Adapter: 1.5lbs (0.7Kg) Inputs: • • • • 2 2 1 2 Outputs: • • • • • Master RCA Line Level (Record) RCA 1/8” Headphone (mini jack) 1/4” Headphone 1 S-Video Output MISC: • • 2 USB 2.0 data connection ports to each iPod Docking Connector Kensington Security Lock compatible.