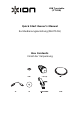
USB Turntable (iTTUSB) Quick Start Owner’s Manual Kurzbedienungsanleitung(DEUTSCH) Box Contents Inhalt der Verpackung
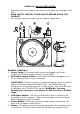
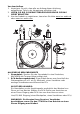
(ENGLISH) QUICK START GUIDE o o o Make sure all items listed on the front of this guide are included in the box. READ SAFETY INSTRUCTION BOOKLET BEFORE USING THE PRODUCT Go to http://www.ion-audio.com for product registration. GENERAL CONTROLS 1. Power Cable: This power cable should be plugged into a wall receptacle AFTER all audio connections are made. 2. RCA Audio Output Cables: These cables should be plugged into a CD or Auxiliary input on your computer. 3. 4. 5.
underneath the platter. See SETUP INSTRUCTIONS for detailed information on installing the Motor Drive Belt. 6. Start/Stop Buttons: These buttons start and stop the turntable motor. Both buttons have the same function. If they seem to not be functioning, check to make sure that the Motor Drive Belt is properly installed in the SETUP INSTRUCTIONS. 7. 1/8” Stereo Line Input: Connect Tape Players, Reel to Reel, or any other audio source here. This signal is sent to the computer through the USB.
with a variety of standard cartridges. Be sure to remove the clear plastic cover before operating the turntable from the cartridge.
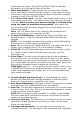
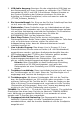
1. 2. 3. 4. Begin by rotating the counterweight clockwise until it is in the complete forward position (NOTE: this is also the maximum amount of pressure that can be applied to the cartridge.) Now there should be a feeling of weight and resistance when the head shell is raised and lowered. Begin rotating the counterweight counterclockwise (away from the pivot point) until the weight and resistance feeling is gone.
Setting the Anti-Skate Adjustment In most cases, the Anti-Skate should be set to its minimum setting. AntiSkate compensates for inward tracking forces that occur with certain cartridges when the stylus nears the center of the record. If the turntable is experiencing excessive skipping during back-cueing and scratching while nearing the center spindle, try increasing the Anti-Skate in the increments indicated on the dial.
Vor dem Aufbau 1. Versichern Sie sich, dass alle am Anfang dieser Anleitung aufgeführten Teile in der Verpackung enthalten sind. 2. LESEN SIE DIE SICHERHEITSBROSCHÜRE BEVOR SIE DAS GERÄT BENUTZEN 3. Um das Produkt zu registrieren, besuchen Sie bitte www.ion-audio.de oder www.ion-audio.com ALLGEMEINE BEDIENELEMENTE 1. Stromkabel: Stecken Sie das Stromkabel in eine Steckdose, NACHDEM alle Tonanschlüsse erfolgt sind. 2. RCA-Audioausgabekabel: Diese Kabel dienen zum Anschluß des Plattenspielers an z.B.
3. 4. USB Audio Ausgang: Benutzen Sie das mitgelieferte USB Kabel um den Plattenspieler mit ihrem Computer zu verbinden. Der iTTUSB ist kompatibel zu USB 1 und USB 2 Anschlüssen. Weitere Hinweise zu den System Einstellung der Software entnehmen Sie bitte der Anleitung zur Software Installation (online auf www.ion-audio.de „iTTUSB_Software_Audacity“) Ein/Ausschaltknopf: Der Ring um den Ein/Aus-Schaltknopf leuchtet rot auf, wenn der Plattenspieler eingeschaltet ist. 5.
12. Anti-Skate-Einstellung: Dieser Drehknopf dient zum Ausgleich der nach innen gerichteten Kräfte des Tonarms. Für weitere Einzelheiten, lesen Sie bitte im Abschnitt TONARM-AUFBAU nach. 13. Arm-Clip: Dieser speziell entworfene Arm-Clip sichert den Tonarm während Pausen und bei Nichtgebrauch. Der Arm-Clip wurde so entworfen, dass er in der aufrechten Stellung verbleibt solang er geöffnet ist.
AUFBAU DES PLATTENTELLERS
2. 3. 4. zugleich der größtmögliche Druck, der auf das Tonabnehmersystem ausgeübt werden kann.) Sie sollten nun Gewicht und Widerstand fühlen können, wenn der Tonarm angehoben und abgesenkt wird. Fangen Sie nun an, das Gegengewicht gegen den Uhrzeigersinn (weg vom Schwenkpunkt) so lange zu drehen, bis das Gefühl von Gewicht und Widerstand nicht mehr wahrzunehmen ist.
Spezifikationen (iTTUSB) Anleitungsversion: 1.