
Operation Manual


3
Quickstart Guide (English)
Support
For product registration, visit the ION website: ionaudio.com
For the latest information about this product, visit
ionaudio.com/partyrockerlive
For additional product support, visit ionaudio.com/support
For safety/warranty information, visit ionaudio.com/warranty
WARNING: DO NOT splash or immerse in water or other liquids.
Not for use in rain. Use only in dry locations.
WARNING: DO NOT look directly into the dome light.
Do not sit, stand, or apply pressure on the dome light.
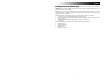
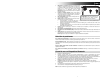
Quick Setup / Connection Diagram
1. Make sure all items listed in Box Contents at the beginning of this guide are included in the box.
2. READ SAFETY INSTRUCTION BOOKLET BEFORE USING THE PRODUCT.
3. For optimal performance, place Party Rocker Live in the center of the room so it is unobstructed by walls,
furniture, etc.
4. Move Light Mode switch to OFF.
5. Turn down the Master Volume on the Party Rocker Live.
6. Turn on Party Rocker Live.
7. Connect your music player with an audio cable or Bluetooth. (see Connecting with a Bluetooth Device for more
details on this)
8. Adjust the volume on your music player and on Party Rocker Live as needed.
9. Adjust the Light Mode switch on Party Rocker Live as needed.
10. Turn off Party Rocker Live when not in use.
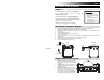
Diagram and Parts Description
1. Microphone Input with Volume Control
(1/4"): This mono input accepts a 1/4" input
such as a microphone, guitar, or other musical
instrument.
2. Auxiliary input: This stereo 1/8” input can be
used to connect a smartphone, MP3 player, or
other audio source.
3. Bluetooth: The Paired LED will be lit when a
device is paired to Party Rocker Live. This
LED will not be lit when Party Rocker Live is
first powered on (unless it was previously
paired with a device). Press the Disconnect
button to disconnect a paired Bluetooth device.
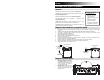
BOX CONTENTS
Party Rocker Live
Microphone with mic cable
Audio Cable with 1/8” (3.5mm)
connectors
Power Cable (standard IEC)
Quickstart Guide
Safety Instructions & Warranty
Information Booklet
TOP PANEL
MICROPHONE
MP3 PLAYER
(not included)
MICROPHONE
REAR PANEL
POWER
1
2
3
4
5
6
7