
Audio USB Turntable Quick Start Owner's Manual

(ENGLISH) QUICK START GUIDE
o Make sure all items listed on the front of this guide are included in the box.
o READ SAFETY INSTRUCTION BOOKLET BEFORE USING THE PRODUCT
o Go to http://www.ion-audio.com for product registration.
INTRODUCTION
The USB turntable connects directly to your computer to turn your treasured vinyl recordings into digital music. We
have included two software packages to aid you in converting your vinyl recordings:
EZ Vinyl/Tape Converter (PC only) is the quickest and easiest way to turn your recordings into digital media.
EZ Vinyl/Tape Converter conveniently saves your recordings in your iTunes library. Novice users may find this
application preferable. We have included a handy Quickstart Guide with step-by-step instructions on software
installation and operation.
EZ Audio Converter (Mac only) is a basic converter application for Mac OS X and is ideal for novice users.
Please refer to the included Software Quickstart Guide for step-by-step instructions on software installation and
operation.
To install the software: simply insert the included CD into your computer and follow the on-screen instructions. After
you finish converting your vinyl, you can then burn to CD or load onto portable media devices.
* iTunes and iPod are trademarks of Apple, Inc., registered in the U.S.A. and other countries.
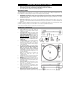
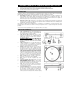
GENERAL CONTROLS
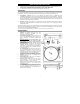
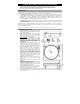
1. Power Cable: This power cable should be
plugged into a wall receptacle AFTER all audio
connections are made.
2. RCA Audio Output Cables: These cables should
be plugged into a CD or Auxiliary LINE input. This
output should be connected to your receiver, home
stereo, or other speaker system.
IMPORTANT WARNING: The RCA cables are
LINE level. Please only connect these cables
to LINE level inputs. You may damage your
receiver if you plug in a LINE level into a
PHONO input.
3. USB Audio Output: Use the included USB Cable
to connect your turntable to your computer. For
transferring your vinyl records to your computer,
we have provided two different software packages
on the included CD.
4. 1/8” Stereo Line Input: Connect Tape Players,
Reel to Reel, or any other audio source here. This
signal is sent to the computer through the USB.
Make sure that your phono cartridge is
installed while using this input for maximum
sound quality. Also make sure that your RCA
jacks are either plugged into an input device or not
in contact with metal.
Note: The 1/8" audio input is not routed to the
turntable's RCA output jacks, only to your
computer via USB.
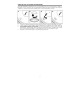
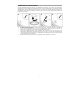
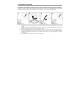
5. Tonearm: The tonearm can be raised and lowered
by hand, or by pressing the Raise/Lower button.
6. Platter: Put the record you would like to play on
this platter.
7. 45 RPM Adapter Holder: Holds the included 45
RPM adapter. When not using the adapter, please
place it in this holder.
8. Raise/Lower Button: Press this button in to raise
the tonearm. To lower the tonearm, press this
button so it is in the out position.
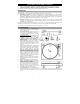
9. Stop: Press this button to stop playback. When
this button is pressed, the tonearm will return back
to its original resting position.
10. Speed 33/45 RPM: This button controls the
playback speed of the record. Depending on what
kind of record you are playing, you will need to
adjust the speed to match the speed of the record (or else the music might sound too slow or too fast).