
User's Manual
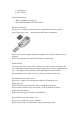


Step 1: Plug the dongle receiver into your computer. For the best performance, please
plug the dongle receiver into the front USB port of your computer, or use the
USB extension cable to place the dongle receiver 20cm away from monitor,
speaker, power supply, USB hub and other RF interference sources.
Step 2: Press the connect button on the dongle receiver. The LED will start to blink.
Step 3: Press the connect button on the bottom of the Wireless Mouse within 8
seconds after Step 2.
Step 4: The LED on the dongle receiver will blink faster for few seconds. This means
that ID setting is completed.
Note: If the Wireless Mouse does not work properly, please go back to step 2.
Reminder: For optimal performance, please plug the dongle receiver into the front
USB port of your computer, or use the USB extension cable to place the dongle
receiver 20cm away from monitor, speaker, power supply, USB hub and other RF
interference sources.
Note: You can turn off the mouse manually if you don’t use this mouse for long period
of time. To turn the mouse off, please press the connect button of the mouse for 10
seconds. To turn the mouse on, just press the connect button of the mouse.
Now, Enjoy and Have a Fun!!!
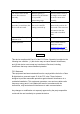
TROUBLE SHOOTING GUIDE
Symptom Possible Reason Remedy
The LED of dongle receiver
does not light or blink when
the mouse is moving.
The ID is lost or the
distance is beyond RF
transmitting range
Follow the above ID
setting procedure, or move
the mouse closer to the
dongle receiver until the
LED blinks, when you