
User's Manual


Step4:Navigate to the Folder to which you extracted the zip-file and double-click the
icon or execute the .exe file to install the software.
Step5: Select the interface.
Step6: Follow the steps to complete the installation.
Note: If you still have problems with this program, please read the “help”-files or
contact us at ione@ione.com.tw or support@itron-europe.com
ID Setting
The product has been pre-set, mouse and receiver are already paired. It is not
necessary to do the ID setting when you use the mouse for the first time. However,
the connection may be lost due to RF interference of environment. Hence, it may
be necessary to re-set the connection-ID. Please follow the process below for the
ID setting.
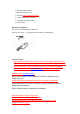
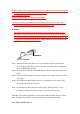
Step 1: Plug the Mini Wireless Receiver in your computer. For best performance,
please plug the Mini Wireless Receiver in the front USB port of computer or
use the USB Extension Cable.
Step 2: Press the connect button on the Mini Wireless Receiver. The LED will start to
blink.
Step 3: Press the connect button on the back of the Wireless Mouse within 8 seconds
after Step 2.
Step 4: The LED on the Mini Wireless Receiver will blink faster for a while. This
means that ID setting is completed.
Note: 1. If the Wireless Mouse does not work properly, please go back to step 2.
2. If the ID is used by other users or devices, please go back to step 2.
Reminder: For optimal performance, please place the Mini Wireless Receiver 20cm
away from other electrical devices such as computer monitors and speakers.
Now, Enjoy and Have Fun !!!