
User's Manual


20
numbers by 60. For example, N47.53 can be changed to N47º31'48”: 47.53º = 47º +0.53º,
0.53º=0.53x60'=31.8', 0.8'=0.8x60"=48". Therefore, 47.53º=47º31'48" or 47d31m48s.
Select N/S Hemisphere
The northern/southern hemisphere will be determined by your latitude coordinate, with one exception. If
your are near the equator (within +/- 10°), you can choose your own N/S setting.
If the polar axis is aligned to the North Celestial Pole, then set the mount to Northern Hemisphere. If the
polar axis is pointing to the South Celestial Pole, set the mount to Southern Hemisphere. Press the ◄
or ► key to move the cursor and use the ▲ or ▼ key to toggle between “Northern Hemisphere” and
“Southern Hemisphere”.
The time and site information will be stored inside the hand controller’s memory chip. If you are not
traveling to another observation site, they do not need to be changed.
Check the Hand Controller Battery
The hand controller has a real time clock (RTC) which should display the correct time every time the
mount is turned on. If the time is incorrect, please check the battery inside the hand controller and
replace it if required. The battery is a 3V, CR1220 button battery.
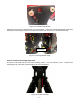
STEP 11. Set the Zero Position
Zero Position is the mount starting reference point which ensures the GOTO performance. Press
MENU => “Zero Position” => “Search Zero Position” to let the mount search the Zero Position.
Follow the instruction on hand controller display to adjust the Zero Position if RA or DEC is not aligned.
Or press MENU => “Zero Position” => “Set Zero Position”, to manually set the mount to Zero
Position. Loosen the DEC and R.A. Gear Switches in turn to adjust the mount to the Zero Position.
Engage the clutches after each adjustment.
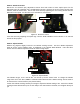
STEP 12. Perform Polar Alignment
Polar Alignment with iPolar Electronic Polar Scope
CEM40 & CEM40EC are equipped with an iPolar
TM
electronic polar scope. To perform polar alignment,
please refer to Appendix C. It is simple and fast, even the pole star or part of the sky is blocked. Steps
are briefly outlined below:
Download and install iPolar Software (first time use)
Connect a USB cable between the iPolar port on the mount and a computer USB port
Calibrate the iPolar Rotation Center (first time use)
Start polar alignment by following on screen instructions
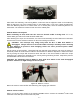
Quick Polar Alignment
If the mount equipped with a AccuAlign
TM
optical polar scope, you can use ths Quick Polar Alignment
procedure to perform the polar alignment. One of the CEM40’s unique features is that the polar scope
can be used at anytime as it is not blocked by DEC axle as is the case in a German Equatorial Mount.
This makes it possible to adjust the polar alignment while the mount is tracking.
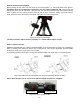
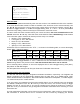
As indicated in Figure 25, the Polar Scope reticle has been divided into 12 hours along the angular
direction with 20-minute tics. There are 6 concentric circles in 2 groups of 3 marked from 36’ to 44’ and
60’ to 70’, respectively. The 36’ to 44’ concentric circles are used for polar alignment in the Northern
Hemisphere using Polaris, while the 60’ to 70’ circles are used for polar alignment in Southern
Hemisphere using Sigma Octantis.