
User's Manual


31
Select “Add a New Object”. A screen will be displayed asking you to Enter R.A. and DEC
coordinates:
You may enter the R.A. and DEC coordinates of the object you want to store, and press ENTER to
confirm.
A more useful application of this function is to store your favorite viewing objects before heading to
the field. When the “Enter R.A. and DEC” screen appears, press the MENU button. It brings up the
catalogs that you can select the object from. Follow the screen instructions to add your favorite objects.
Press BACK button to go back one level.
Press the BACK button to go back to the object entry submenu. You may review the records or
delete those that are no longer wanted. Press the BACK button to finish the operation. Now you can slew to
your favorite stars from “Custom Objects” catalog using “Select and Slew.”
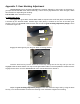
5.8. Firmware Information
This option will display the mount type, firmware version information for the hand controller (HC),
R.A. board (RA), and DEC board (DEC).
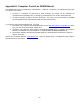
5.9. Zero Position
5.9.1. Goto Zero Position
This moves your telescope to its Zero Position. When the power is turned on, the mount assumes
the Zero Position. This is the reference point for alignment and GoTo functions.
5.9.2. Set Zero Position
This set the Zero Position for the firmware.
The Zero Position reference will be an undefined value before the first time power on the mount,
after firmware upgrade, or HC battery replacement. You can use this function to set the zero position
reference.
Press the ENTER after moving the mount to Zero Position either manually or with the hand
controller.
Enter R.A. and DEC
R.A.: 00h00m00s
DEC: +00d00m00s
Add a New Object
Browse Objects
Delete an Object
Clear All Objects