SmartStar®-E Series Mount and Telescopes (For 8500, 8502, 8503 and 8504) Instruction Manual
Table of Content Table of Content .............................................................................................................. 2 1. SmarStar®-E Series Overview ..................................................................................... 4 1.1. SmartStar®-E Series Features .............................................................................. 4 1.2. Assembly Terms ................................................................................................... 6 2.
5.9. Set Telescope Coord. ......................................................................................... 20 5.10. Park Scope ....................................................................................................... 20 6. Maintenance and Servicing ....................................................................................... 21 6.1. Maintenance ....................................................................................................... 21 6.2.
1. SmarStar®-E Series Overview ® 1.1. SmartStar -E Series Features Alt-Azimuth Mount– The Cube™ The SmartStar®-E series come with our patented Alt-Azimuth (AltAzi) mount, a.k.a. The Cube™. This compact mount design is probably the most functional and flexible unit on the market. It was named “Hot Product 2008” by Sky and Telescope. Both axis motors are built into a small single unit with optical encoders which provides accurate GOTO and tracking.
Package Contents1 (1) SmartStar®-E Mount, the CubeTM (Models 8500, 8502, 8503 and 8504) (1) GOTONOVATM Hand Controller (Part No.
1.2. Assembly Terms 1. 2. 3. 4. 5. 6. 7. 8. 9.
2. Telescope Assembly Step 1. Preparing the Tripod Extend tripod legs to full extension. Step 2. Attaching the Mount Attach mount to tripod using the long bolt (#7). Slide tray on bottom of shaft. Then screw on round black knob (#9). Step 3a. Installing Batteries (not included) Note: you may use 8 AA batteries (Step 3) or the AC adaptor (Step 5) to operate the mount. Pull the batteries compartment cover (shown) open.
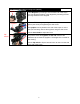
Step 5. Plug in hand controller and AC adaptor. Plug hand controller into either one of the two HBX ports on the mount. Next plug in AC adaptor. (Or use batteries—see step 3). Turn on power (the red light should go on). At this point you can begin observing manually. Use the 4 Arrow keys (▲▼◄►) to rotate the scope Up, Down, Left, and Right. Use the SPEED key to change the slew rate from the slowest (2X) to the fastest (MAX).
For 90mm Maksutov-Cassegrain (#8504)…………………………………. Diagonal Eyepiece Install Diagonal by screwing it onto the back end of the scope. You can adjust the position of the diagonal by loosening the freespinning threader on the diagonal. Install the Finderscope by sliding the dovetail plate onto the sleeve (see arrow) and tightening the side screw. The eyepiece can be placed on the end of the scope or on the side (see next step). Secure the eyepiece using the side screw.
3. GOTONOVATM 8403 Hand Controller • • • • SPEED Key: To select slew speed (2X, 8X, 64X, 256X, and MAX) Light Key(☼): Turns on/off the red LED reading light on the back of the controller. HELP Key: For help and display more information on an object. HBX (handbox) port: connect the HC to SmartStar mount using a 6-wire RJ11 cable. 3.2. The LCD Screen The 8403 hand controller consists of a large 4-line LCD screen, which displays all the information as shown in Figure 2.
2. Mount/GPS Status: display current status of the mount. If the mount equipped with an external GPS module, it also indicates GPS status, when the mount is turned on. 4.1. Level and Align the Mount • Level the mount by observing the bubble (shown) on the base of the mount by adjusting the tripod legs. The bubble should be in the center of the circle. It is also recommended to use additional levelers (such as a torpedo leveler) to assure precise leveling.
or Set local time: 2. Turn the mount power on. Press the SPEED button to select a slew speed (MAX for fast slew and 2X for fine tuning). Turn the SOUTH mark pointing to south using ► or ◄ button. An additional compass may needed. Rotate the telescope point to the zenith using ▲ or ▼ button. A torpedo level may help. Then turn the mount power off and turn it on. Or you can press MENU, scroll down to “Set Telescope Coord.”, press ENTER. The default number is “Alt: 90º00.0’ and Azi: 180º00.0’”.
time zone). Enter minutes “ahead of” or “behind” UT (universal time). The minimum time difference is 60 minutes. • • • • • after the link is established. Only Daylight Time Saving and Time Zone settings are needed. However, the local time and site info also can be manually entered in case of GPS malfunction or testing the mount inside. It is always a good idea to do your home work to get the GPS coordinates before traveling to a new observation site.
select “Select and Slew” and press ENTER. Then select a known sky object, such as Moon from “Planets, Sun, Moon” menu and press ENTER. The mount will slew to the Moon. When the mount stopped slewing, the Moon could be just inside your eyepiece or way off. Press MENU button and scroll down the menu to “Sync to Target” and press ENTER. Follow the instruction, use ◄ ► ▲ and ▼ keys to move the Moon in the center of your eyepiece and press ENTER. telescope section).
number. A check mark “√” indicates the object is above the horizon, and cross mark “X” means it is below the horizon. Only those objects above the horizon can be observed. In some catalogs, those stars below the horizon may not display. • 5.2.1. Planets, Sun, Moon It can consist up to 128 user predefined objects. These objects need to be entered before they can be selected for slewing (Refer to 5.7.1 R.A. and DEC). • Double Stars: It consists of 40 double stars. A list is attached in Appendix C.
ENTER. Enter the Name using ▼ or ▲ to select form A-Z, 0-9 and “-, space“. (such as Z0). A coordinate setting screen will show: Add a New landmark Edit One Data Delete One Data Delete All Enter Alt. Azi. Alt: 13º 0.0’ Azi: 25º58.8’ Goto Landmark: Use ▼ or ▲ button to move the cursor to “Goto Landmark” line, press ENTER. The first saved landmark will display: No: 01 Name: Z0 A 23º33.1’ Use ► or ◄ button to move the cursor, and ▼ or ▲ button to change the number. Then press ENTER.
Delete All Data LCD Back Light Use ▼ or ▲ button to move the cursor to “Delete All Data” line, and press ENTER. Press ENTER to confirm the deletion. • Press BACK to back to main menu. Keypad Backlight. Use arrow keys to adjust keypad backlight. Press ENTER. 5.4. Sync to Target This operation will match the telescope's current coordinates to Target Right Ascension and Declination. After slew to an object, move the cursor to “Sync to Target” and press ENTER. Follow the screen to do the sync.
If you have a very good initial setup, one star alignment should be sufficient for good GOTO accuracy. To increase the accuracy you may choose to do two star alignment. Use ▲ or ▼ button to select DEC., comets or asteroids. R.A. and 5.7.1. R.A. and DEC. 5.6.2. Two Star Alignment Select “R.A. and DEC.” and press ENTER, a menu like following will show: Two star alignment will increase the GOTO accuracy of the mount. It is suggested to do two star alignment after one star alignment.
Edit one data Add a new comet Edit one comet Delete one comet Reset all comets Use ▼ or ▲ button to move the cursor to “Edit one data” line, and press ENTER. A user object screen will show: Add a new comet: No: 003 The hand controller has 16 preloaded comets. Up to 64 comets can be stored in the hand controller. Name: SAO2940 R:17h30.7m D:86º58.1’ Select “Add a new comet” and press ENTER.
be compiled into the list. Up to 20 objects can be added to the watch list. position and ▲ or ▼ key change the number and press ENTER to select the object you want to edit. To setup/modify a Watch List, press MENU, use ▲ or ▼ button move the cursor to “Watch List” and press ENTER. A following screen will show: Follow the same procedure as “Add a new comet” to edit it.
month or more, it is advisable to remove the batteries from battery holder, if they are installed. Batteries left installed for prolonged periods may leak, causing damage to the telescope’s electronic circuitry. 6. Do not leave your telescope outdoors on a warm day or inside a sealed car for an extended period of time. Excessive ambient temperatures can damage the telescope’s internal lubrication and electronic circuitry. 6. Maintenance and Servicing 6.1.
• • outside in the open air instead of observing through an open or closed window or screen. 3. If viewing a land object on a warm day, heat waves distort the image. 4. The optics within the telescope need time to adjust to the outside ambient temperature to provide the sharpest image. To "cool down" the optics, set the telescope outside for 10 to 15 minutes before observing begins.
Appendix A. Technical Specifications SmartStar® GOTO Mount Mount Body Materials Motor Gear Bearing Speed GOTO System Processor Object in Database GOTO accuracy Tracking Payload Battery Power Requirement Operating Temperature Weight with tripod AltAzimuth Mount Die-cast Aluminum Dual-Axis DC Servo motor with encoders Acetal worm wheel/Nylon 6 worm gear 4 steel ball bearings Dual-Axis, 5-Gear, Electronic (2×,8×,64×,256×,MAX) GOTONOVATM 8403 32bit ARM 3,500+ 1 Arc Min.
Appendix B. GOTONOVATM 8403 HC MENU STRUCTURE MENU Select and Slew Planets, Sun, Moon Mercury Venus Mars Jupiter Saturn Uranus Neptune Sun Moon Deep Sky Objects Named Deepsky Object Messier Catalog Comets Asteroids Stars Named Stars Constellations Double Stars SAO Bright Stars User Objects Enter Position Watch List Watch List Auto Land Objects Sync.
Align One Star Align Two Star Align User Object List R.A. and DEC. Comets Asteroids Watch List Add a Watch Object Delete One Data Delete All Browse the List Set Telescope Coord.
Appendix C. GOTONOVATM Star List GOTONOVA Deep Sky Object List for 8403 ID No.
36 37 38 39 40 41 42 43 44 45 46 47 48 49 50 51 52 53 54 55 56 57 58 59 60 Lagoon Nebula Little Gem Little Gem Nebula Little Ghost Nebula North American Nebula Omega Nebula Orion Nebula Owl Nebula Pelican Nebula Phantom Streak Nebula Pinwheel Galaxy Pleiades Ring Nebula Ring Tail Galaxy Rosette Nebula Saturn Nebula Sextans B Dwarf Small Magellanic Cloud Sombrero Galaxy Spindle Galaxy Tank Track Nebula Trifid Nebula Ursa Minor Dwarf Whirlpool Galaxy Wild Duck Cluster 6523 6445 6818 6369 7000 6618 1976 3587
Messier This table is licensed under the GNU Free Documentation License.
GOTONOVA Named Star List for 8403 001 Acamar 002 Achernar 003 Acrux 004 Acubens 005 Adhafera 006 Adhara 007 Al Na’ir 008 Albali 009 Alberio 010 Alchibar 011 Alcor 012 Alcyone 013 Aldebaran 014 Alderamin 015 Alfirk 016 Algedi 017 Algenib 018 Algiebra 019 Algol 020 Algorab 021 Alhena 022 Alioth 023 Alkaid 024 Alkalurops 025 Alkes 026 Almach 027 Alnasl 028 Alnilam 029 Alnitak 030 Alphard 031 Alphecca 032 Alpheratz 033 Alrakis 034 Alrescha 035 Alshain 036 Altair 037 Altais 038 Alterf 039 Aludra 040 Alula Austra
Modern Constellations for 8403 No.
GOTONOVA Double Star List for 8403 No.
IOPTRON ONE YEAR LIMITED WARRANTY A. iOptron warrants your telescope, mount, or controller to be free from defects in materials and workmanship for one year. iOptron will repair or replace such product or part which, upon inspection by iOptron, is found to be defective in materials or workmanship. As a condition to the obligation of iOptron to repair or replace such product, the product must be returned to iOptron together with proof-of-purchase satisfactory to iOptron. B.