Auto Sense Air Vent & CD Mount i®ttie Manual • Guide • Manuale • Handbuch • Manual I I I I iOttie
· Getting Started For optimal mounting and charging, please follow the detailed instructions within this manual when using the Auto Sense Wireless Charging Mount. iOttie Is not llable for possible damages due to product misuse. Critical Information Mounting at a perpendicular angle to the mount works best with the proximity sensor. 0 If mounting at an angle, phone will need to be very close to sensor for arms to open. 0 O Smartphone cases Reflective Smartphone cases work best.
Back Vi ew At a Glance Cradle Knob ...... . Micro USB Port •···••tt Release Buttons ......... . Auto Open Side Arms Twist Lock Foot Knob CD Mount Proximity Sensor Charging Light ..... Rotating Ball Joint Adjustable Foot Dual Car Charger with Micro USB cable Bracket ................
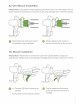
Air Vent Mount Installation Please Note: Use caution when adjusting the twist lock on air vent blade. Do not apply excessive pressure to twist lock as this may damage you r vehicle's blades. Open twist lock and push mount completely onto vent blade. Slowly tighten twist lock for a secure connection to the air vent. CD Mount Installation Please Note: Remember to remove all CDs from CD Slot before using your Auto Sense CD Mount to avoid possible damage to the product and your vehicle. A .
Adjusting the Mount 1. Foot Knob Out of box, the foot knob Is set to regular sized phones. Foot will need to be adjusted for plus sized phones or cases with thicker bottoms. Move the knob down until marking is aligned appropriately as shown In line drawing. Connecting Power 1. Plug the micro-USS cable Into the USB port on the back of the Mounting Head. 2 . Insert Car Charger into your vehicle's power port.
Using the Auto Sense Mechanism Once it Is unplugged or car Is turned off, the Auto Sense's Internal battery keeps a charge for up to one hour. Mounting and Charging 1. Side arms on mount automatically open via silent step motor for one second when phone is detected in front of Proximity Sensor on mount. 2. Once phone 1s placed in mount. arms will automatically close after one second. QI wireless charging will start immediately. Releasing Device 3 .
Qi Alignment Guide The a, Receiver Coil is usually located in the center area of the phone. Check with your phone's manufacturer for 01 coil location. Below are some examples for commonly used phones. 0 For larger/plus phones or larger cases, knob on mount will need to be adJusted as indicated by ma, king on back for proper alignment with 01 coils. 0 The QI coll on the mount Is located at the top. above the 10tt1e logo.
Wireless Charger Specifications -- INPUT DC 9.0V-1.67A DC 5.0V-2.0A CHARGING PORT MICRO USS LENGTH 2.96" WIDTH 2.75" HEIGHT 3.74" I I WEIGHT I 4.16oz - Car Charger Specifications MODEL NUMBER CHY-CC-U2CQ3C v INPUT DC 12VN24V 5V-3A OUTPUT DC DC DC MICRO USS CABLE LENGTH 9V-2A 12V - 1.5A 120MM - - Charging Indicator Solid Green Light Smartphone charging. Smartphone not charging. Blinking Red Light Foreign object detected or overheating of mount or smartphone.
FCC Part 18 Compliance This device complies with Part 18 of the FCC Rules. CAUTION: Changes or modifications not expressly approved by the party responsible for compliance could void the user's authority to operate the product. NOTE: This equipment has been tested and found to comply with the limits for a wireless power transfer, pursuant to Part 18 of the FCC Rules. These limits are designed to provide reasonable protection against harmful interference in a residential installation.
Auto Sense Sticker (ooo oQ ) Please apply the Auto Sense Sticker to Black and Matte phone cases to increase the detection zone for the Sensor. The Auto Sense sticker should be applied to the bottom of your phone and is designed for the best user experience. 0 The sticker will reflect light in a more efficient manner to activate the Proximity sensor, which helps the automatic clamp open as you move your phone towards the Auto Sense mount.
i®ttie i®ttie Read Back for Instructions