
Installation Guide
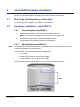
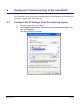
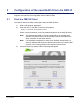
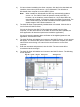
Table Of Contents
- nano3GAP Installation Manual
- 1 Introduction
- 2 Installation Requirements
- 3 nano3GAP Hardware Installation
- 4 Deployment Commissioning of the nano3GAP
- 5 Configuration of the nano3GAP-4 from the OMC-R
- 6 Troubleshooting
- 7 nano3GAP and PSU Regulatory Information
- 8 Appendices
- 8.1 Appendix A - Example AP Configuration File
- 8.2 Appendix B - Licenses and Copyright Notices
- 8.2.1 asn1c
- 8.2.2 bash
- 8.2.3 BusyBox
- 8.2.4 cramfs
- 8.2.5 dropbear
- 8.2.6 glibc
- 8.2.7 gmp
- 8.2.8 ipkg
- 8.2.9 iproute2
- 8.2.10 iptables
- 8.2.11 libcurl
- 8.2.12 libgcc
- 8.2.13 libpcap
- 8.2.14 libxml2
- 8.2.15 Linux Kernel
- 8.2.16 mtd.utils
- 8.2.17 ncurses
- 8.2.18 NTP daemon
- 8.2.19 pcre
- 8.2.20 procps
- 8.2.21 SSL Stack
- 8.2.22 StrongSwan
- 8.2.23 TCL
- 8.2.24 tcpdump
- 8.2.25 thttpd
- 8.2.26 U-Boot
- 8.2.27 zlib
- 8.2.28 General Licenses

nano3GAP Installation Manual Deployment Commissioning of the nano3GAP
© ip.access Ltd Page 11
4 Deployment Commissioning of the nano3GAP
Deployment commissioning is performed typically on site, with a provisioning laptop.
The nano3GAP-4 must be in factory reset status for the commissioning. For instructions on
performing a factory reset, see section 6.3.
4.1 Configure the IP Settings of the Provisioning Laptop
1) Open the control panel on the laptop.
2) Select Network Connections, select the relevant Local Area Connection, then
right-click Properties.
The following Dialog box appears: