
Installation Guide
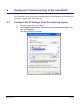
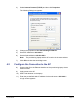
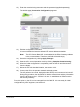
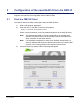
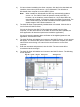
Table Of Contents
- nano3GAP Installation Manual
- 1 Introduction
- 2 Installation Requirements
- 3 nano3GAP Hardware Installation
- 4 Deployment Commissioning of the nano3GAP
- 5 Configuration of the nano3GAP-4 from the OMC-R
- 6 Troubleshooting
- 7 nano3GAP and PSU Regulatory Information
- 8 Appendices
- 8.1 Appendix A - Example AP Configuration File
- 8.2 Appendix B - Licenses and Copyright Notices
- 8.2.1 asn1c
- 8.2.2 bash
- 8.2.3 BusyBox
- 8.2.4 cramfs
- 8.2.5 dropbear
- 8.2.6 glibc
- 8.2.7 gmp
- 8.2.8 ipkg
- 8.2.9 iproute2
- 8.2.10 iptables
- 8.2.11 libcurl
- 8.2.12 libgcc
- 8.2.13 libpcap
- 8.2.14 libxml2
- 8.2.15 Linux Kernel
- 8.2.16 mtd.utils
- 8.2.17 ncurses
- 8.2.18 NTP daemon
- 8.2.19 pcre
- 8.2.20 procps
- 8.2.21 SSL Stack
- 8.2.22 StrongSwan
- 8.2.23 TCL
- 8.2.24 tcpdump
- 8.2.25 thttpd
- 8.2.26 U-Boot
- 8.2.27 zlib
- 8.2.28 General Licenses

nano3GAP Installation Manual Configuration of the nano3GAP-4 from the OMC-R
© ip.access Ltd Page 16
4) If it has not been installed on the client computer, click the link to download and
install the Java runtime (JRE version 1.5) for Windows®. This will allow a
Windows® client computer to run the OMC-R Client.
Note: When installed on Windows®, the JRE may automatically update to
version 1.6. The OMC-R Client will operate correctly with JRE 1.6.
However, do not install any version later than 1.6 (or allow JRE to be
automatically updated; for example, decline the update if prompted). The
Java Control Panel may be used to disable automatic updates and/or
disable usage of JRE versions later than 1.6.
5) The OMC-R Client is automatically installed when it is started. Click the link or
icon for Start 3G OMC-R Client.
If this is the first time the OMC-R Client has been started from this client
computer, or if the client version on the OMC-R Server has been updated, the
client application will download (which also installs the application).
If a security warning appears about verification of the digital signature for the
application, click the Run button.
6) The OMC-R Client will initialize and connect to the OMC-R Server. A login prompt
will appear. The first time the client is used from a particular computer, the User
name will be set to the log in ID used for the current session on the client
computer.
7) Enter the username and password, then click OK. The user name will be
remembered at the next login.
8) The OMC-R Client will initialize and connect to the OMC-R Server. The following
screen appears: