
User Manual


Smarter Business Communications
IP620
HD- E Q U I P P E D
E N T E R P R I S E - G R A D E
V O I C E E N D P O I N T
- 6 -
5. Inside the box
If you are removing the IP620 from its carton, you can check the contents against the following list to assure
that all parts have been received:
Item
Quantity
HD-compliant IP Speakerphone
1
HD-compliant Handset
1
1.5-meter Handset Cord
1
3-meter RJ45 cable
1
Wall Mount Template
1
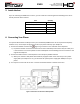
6. Connecting Your Phone
Your system administrator will likely connect your new IPitomy IP620 IP Phone to the corporate IP telephony
network. If not, use the steps and figures to connect your phone and setup your telephone.
1) Connect the Handset Cord into RJ9 [ (Figure 2)] connector on the underside of the telephone.
a) Inspect the handset cord and notice that one end has an extended portion that is flat (not coiled). This
is the end of the cord is to be placed into the molded plastic channel leading from the connector to the
edge of the telephone.
2) Connect the LAN connector to the telephone to the Telephony enabled network.
a) When your network is PoE (Power Over Ethernet) equipped it will not be necessary to use a power
supply with your telephone. If not, you will need the optional power supply (PN: PS346) to use your
phone.
3) You may also connect a PC to the “PC” connector to facilitate that PC’s network connection.
Figure 1 Connections on the back of IPitomy IP620