Installation Instruction SINGLE-HANDLE KITCHEN FAUCET Model: 7556 1
*Specify Finish 1 13 16 2 3 14 15 6 7 4 5 8 17 19 9 10 11 18 12 PART PIÈCE DESCRIPTION DESCRIPTION PART# N ° DE PIECE 1 2 3 Spray head / Cabezal del rociador Cartridge / Cartucho Bonnet / Bonete RP38120* RP20005 RP70159 4 Cap / Tapa RP80132* 5 6 7 8 9 Screw / Tornillo Handle & O-ring / Llave y aro tórico Set screw / Tornillo de fijación Handle seat / Asiento de la llave Mounting bracket / Soporte de montaje RP50015 RP13257* RP50002 RP17075* RP70244 10 Rubber washer / Arandela de go
Product Dimension Drawing 234.6mm [9.2in] 255.0mm [10.0in] 186.4mm [7.3in] 598.0mm [23.5in] 45° 23° 45° 218.7mm [8.6in] 64.5mm [2.5in] 809.8mm [31.9in] Max: 65.4mm [2.6in] 9/16-27UNS-2B 108.7mm [4.3in] 75.2mm [3.0in] 39.0mm [1.5in] 51.0mm [2.
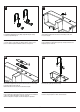
2a 1 This faucet can be installed as 4 hole installation with the escutcheon or as 2 hole installation with flange. If using flange, begin with step 2a. If using escutcheon, begin with step 2b. Optional Flange Installation Shut off water supplies. Remove old faucet. Place flange on the sink. Proceed to Step 3a. Este grifo se puede instalar con cuatro orificios con la placa ornamental o con un dos orificio con un reborde. Si utiliza un reborde, comience con el paso 2a.
3b 4 4 1 2 3 1 2 3 Optional Escutcheon Installation Insert faucet body through the hole in escutcheon. From underside, install the rubber washer (1), metal washer (2) and nut (3) onto the bolt. Firmly tighten the nut. Do not overtighten. NOTE: The mounting bracket (4) only needs to be used if installing onto a sink or countertop less than 3/4". Otherwise it can be discarded. Instalación de la Placa Ornamental Opcional Inserte el cuerpo del grifo en el orificio de la placa ornamental.
7 IMPORTANT: After installation is completed, turn on the hot and cold water supplies. Check for leaks. Pull the hose assembly out of the spout and remove the spray head by unscrewing it from the hose in a counterclockwise direction. Be sure to hold the end of the hose down into the sink and turn the faucet on to the warm position where it mixes hot and cold water. Flush the water lines for one minute. This flushes away any debris that could cause damage to internal parts. Check for leaks.
Cleaning Recommendations Today, modern sanitary and kitchen tapware, showers, accessories, washstands, tubs and consist of very different materials to comply with the needs of the market with regard to design and functionality. To avoid damage and product failures and not void Warranty please follow the below guideline. •Only use cleaning material which is explicitly provided for this type of application.
Warranty conditions General LIMITED CONSUMER Warranty is limited to products that are purchased by a consumer in the United States or Canada after November 1, 2015, and installed in either the United States or in Canada. WHO IS COVERED BY THE WARRANTY This warranty extends to the original purchaser only. This warranty is non-transferable.