
Installation Guide

Apron Front Stainless Steel Sink
Installation Instructions
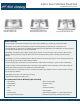
1: PREPARE THE BASE CABINET
1. Apply painter’s tape to the cabinets for marking and cutting purposes.
This will protect the cabinet from damage while cutting.
2. Mark the front apron cut out on the painter’s tape using the dimension
of the apron front.
3. Using a sharp saw blade, carefully cut the cabinet on the traced line.
IMPORTANT: The cabinet must be installed, secured, plumb, and level
BEFORE installing the sink.
IMPORTANT: IPT Sink Company recommends providing the cabinet maker with
the actual sink prior to cabinet fabrication. Before installing the sink, verify that the
distance from the top of the doors to the top of the cabinet is greater than the
apron front.
IMPORTANT: Double check the measurement of the cabinet cutout and
make any necessary adjustments by either adding ller strips or sanding the
opening.
Apron Front Stainless Steel Sink
Installation Instructions
1: PREPARE THE BASE CABINET
1. Apply painter’s tape to the cabinets for marking and cutting purposes.
This will protect the cabinet from damage while cutting.
2. Position the template (provided with your sink) on the front of the
cabinet, flush to the top and centered; secure with tape.
3. Trace the template and remove.
4. Using a sharp saw blade, carefully cut the cabinet on the traced line.
IMPORTANT: The cabinet must be installed, secured, plumb, and level
BEFORE installing the sink.
IMPORTANT: Soleil recommends providing the cabinet maker with the actual
sink prior to cabinet fabrication. Before installing the sink, verify that the
distance from the top of the doors to the top of the cabinet is greater than the
apron front.
IMPORTANT: Double check the measurement of the cabinet cutout and
make any necessary adjustments by either adding filler strips or sanding the
opening.
hts reserved.
1: PREPARE THE BASE CABINET
1. Apply painter’s tape to the cabinets for marking and cutting purposes.
This will protect the cabinet from damage while cutting.
2. Position the template (provided with your sink) on the front of the
3. Trace the template and remove.
4. Using a sharp saw blade, carefully cut the cabinet on the traced line.
IMPORTANT: The cabinet must be installed, secured, plumb, and level BEFORE
installing the sink.
IMPORTANT: Soleil recommends providing the cabinet maker with the actual
sink prior to cabinet fabrication. Before installing the sink, verify that the
distance from the top of the doors to the top of the cabinet is greater than the
apron front.
IMPORTANT: Double check the measurement of the cabinet cutout and
opening.
OUTLINE FOR APRON
FRONT SINK CUTOUT
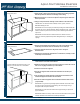
1. Cut two lengths of support framing to extend horizontally along the
inside walls on each side of the cabinet.
2. Measure and mark the support mounting locations; ensure the sink rim
will sit at or slightly below the top of the cabinet.
3. Position and level the supports.
4. Secure the supports with construction adhesive and screws (not
provided).
5. Cut (4) lengths of support framing to extend from the bottom of the
6. Secure the vertical supports with construction adhesive and screws (not
provided).
IMPORTANT: Long screws may damage adjacent cabinets. Ensure the screws
are long enough to secure the support framing, but short enough not to go
through the walls of adjacent cabinets.
IMPORTANT: A custom sink base cabinet and support framing is required for
proper installation.
IMPORTANT: Make sure the top of the sink does not extend above the top of the
cabinet; otherwise it will interfere with countertop installation.
SUPPORT FRAMING SHOULD BE RECESSED SO THE
SINK FITS FLUSH WITH THE TOP OF THE CABINET
3: INSTALL SUPPORT FRAMING
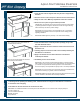
2: PREP COUNTERTOP
1. Position the template (provided with your sink) on the bottom of the
2.
measurements.
4. Following the countertop manufacturer’s instructions, carefully cut the
countertop on the traced line.
OUTLINE FOR APRON
FRONT SINK CUTOUT
Apron Front Stainless Steel Sink
Installation Instructions
Contact Soleil at (687) 445-4638 or visit www.soleilsinks.com. Copyright ©2015, Soleil Sink Company Inc. All rights reserved.
PAGE 2
2: PREP COUNTERTOP
1. Position the template (provided with your sink) on the bottom of the
countertop, flush to the front and centered; secure with tape.
2. Trace the template and remove. Dry fit the sink to verify the
measurements.
3. Following the countertop manufacturer’s instructions, carefully cut the
countertop on the traced line.
hts reserved.
1: PREPARE THE BASE CABINET
1. Apply painter’s tape to the cabinets for marking and cutting purposes.
This will protect the cabinet from damage while cutting.
2. Position the template (provided with your sink) on the front of the
3. Trace the template and remove.
4. Using a sharp saw blade, carefully cut the cabinet on the traced line.
IMPORTANT: The cabinet must be installed, secured, plumb, and level BEFORE
installing the sink.
IMPORTANT: Soleil recommends providing the cabinet maker with the actual
sink prior to cabinet fabrication. Before installing the sink, verify that the
distance from the top of the doors to the top of the cabinet is greater than the
apron front.
IMPORTANT: Double check the measurement of the cabinet cutout and
opening.
OUTLINE FOR APRON
FRONT SINK CUTOUT
1. Cut two lengths of support framing to extend horizontally along the
inside walls on each side of the cabinet.
2. Measure and mark the support mounting locations; ensure the sink rim
will sit at or slightly below the top of the cabinet.
3. Position and level the supports.
4. Secure the supports with construction adhesive and screws (not
provided).
5. Cut (4) lengths of support framing to extend from the bottom of the
6. Secure the vertical supports with construction adhesive and screws (not
provided).
IMPORTANT: Long screws may damage adjacent cabinets. Ensure the screws
are long enough to secure the support framing, but short enough not to go
through the walls of adjacent cabinets.
IMPORTANT: A custom sink base cabinet and support framing is required for
proper installation.
IMPORTANT: Make sure the top of the sink does not extend above the top of the
cabinet; otherwise it will interfere with countertop installation.
SUPPORT FRAMING SHOULD BE RECESSED SO THE
SINK FITS FLUSH WITH THE TOP OF THE CABINET
3: INSTALL SUPPORT FRAMING
2: PREP COUNTERTOP
1. Position the template (provided with your sink) on the bottom of the
2.
measurements.
4. Following the countertop manufacturer’s instructions, carefully cut the
countertop on the traced line.
OUTLINE FOR APRON
FRONT SINK CUTOUT
Apron Front Stainless Steel Sink
Installation Instructions
Contact Soleil at (687) 445-4638 or visit www.soleilsinks.com. Copyright ©2015, Soleil Sink Company Inc. All rights reserved.
PAGE 2
3: INSTALL SUPPORT FRAMING
1. Cut two lengths of support framing to extend horizontally along the
inside walls on each side of the cabinet.
2. Measure and mark the support mounting locations; ensure the sink rim
will sit at or slightly below the top of the cabinet.
3. Position and level the supports.
4. Secure the supports with construction adhesive and screws (not
provided).
5. Cut (4) lengths of support framing to extend from the bottom of the
horizontal supports to the floor of the cabinet.
6. Secure the vertical supports with construction adhesive and screws
(not provided).
IMPORTANT: Long screws may damage adjacent cabinets. Ensure the screws
are long enough to secure the support framing, but short enough not to go
through the walls of adjacent cabinets.
IMPORTANT: A custom sink base cabinet and support framing is required for
proper installation.
IMPORTANT: Make sure the top of the sink does not extend above the top of the
cabinet; otherwise it will interfere with countertop installation.
PAGE 2
hts reserved.
1: PREPARE THE BASE CABINET
1. Apply painter’s tape to the cabinets for marking and cutting purposes.
This will protect the cabinet from damage while cutting.
2. Position the template (provided with your sink) on the front of the
3. Trace the template and remove.
4. Using a sharp saw blade, carefully cut the cabinet on the traced line.
IMPORTANT: The cabinet must be installed, secured, plumb, and level BEFORE
installing the sink.
IMPORTANT: Soleil recommends providing the cabinet maker with the actual
sink prior to cabinet fabrication. Before installing the sink, verify that the
distance from the top of the doors to the top of the cabinet is greater than the
apron front.
IMPORTANT: Double check the measurement of the cabinet cutout and
opening.
OUTLINE FOR APRON
FRONT SINK CUTOUT
1. Cut two lengths of support framing to extend horizontally along the
inside walls on each side of the cabinet.
2. Measure and mark the support mounting locations; ensure the sink rim
will sit at or slightly below the top of the cabinet.
3. Position and level the supports.
4. Secure the supports with construction adhesive and screws (not
provided).
5. Cut (4) lengths of support framing to extend from the bottom of the
6. Secure the vertical supports with construction adhesive and screws (not
provided).
IMPORTANT: Long screws may damage adjacent cabinets. Ensure the screws
are long enough to secure the support framing, but short enough not to go
through the walls of adjacent cabinets.
IMPORTANT: A custom sink base cabinet and support framing is required for
proper installation.
IMPORTANT: Make sure the top of the sink does not extend above the top of the
cabinet; otherwise it will interfere with countertop installation.
SUPPORT FRAMING SHOULD BE RECESSED SO THE
SINK FITS FLUSH WITH THE TOP OF THE CABINET
3: INSTALL SUPPORT FRAMING
2: PREP COUNTERTOP
1. Position the template (provided with your sink) on the bottom of the
2.
measurements.
4. Following the countertop manufacturer’s instructions, carefully cut the
countertop on the traced line.
OUTLINE FOR APRON
FRONT SINK CUTOUT
Apron Front Stainless Steel Sink
Installation Instructions
Contact Soleil at (687) 445-4638 or visit www.soleilsinks.com. Copyright ©2015, Soleil Sink Company Inc. All rights reserved.
PAGE 2
Contact Soleil Sinks at (687) 445-4638 or visit www.soleilsinks.com. Copyright ©2015, Soleil Sink Company Inc. All rights reserved.
2: PREP COUNTERTOP
1. Position the template (provided with your sink) on the bottom of the
countertop, flush to the front and centered; secure with tape.
2. Trace the template and remove. Dry fit the sink to verify the
measurements.
3. Following the countertop manufacturer’s instructions, carefully cut the
countertop on the traced line.
Apron Front Stainless Steel Sink
Installation Instructions
1: PREPARE THE BASE CABINET
1. Apply painter’s tape to the cabinets for marking and cutting purposes.
This will protect the cabinet from damage while cutting.
2. Position the template (provided with your sink) on the front of the
cabinet, flush to the top and centered; secure with tape.
3. Trace the template and remove.
4. Using a sharp saw blade, carefully cut the cabinet on the traced line.
IMPORTANT: The cabinet must be installed, secured, plumb, and level
BEFORE installing the sink.
IMPORTANT: Soleil recommends providing the cabinet maker with the actual
sink prior to cabinet fabrication. Before installing the sink, verify that the
distance from the top of the doors to the top of the cabinet is greater than the
apron front.
IMPORTANT: Double check the measurement of the cabinet cutout and
make any necessary adjustments by either adding filler strips or sanding the
opening.
hts reserved.
1: PREPARE THE BASE CABINET
1. Apply painter’s tape to the cabinets for marking and cutting purposes.
This will protect the cabinet from damage while cutting.
2. Position the template (provided with your sink) on the front of the
3. Trace the template and remove.
4. Using a sharp saw blade, carefully cut the cabinet on the traced line.
IMPORTANT: The cabinet must be installed, secured, plumb, and level BEFORE
installing the sink.
IMPORTANT: Soleil recommends providing the cabinet maker with the actual
sink prior to cabinet fabrication. Before installing the sink, verify that the
distance from the top of the doors to the top of the cabinet is greater than the
apron front.
IMPORTANT: Double check the measurement of the cabinet cutout and
opening.
OUTLINE FOR APRON
FRONT SINK CUTOUT
1. Cut two lengths of support framing to extend horizontally along the
inside walls on each side of the cabinet.
2. Measure and mark the support mounting locations; ensure the sink rim
will sit at or slightly below the top of the cabinet.
3. Position and level the supports.
4. Secure the supports with construction adhesive and screws (not
provided).
5. Cut (4) lengths of support framing to extend from the bottom of the
6. Secure the vertical supports with construction adhesive and screws (not
provided).
IMPORTANT: Long screws may damage adjacent cabinets. Ensure the screws
are long enough to secure the support framing, but short enough not to go
through the walls of adjacent cabinets.
IMPORTANT: A custom sink base cabinet and support framing is required for
proper installation.
IMPORTANT: Make sure the top of the sink does not extend above the top of the
cabinet; otherwise it will interfere with countertop installation.
SUPPORT FRAMING SHOULD BE RECESSED SO THE
SINK FITS FLUSH WITH THE TOP OF THE CABINET
3: INSTALL SUPPORT FRAMING
2: PREP COUNTERTOP
1. Position the template (provided with your sink) on the bottom of the
2.
measurements.
4. Following the countertop manufacturer’s instructions, carefully cut the
countertop on the traced line.
OUTLINE FOR APRON
FRONT SINK CUTOUT
Apron Front Stainless Steel Sink
Installation Instructions
Contact Soleil at (687) 445-4638 or visit www.soleilsinks.com. Copyright ©2015, Soleil Sink Company Inc. All rights reserved.
PAGE 2
2: PREP COUNTERTOP
1. Position the template (provided with your sink) on the bottom of the
countertop, flush to the front and centered; secure with tape.
2. Trace the template and remove. Dry fit the sink to verify the
measurements.
3. Following the countertop manufacturer’s instructions, carefully cut the
countertop on the traced line.
hts reserved.
1: PREPARE THE BASE CABINET
1. Apply painter’s tape to the cabinets for marking and cutting purposes.
This will protect the cabinet from damage while cutting.
2. Position the template (provided with your sink) on the front of the
3. Trace the template and remove.
4. Using a sharp saw blade, carefully cut the cabinet on the traced line.
IMPORTANT: The cabinet must be installed, secured, plumb, and level BEFORE
installing the sink.
IMPORTANT: Soleil recommends providing the cabinet maker with the actual
sink prior to cabinet fabrication. Before installing the sink, verify that the
distance from the top of the doors to the top of the cabinet is greater than the
apron front.
IMPORTANT: Double check the measurement of the cabinet cutout and
opening.
OUTLINE FOR APRON
FRONT SINK CUTOUT
1. Cut two lengths of support framing to extend horizontally along the
inside walls on each side of the cabinet.
2. Measure and mark the support mounting locations; ensure the sink rim
will sit at or slightly below the top of the cabinet.
3. Position and level the supports.
4. Secure the supports with construction adhesive and screws (not
provided).
5. Cut (4) lengths of support framing to extend from the bottom of the
6. Secure the vertical supports with construction adhesive and screws (not
provided).
IMPORTANT: Long screws may damage adjacent cabinets. Ensure the screws
are long enough to secure the support framing, but short enough not to go
through the walls of adjacent cabinets.
IMPORTANT: A custom sink base cabinet and support framing is required for
proper installation.
IMPORTANT: Make sure the top of the sink does not extend above the top of the
cabinet; otherwise it will interfere with countertop installation.
SUPPORT FRAMING SHOULD BE RECESSED SO THE
SINK FITS FLUSH WITH THE TOP OF THE CABINET
3: INSTALL SUPPORT FRAMING
2: PREP COUNTERTOP
1. Position the template (provided with your sink) on the bottom of the
2.
measurements.
4. Following the countertop manufacturer’s instructions, carefully cut the
countertop on the traced line.
OUTLINE FOR APRON
FRONT SINK CUTOUT
Apron Front Stainless Steel Sink
Installation Instructions
Contact Soleil at (687) 445-4638 or visit www.soleilsinks.com. Copyright ©2015, Soleil Sink Company Inc. All rights reserved.
PAGE 2
3: INSTALL SUPPORT FRAMING
1. Cut two lengths of support framing to extend horizontally along the
inside walls on each side of the cabinet.
2. Measure and mark the support mounting locations; ensure the sink rim
will sit at or slightly below the top of the cabinet.
3. Position and level the supports.
4. Secure the supports with construction adhesive and screws (not
provided).
5. Cut (4) lengths of support framing to extend from the bottom of the
horizontal supports to the floor of the cabinet.
6. Secure the vertical supports with construction adhesive and screws
(not provided).
IMPORTANT: Long screws may damage adjacent cabinets. Ensure the screws
are long enough to secure the support framing, but short enough not to go
through the walls of adjacent cabinets.
IMPORTANT: A custom sink base cabinet and support framing is required for
proper installation.
IMPORTANT: Make sure the top of the sink does not extend above the top of the
cabinet; otherwise it will interfere with countertop installation.
PAGE 2
hts reserved.
1: PREPARE THE BASE CABINET
1. Apply painter’s tape to the cabinets for marking and cutting purposes.
This will protect the cabinet from damage while cutting.
2. Position the template (provided with your sink) on the front of the
3. Trace the template and remove.
4. Using a sharp saw blade, carefully cut the cabinet on the traced line.
IMPORTANT: The cabinet must be installed, secured, plumb, and level BEFORE
installing the sink.
IMPORTANT: Soleil recommends providing the cabinet maker with the actual
sink prior to cabinet fabrication. Before installing the sink, verify that the
distance from the top of the doors to the top of the cabinet is greater than the
apron front.
IMPORTANT: Double check the measurement of the cabinet cutout and
opening.
OUTLINE FOR APRON
FRONT SINK CUTOUT
1. Cut two lengths of support framing to extend horizontally along the
inside walls on each side of the cabinet.
2. Measure and mark the support mounting locations; ensure the sink rim
will sit at or slightly below the top of the cabinet.
3. Position and level the supports.
4. Secure the supports with construction adhesive and screws (not
provided).
5. Cut (4) lengths of support framing to extend from the bottom of the
6. Secure the vertical supports with construction adhesive and screws (not
provided).
IMPORTANT: Long screws may damage adjacent cabinets. Ensure the screws
are long enough to secure the support framing, but short enough not to go
through the walls of adjacent cabinets.
IMPORTANT: A custom sink base cabinet and support framing is required for
proper installation.
IMPORTANT: Make sure the top of the sink does not extend above the top of the
cabinet; otherwise it will interfere with countertop installation.
SUPPORT FRAMING SHOULD BE RECESSED SO THE
SINK FITS FLUSH WITH THE TOP OF THE CABINET
3: INSTALL SUPPORT FRAMING
2: PREP COUNTERTOP
1. Position the template (provided with your sink) on the bottom of the
2.
measurements.
4. Following the countertop manufacturer’s instructions, carefully cut the
countertop on the traced line.
OUTLINE FOR APRON
FRONT SINK CUTOUT
Apron Front Stainless Steel Sink
Installation Instructions
Contact Soleil at (687) 445-4638 or visit www.soleilsinks.com. Copyright ©2015, Soleil Sink Company Inc. All rights reserved.
PAGE 2
Contact Soleil Sinks at (687) 445-4638 or visit www.soleilsinks.com. Copyright ©2015, Soleil Sink Company Inc. All rights reserved.
3: INSTALL SUPPORT FRAMING
1. Cut two lengths of support framing to extend horizontally along the
inside walls on each side of the cabinet.
2. Measure and mark the support mounting locations; ensure the sink rim
will sit at or slightly below the top of the cabinet.
3. Position and level the supports.
4. Secure the supports with construction adhesive and screws (not
provided).
5. Cut (4) lengths of support framing to extend from the bottom of the
horizontal supports to the floor of the cabinet.
6. Secure the vertical supports with construction adhesive and screws
(not provided).
IMPORTANT: Long screws may damage adjacent cabinets. Ensure the screws
are long enough to secure the support framing, but short enough not to go
through the walls of adjacent cabinets.
IMPORTANT: A custom sink base cabinet and support framing is required for
proper installation.
IMPORTANT: Make sure the top of the sink does not extend above the top of the
cabinet; otherwise it will interfere with countertop installation.
PAGE 2
Apron Front Stainless Steel Sink
Installation Instructions
1: PREPARE THE BASE CABINET
1. Apply painter’s tape to the cabinets for marking and cutting purposes.
This will protect the cabinet from damage while cutting.
2. Position the template (provided with your sink) on the front of the
cabinet, flush to the top and centered; secure with tape.
3. Trace the template and remove.
4. Using a sharp saw blade, carefully cut the cabinet on the traced line.
IMPORTANT: The cabinet must be installed, secured, plumb, and level
BEFORE installing the sink.
IMPORTANT: Soleil recommends providing the cabinet maker with the actual
sink prior to cabinet fabrication. Before installing the sink, verify that the
distance from the top of the doors to the top of the cabinet is greater than the
apron front.
IMPORTANT: Double check the measurement of the cabinet cutout and
make any necessary adjustments by either adding filler strips or sanding the
opening.
hts reserved.
1: PREPARE THE BASE CABINET
1. Apply painter’s tape to the cabinets for marking and cutting purposes.
This will protect the cabinet from damage while cutting.
2. Position the template (provided with your sink) on the front of the
3. Trace the template and remove.
4. Using a sharp saw blade, carefully cut the cabinet on the traced line.
IMPORTANT: The cabinet must be installed, secured, plumb, and level BEFORE
installing the sink.
IMPORTANT: Soleil recommends providing the cabinet maker with the actual
sink prior to cabinet fabrication. Before installing the sink, verify that the
distance from the top of the doors to the top of the cabinet is greater than the
apron front.
IMPORTANT: Double check the measurement of the cabinet cutout and
opening.
OUTLINE FOR APRON
FRONT SINK CUTOUT
1. Cut two lengths of support framing to extend horizontally along the
inside walls on each side of the cabinet.
2. Measure and mark the support mounting locations; ensure the sink rim
will sit at or slightly below the top of the cabinet.
3. Position and level the supports.
4. Secure the supports with construction adhesive and screws (not
provided).
5. Cut (4) lengths of support framing to extend from the bottom of the
6. Secure the vertical supports with construction adhesive and screws (not
provided).
IMPORTANT: Long screws may damage adjacent cabinets. Ensure the screws
are long enough to secure the support framing, but short enough not to go
through the walls of adjacent cabinets.
IMPORTANT: A custom sink base cabinet and support framing is required for
proper installation.
IMPORTANT: Make sure the top of the sink does not extend above the top of the
cabinet; otherwise it will interfere with countertop installation.
SUPPORT FRAMING SHOULD BE RECESSED SO THE
SINK FITS FLUSH WITH THE TOP OF THE CABINET
3: INSTALL SUPPORT FRAMING
2: PREP COUNTERTOP
1. Position the template (provided with your sink) on the bottom of the
2.
measurements.
4. Following the countertop manufacturer’s instructions, carefully cut the
countertop on the traced line.
OUTLINE FOR APRON
FRONT SINK CUTOUT
Apron Front Stainless Steel Sink
Installation Instructions
Contact Soleil at (687) 445-4638 or visit www.soleilsinks.com. Copyright ©2015, Soleil Sink Company Inc. All rights reserved.
PAGE 2
2: PREP COUNTERTOP
1. Position the template (provided with your sink) on the bottom of the
countertop, flush to the front and centered; secure with tape.
2. Trace the template and remove. Dry fit the sink to verify the
measurements.
3. Following the countertop manufacturer’s instructions, carefully cut the
countertop on the traced line.
hts reserved.
1: PREPARE THE BASE CABINET
1. Apply painter’s tape to the cabinets for marking and cutting purposes.
This will protect the cabinet from damage while cutting.
2. Position the template (provided with your sink) on the front of the
3. Trace the template and remove.
4. Using a sharp saw blade, carefully cut the cabinet on the traced line.
IMPORTANT: The cabinet must be installed, secured, plumb, and level BEFORE
installing the sink.
IMPORTANT: Soleil recommends providing the cabinet maker with the actual
sink prior to cabinet fabrication. Before installing the sink, verify that the
distance from the top of the doors to the top of the cabinet is greater than the
apron front.
IMPORTANT: Double check the measurement of the cabinet cutout and
opening.
OUTLINE FOR APRON
FRONT SINK CUTOUT
1. Cut two lengths of support framing to extend horizontally along the
inside walls on each side of the cabinet.
2. Measure and mark the support mounting locations; ensure the sink rim
will sit at or slightly below the top of the cabinet.
3. Position and level the supports.
4. Secure the supports with construction adhesive and screws (not
provided).
5. Cut (4) lengths of support framing to extend from the bottom of the
6. Secure the vertical supports with construction adhesive and screws (not
provided).
IMPORTANT: Long screws may damage adjacent cabinets. Ensure the screws
are long enough to secure the support framing, but short enough not to go
through the walls of adjacent cabinets.
IMPORTANT: A custom sink base cabinet and support framing is required for
proper installation.
IMPORTANT: Make sure the top of the sink does not extend above the top of the
cabinet; otherwise it will interfere with countertop installation.
SUPPORT FRAMING SHOULD BE RECESSED SO THE
SINK FITS FLUSH WITH THE TOP OF THE CABINET
3: INSTALL SUPPORT FRAMING
2: PREP COUNTERTOP
1. Position the template (provided with your sink) on the bottom of the
2.
measurements.
4. Following the countertop manufacturer’s instructions, carefully cut the
countertop on the traced line.
OUTLINE FOR APRON
FRONT SINK CUTOUT
Apron Front Stainless Steel Sink
Installation Instructions
Contact Soleil at (687) 445-4638 or visit www.soleilsinks.com. Copyright ©2015, Soleil Sink Company Inc. All rights reserved.
PAGE 2
3: INSTALL SUPPORT FRAMING
1. Cut two lengths of support framing to extend horizontally along the
inside walls on each side of the cabinet.
2. Measure and mark the support mounting locations; ensure the sink rim
will sit at or slightly below the top of the cabinet.
3. Position and level the supports.
4. Secure the supports with construction adhesive and screws (not
provided).
5. Cut (4) lengths of support framing to extend from the bottom of the
horizontal supports to the floor of the cabinet.
6. Secure the vertical supports with construction adhesive and screws
(not provided).
IMPORTANT: Long screws may damage adjacent cabinets. Ensure the screws
are long enough to secure the support framing, but short enough not to go
through the walls of adjacent cabinets.
IMPORTANT: A custom sink base cabinet and support framing is required for
proper installation.
IMPORTANT: Make sure the top of the sink does not extend above the top of the
cabinet; otherwise it will interfere with countertop installation.
PAGE 2
hts reserved.
1: PREPARE THE BASE CABINET
1. Apply painter’s tape to the cabinets for marking and cutting purposes.
This will protect the cabinet from damage while cutting.
2. Position the template (provided with your sink) on the front of the
3. Trace the template and remove.
4. Using a sharp saw blade, carefully cut the cabinet on the traced line.
IMPORTANT: The cabinet must be installed, secured, plumb, and level BEFORE
installing the sink.
IMPORTANT: Soleil recommends providing the cabinet maker with the actual
sink prior to cabinet fabrication. Before installing the sink, verify that the
distance from the top of the doors to the top of the cabinet is greater than the
apron front.
IMPORTANT: Double check the measurement of the cabinet cutout and
opening.
OUTLINE FOR APRON
FRONT SINK CUTOUT
1. Cut two lengths of support framing to extend horizontally along the
inside walls on each side of the cabinet.
2. Measure and mark the support mounting locations; ensure the sink rim
will sit at or slightly below the top of the cabinet.
3. Position and level the supports.
4. Secure the supports with construction adhesive and screws (not
provided).
5. Cut (4) lengths of support framing to extend from the bottom of the
6. Secure the vertical supports with construction adhesive and screws (not
provided).
IMPORTANT: Long screws may damage adjacent cabinets. Ensure the screws
are long enough to secure the support framing, but short enough not to go
through the walls of adjacent cabinets.
IMPORTANT: A custom sink base cabinet and support framing is required for
proper installation.
IMPORTANT: Make sure the top of the sink does not extend above the top of the
cabinet; otherwise it will interfere with countertop installation.
SUPPORT FRAMING SHOULD BE RECESSED SO THE
SINK FITS FLUSH WITH THE TOP OF THE CABINET
3: INSTALL SUPPORT FRAMING
2: PREP COUNTERTOP
1. Position the template (provided with your sink) on the bottom of the
2.
measurements.
4. Following the countertop manufacturer’s instructions, carefully cut the
countertop on the traced line.
OUTLINE FOR APRON
FRONT SINK CUTOUT
Apron Front Stainless Steel Sink
Installation Instructions
Contact Soleil at (687) 445-4638 or visit www.soleilsinks.com. Copyright ©2015, Soleil Sink Company Inc. All rights reserved.
PAGE 2
Contact Soleil Sinks at (687) 445-4638 or visit www.soleilsinks.com. Copyright ©2015, Soleil Sink Company Inc. All rights reserved.
Contact Soleil Sinks at (678) 445-4638 or visit www.soleilsinks.com. Copyright ©2016, Soleil Sink Company Inc. All rights reserved.
2: PREP COUNTERTOP
1. Position the template (provided with your sink) on the bottom of the
countertop, ush to the front and centered; secure with tape.
2. Trace the template and remove. Dry t the sink to verify the
measurements.
3. Following the countertop manufacturer’s instructions, carefully cut the
countertop on the traced line.
Apron Front Stainless Steel Sink
Installation Instructions
1: PREPARE THE BASE CABINET
1. Apply painter’s tape to the cabinets for marking and cutting purposes.
This will protect the cabinet from damage while cutting.
2. Position the template (provided with your sink) on the front of the
cabinet, flush to the top and centered; secure with tape.
3. Trace the template and remove.
4. Using a sharp saw blade, carefully cut the cabinet on the traced line.
IMPORTANT: The cabinet must be installed, secured, plumb, and level
BEFORE installing the sink.
IMPORTANT: Soleil recommends providing the cabinet maker with the actual
sink prior to cabinet fabrication. Before installing the sink, verify that the
distance from the top of the doors to the top of the cabinet is greater than the
apron front.
IMPORTANT: Double check the measurement of the cabinet cutout and
make any necessary adjustments by either adding filler strips or sanding the
opening.
hts reserved.
1: PREPARE THE BASE CABINET
1. Apply painter’s tape to the cabinets for marking and cutting purposes.
This will protect the cabinet from damage while cutting.
2. Position the template (provided with your sink) on the front of the
3. Trace the template and remove.
4. Using a sharp saw blade, carefully cut the cabinet on the traced line.
IMPORTANT: The cabinet must be installed, secured, plumb, and level BEFORE
installing the sink.
IMPORTANT: Soleil recommends providing the cabinet maker with the actual
sink prior to cabinet fabrication. Before installing the sink, verify that the
distance from the top of the doors to the top of the cabinet is greater than the
apron front.
IMPORTANT: Double check the measurement of the cabinet cutout and
opening.
OUTLINE FOR APRON
FRONT SINK CUTOUT
1. Cut two lengths of support framing to extend horizontally along the
inside walls on each side of the cabinet.
2. Measure and mark the support mounting locations; ensure the sink rim
will sit at or slightly below the top of the cabinet.
3. Position and level the supports.
4. Secure the supports with construction adhesive and screws (not
provided).
5. Cut (4) lengths of support framing to extend from the bottom of the
6. Secure the vertical supports with construction adhesive and screws (not
provided).
IMPORTANT: Long screws may damage adjacent cabinets. Ensure the screws
are long enough to secure the support framing, but short enough not to go
through the walls of adjacent cabinets.
IMPORTANT: A custom sink base cabinet and support framing is required for
proper installation.
IMPORTANT: Make sure the top of the sink does not extend above the top of the
cabinet; otherwise it will interfere with countertop installation.
SUPPORT FRAMING SHOULD BE RECESSED SO THE
SINK FITS FLUSH WITH THE TOP OF THE CABINET
3: INSTALL SUPPORT FRAMING
2: PREP COUNTERTOP
1. Position the template (provided with your sink) on the bottom of the
2.
measurements.
4. Following the countertop manufacturer’s instructions, carefully cut the
countertop on the traced line.
OUTLINE FOR APRON
FRONT SINK CUTOUT
Apron Front Stainless Steel Sink
Installation Instructions
Contact Soleil at (687) 445-4638 or visit www.soleilsinks.com. Copyright ©2015, Soleil Sink Company Inc. All rights reserved.
PAGE 2
2: PREP COUNTERTOP
1. Position the template (provided with your sink) on the bottom of the
countertop, flush to the front and centered; secure with tape.
2. Trace the template and remove. Dry fit the sink to verify the
measurements.
3. Following the countertop manufacturer’s instructions, carefully cut the
countertop on the traced line.
hts reserved.
1: PREPARE THE BASE CABINET
1. Apply painter’s tape to the cabinets for marking and cutting purposes.
This will protect the cabinet from damage while cutting.
2. Position the template (provided with your sink) on the front of the
3. Trace the template and remove.
4. Using a sharp saw blade, carefully cut the cabinet on the traced line.
IMPORTANT: The cabinet must be installed, secured, plumb, and level BEFORE
installing the sink.
IMPORTANT: Soleil recommends providing the cabinet maker with the actual
sink prior to cabinet fabrication. Before installing the sink, verify that the
distance from the top of the doors to the top of the cabinet is greater than the
apron front.
IMPORTANT: Double check the measurement of the cabinet cutout and
opening.
OUTLINE FOR APRON
FRONT SINK CUTOUT
1. Cut two lengths of support framing to extend horizontally along the
inside walls on each side of the cabinet.
2. Measure and mark the support mounting locations; ensure the sink rim
will sit at or slightly below the top of the cabinet.
3. Position and level the supports.
4. Secure the supports with construction adhesive and screws (not
provided).
5. Cut (4) lengths of support framing to extend from the bottom of the
6. Secure the vertical supports with construction adhesive and screws (not
provided).
IMPORTANT: Long screws may damage adjacent cabinets. Ensure the screws
are long enough to secure the support framing, but short enough not to go
through the walls of adjacent cabinets.
IMPORTANT: A custom sink base cabinet and support framing is required for
proper installation.
IMPORTANT: Make sure the top of the sink does not extend above the top of the
cabinet; otherwise it will interfere with countertop installation.
SUPPORT FRAMING SHOULD BE RECESSED SO THE
SINK FITS FLUSH WITH THE TOP OF THE CABINET
3: INSTALL SUPPORT FRAMING
2: PREP COUNTERTOP
1. Position the template (provided with your sink) on the bottom of the
2.
measurements.
4. Following the countertop manufacturer’s instructions, carefully cut the
countertop on the traced line.
OUTLINE FOR APRON
FRONT SINK CUTOUT
Apron Front Stainless Steel Sink
Installation Instructions
Contact Soleil at (687) 445-4638 or visit www.soleilsinks.com. Copyright ©2015, Soleil Sink Company Inc. All rights reserved.
PAGE 2
3: INSTALL SUPPORT FRAMING
1. Cut two lengths of support framing to extend horizontally along the
inside walls on each side of the cabinet.
2. Measure and mark the support mounting locations; ensure the sink rim
will sit at or slightly below the top of the cabinet.
3. Position and level the supports.
4. Secure the supports with construction adhesive and screws (not
provided).
5. Cut (4) lengths of support framing to extend from the bottom of the
horizontal supports to the floor of the cabinet.
6. Secure the vertical supports with construction adhesive and screws
(not provided).
IMPORTANT: Long screws may damage adjacent cabinets. Ensure the screws
are long enough to secure the support framing, but short enough not to go
through the walls of adjacent cabinets.
IMPORTANT: A custom sink base cabinet and support framing is required for
proper installation.
IMPORTANT: Make sure the top of the sink does not extend above the top of the
cabinet; otherwise it will interfere with countertop installation.
PAGE 2
hts reserved.
1: PREPARE THE BASE CABINET
1. Apply painter’s tape to the cabinets for marking and cutting purposes.
This will protect the cabinet from damage while cutting.
2. Position the template (provided with your sink) on the front of the
3. Trace the template and remove.
4. Using a sharp saw blade, carefully cut the cabinet on the traced line.
IMPORTANT: The cabinet must be installed, secured, plumb, and level BEFORE
installing the sink.
IMPORTANT: Soleil recommends providing the cabinet maker with the actual
sink prior to cabinet fabrication. Before installing the sink, verify that the
distance from the top of the doors to the top of the cabinet is greater than the
apron front.
IMPORTANT: Double check the measurement of the cabinet cutout and
opening.
OUTLINE FOR APRON
FRONT SINK CUTOUT
1. Cut two lengths of support framing to extend horizontally along the
inside walls on each side of the cabinet.
2. Measure and mark the support mounting locations; ensure the sink rim
will sit at or slightly below the top of the cabinet.
3. Position and level the supports.
4. Secure the supports with construction adhesive and screws (not
provided).
5. Cut (4) lengths of support framing to extend from the bottom of the
6. Secure the vertical supports with construction adhesive and screws (not
provided).
IMPORTANT: Long screws may damage adjacent cabinets. Ensure the screws
are long enough to secure the support framing, but short enough not to go
through the walls of adjacent cabinets.
IMPORTANT: A custom sink base cabinet and support framing is required for
proper installation.
IMPORTANT: Make sure the top of the sink does not extend above the top of the
cabinet; otherwise it will interfere with countertop installation.
SUPPORT FRAMING SHOULD BE RECESSED SO THE
SINK FITS FLUSH WITH THE TOP OF THE CABINET
3: INSTALL SUPPORT FRAMING
2: PREP COUNTERTOP
1. Position the template (provided with your sink) on the bottom of the
2.
measurements.
4. Following the countertop manufacturer’s instructions, carefully cut the
countertop on the traced line.
OUTLINE FOR APRON
FRONT SINK CUTOUT
Apron Front Stainless Steel Sink
Installation Instructions
Contact Soleil at (687) 445-4638 or visit www.soleilsinks.com. Copyright ©2015, Soleil Sink Company Inc. All rights reserved.
PAGE 2
Contact Soleil Sinks at (687) 445-4638 or visit www.soleilsinks.com. Copyright ©2015, Soleil Sink Company Inc. All rights reserved.
2: PREP COUNTERTOP
1. Position the template (provided with your sink) on the bottom of the
countertop, flush to the front and centered; secure with tape.
2. Trace the template and remove. Dry fit the sink to verify the
measurements.
3. Following the countertop manufacturer’s instructions, carefully cut the
countertop on the traced line.
Apron Front Stainless Steel Sink
Installation Instructions
1: PREPARE THE BASE CABINET
1. Apply painter’s tape to the cabinets for marking and cutting purposes.
This will protect the cabinet from damage while cutting.
2. Position the template (provided with your sink) on the front of the
cabinet, flush to the top and centered; secure with tape.
3. Trace the template and remove.
4. Using a sharp saw blade, carefully cut the cabinet on the traced line.
IMPORTANT: The cabinet must be installed, secured, plumb, and level
BEFORE installing the sink.
IMPORTANT: Soleil recommends providing the cabinet maker with the actual
sink prior to cabinet fabrication. Before installing the sink, verify that the
distance from the top of the doors to the top of the cabinet is greater than the
apron front.
IMPORTANT: Double check the measurement of the cabinet cutout and
make any necessary adjustments by either adding filler strips or sanding the
opening.
hts reserved.
1: PREPARE THE BASE CABINET
1. Apply painter’s tape to the cabinets for marking and cutting purposes.
This will protect the cabinet from damage while cutting.
2. Position the template (provided with your sink) on the front of the
3. Trace the template and remove.
4. Using a sharp saw blade, carefully cut the cabinet on the traced line.
IMPORTANT: The cabinet must be installed, secured, plumb, and level BEFORE
installing the sink.
IMPORTANT: Soleil recommends providing the cabinet maker with the actual
sink prior to cabinet fabrication. Before installing the sink, verify that the
distance from the top of the doors to the top of the cabinet is greater than the
apron front.
IMPORTANT: Double check the measurement of the cabinet cutout and
opening.
OUTLINE FOR APRON
FRONT SINK CUTOUT
1. Cut two lengths of support framing to extend horizontally along the
inside walls on each side of the cabinet.
2. Measure and mark the support mounting locations; ensure the sink rim
will sit at or slightly below the top of the cabinet.
3. Position and level the supports.
4. Secure the supports with construction adhesive and screws (not
provided).
5. Cut (4) lengths of support framing to extend from the bottom of the
6. Secure the vertical supports with construction adhesive and screws (not
provided).
IMPORTANT: Long screws may damage adjacent cabinets. Ensure the screws
are long enough to secure the support framing, but short enough not to go
through the walls of adjacent cabinets.
IMPORTANT: A custom sink base cabinet and support framing is required for
proper installation.
IMPORTANT: Make sure the top of the sink does not extend above the top of the
cabinet; otherwise it will interfere with countertop installation.
SUPPORT FRAMING SHOULD BE RECESSED SO THE
SINK FITS FLUSH WITH THE TOP OF THE CABINET
3: INSTALL SUPPORT FRAMING
2: PREP COUNTERTOP
1. Position the template (provided with your sink) on the bottom of the
2.
measurements.
4. Following the countertop manufacturer’s instructions, carefully cut the
countertop on the traced line.
OUTLINE FOR APRON
FRONT SINK CUTOUT
Apron Front Stainless Steel Sink
Installation Instructions
Contact Soleil at (687) 445-4638 or visit www.soleilsinks.com. Copyright ©2015, Soleil Sink Company Inc. All rights reserved.
PAGE 2
2: PREP COUNTERTOP
1. Position the template (provided with your sink) on the bottom of the
countertop, flush to the front and centered; secure with tape.
2. Trace the template and remove. Dry fit the sink to verify the
measurements.
3. Following the countertop manufacturer’s instructions, carefully cut the
countertop on the traced line.
hts reserved.
1: PREPARE THE BASE CABINET
1. Apply painter’s tape to the cabinets for marking and cutting purposes.
This will protect the cabinet from damage while cutting.
2. Position the template (provided with your sink) on the front of the
3. Trace the template and remove.
4. Using a sharp saw blade, carefully cut the cabinet on the traced line.
IMPORTANT: The cabinet must be installed, secured, plumb, and level BEFORE
installing the sink.
IMPORTANT: Soleil recommends providing the cabinet maker with the actual
sink prior to cabinet fabrication. Before installing the sink, verify that the
distance from the top of the doors to the top of the cabinet is greater than the
apron front.
IMPORTANT: Double check the measurement of the cabinet cutout and
opening.
OUTLINE FOR APRON
FRONT SINK CUTOUT
1. Cut two lengths of support framing to extend horizontally along the
inside walls on each side of the cabinet.
2. Measure and mark the support mounting locations; ensure the sink rim
will sit at or slightly below the top of the cabinet.
3. Position and level the supports.
4. Secure the supports with construction adhesive and screws (not
provided).
5. Cut (4) lengths of support framing to extend from the bottom of the
6. Secure the vertical supports with construction adhesive and screws (not
provided).
IMPORTANT: Long screws may damage adjacent cabinets. Ensure the screws
are long enough to secure the support framing, but short enough not to go
through the walls of adjacent cabinets.
IMPORTANT: A custom sink base cabinet and support framing is required for
proper installation.
IMPORTANT: Make sure the top of the sink does not extend above the top of the
cabinet; otherwise it will interfere with countertop installation.
SUPPORT FRAMING SHOULD BE RECESSED SO THE
SINK FITS FLUSH WITH THE TOP OF THE CABINET
3: INSTALL SUPPORT FRAMING
2: PREP COUNTERTOP
1. Position the template (provided with your sink) on the bottom of the
2.
measurements.
4. Following the countertop manufacturer’s instructions, carefully cut the
countertop on the traced line.
OUTLINE FOR APRON
FRONT SINK CUTOUT
Apron Front Stainless Steel Sink
Installation Instructions
Contact Soleil at (687) 445-4638 or visit www.soleilsinks.com. Copyright ©2015, Soleil Sink Company Inc. All rights reserved.
PAGE 2
3: INSTALL SUPPORT FRAMING
1. Cut two lengths of support framing to extend horizontally along the
inside walls on each side of the cabinet.
2. Measure and mark the support mounting locations; ensure the sink rim
will sit at or slightly below the top of the cabinet.
3. Position and level the supports.
4. Secure the supports with construction adhesive and screws (not
provided).
5. Cut (4) lengths of support framing to extend from the bottom of the
horizontal supports to the floor of the cabinet.
6. Secure the vertical supports with construction adhesive and screws
(not provided).
IMPORTANT: Long screws may damage adjacent cabinets. Ensure the screws
are long enough to secure the support framing, but short enough not to go
through the walls of adjacent cabinets.
IMPORTANT: A custom sink base cabinet and support framing is required for
proper installation.
IMPORTANT: Make sure the top of the sink does not extend above the top of the
cabinet; otherwise it will interfere with countertop installation.
PAGE 2
hts reserved.
1: PREPARE THE BASE CABINET
1. Apply painter’s tape to the cabinets for marking and cutting purposes.
This will protect the cabinet from damage while cutting.
2. Position the template (provided with your sink) on the front of the
3. Trace the template and remove.
4. Using a sharp saw blade, carefully cut the cabinet on the traced line.
IMPORTANT: The cabinet must be installed, secured, plumb, and level BEFORE
installing the sink.
IMPORTANT: Soleil recommends providing the cabinet maker with the actual
sink prior to cabinet fabrication. Before installing the sink, verify that the
distance from the top of the doors to the top of the cabinet is greater than the
apron front.
IMPORTANT: Double check the measurement of the cabinet cutout and
opening.
OUTLINE FOR APRON
FRONT SINK CUTOUT
1. Cut two lengths of support framing to extend horizontally along the
inside walls on each side of the cabinet.
2. Measure and mark the support mounting locations; ensure the sink rim
will sit at or slightly below the top of the cabinet.
3. Position and level the supports.
4. Secure the supports with construction adhesive and screws (not
provided).
5. Cut (4) lengths of support framing to extend from the bottom of the
6. Secure the vertical supports with construction adhesive and screws (not
provided).
IMPORTANT: Long screws may damage adjacent cabinets. Ensure the screws
are long enough to secure the support framing, but short enough not to go
through the walls of adjacent cabinets.
IMPORTANT: A custom sink base cabinet and support framing is required for
proper installation.
IMPORTANT: Make sure the top of the sink does not extend above the top of the
cabinet; otherwise it will interfere with countertop installation.
SUPPORT FRAMING SHOULD BE RECESSED SO THE
SINK FITS FLUSH WITH THE TOP OF THE CABINET
3: INSTALL SUPPORT FRAMING
2: PREP COUNTERTOP
1. Position the template (provided with your sink) on the bottom of the
2.
measurements.
4. Following the countertop manufacturer’s instructions, carefully cut the
countertop on the traced line.
OUTLINE FOR APRON
FRONT SINK CUTOUT
Apron Front Stainless Steel Sink
Installation Instructions
Contact Soleil at (687) 445-4638 or visit www.soleilsinks.com. Copyright ©2015, Soleil Sink Company Inc. All rights reserved.
PAGE 2
Contact Soleil Sinks at (687) 445-4638 or visit www.soleilsinks.com. Copyright ©2015, Soleil Sink Company Inc. All rights reserved.
3: INSTALL SUPPORT FRAMING
1. Cut two lengths of support framing to extend horizontally along the
inside walls on each side of the cabinet.
2. Measure and mark the support mounting locations; ensure the sink rim
will sit at or slightly below the top of the cabinet.
3. Position and level the supports.
4. Secure the supports with construction adhesive and screws (not
provided).
5. Cut (4) lengths of support framing to extend from the bottom of the
horizontal supports to the floor of the cabinet.
6. Secure the vertical supports with construction adhesive and screws
(not provided).
IMPORTANT: Long screws may damage adjacent cabinets. Ensure the screws
are long enough to secure the support framing, but short enough not to go
through the walls of adjacent cabinets.
IMPORTANT: A custom sink base cabinet and support framing is required for
proper installation.
IMPORTANT: Make sure the top of the sink does not extend above the top of the
cabinet; otherwise it will interfere with countertop installation.
PAGE 2
Apron Front Stainless Steel Sink
Installation Instructions
1: PREPARE THE BASE CABINET
1. Apply painter’s tape to the cabinets for marking and cutting purposes.
This will protect the cabinet from damage while cutting.
2. Position the template (provided with your sink) on the front of the
cabinet, flush to the top and centered; secure with tape.
3. Trace the template and remove.
4. Using a sharp saw blade, carefully cut the cabinet on the traced line.
IMPORTANT: The cabinet must be installed, secured, plumb, and level
BEFORE installing the sink.
IMPORTANT: Soleil recommends providing the cabinet maker with the actual
sink prior to cabinet fabrication. Before installing the sink, verify that the
distance from the top of the doors to the top of the cabinet is greater than the
apron front.
IMPORTANT: Double check the measurement of the cabinet cutout and
make any necessary adjustments by either adding filler strips or sanding the
opening.
hts reserved.
1: PREPARE THE BASE CABINET
1. Apply painter’s tape to the cabinets for marking and cutting purposes.
This will protect the cabinet from damage while cutting.
2. Position the template (provided with your sink) on the front of the
3. Trace the template and remove.
4. Using a sharp saw blade, carefully cut the cabinet on the traced line.
IMPORTANT: The cabinet must be installed, secured, plumb, and level BEFORE
installing the sink.
IMPORTANT: Soleil recommends providing the cabinet maker with the actual
sink prior to cabinet fabrication. Before installing the sink, verify that the
distance from the top of the doors to the top of the cabinet is greater than the
apron front.
IMPORTANT: Double check the measurement of the cabinet cutout and
opening.
OUTLINE FOR APRON
FRONT SINK CUTOUT
1. Cut two lengths of support framing to extend horizontally along the
inside walls on each side of the cabinet.
2. Measure and mark the support mounting locations; ensure the sink rim
will sit at or slightly below the top of the cabinet.
3. Position and level the supports.
4. Secure the supports with construction adhesive and screws (not
provided).
5. Cut (4) lengths of support framing to extend from the bottom of the
6. Secure the vertical supports with construction adhesive and screws (not
provided).
IMPORTANT: Long screws may damage adjacent cabinets. Ensure the screws
are long enough to secure the support framing, but short enough not to go
through the walls of adjacent cabinets.
IMPORTANT: A custom sink base cabinet and support framing is required for
proper installation.
IMPORTANT: Make sure the top of the sink does not extend above the top of the
cabinet; otherwise it will interfere with countertop installation.
SUPPORT FRAMING SHOULD BE RECESSED SO THE
SINK FITS FLUSH WITH THE TOP OF THE CABINET
3: INSTALL SUPPORT FRAMING
2: PREP COUNTERTOP
1. Position the template (provided with your sink) on the bottom of the
2.
measurements.
4. Following the countertop manufacturer’s instructions, carefully cut the
countertop on the traced line.
OUTLINE FOR APRON
FRONT SINK CUTOUT
Apron Front Stainless Steel Sink
Installation Instructions
Contact Soleil at (687) 445-4638 or visit www.soleilsinks.com. Copyright ©2015, Soleil Sink Company Inc. All rights reserved.
PAGE 2
2: PREP COUNTERTOP
1. Position the template (provided with your sink) on the bottom of the
countertop, flush to the front and centered; secure with tape.
2. Trace the template and remove. Dry fit the sink to verify the
measurements.
3. Following the countertop manufacturer’s instructions, carefully cut the
countertop on the traced line.
hts reserved.
1: PREPARE THE BASE CABINET
1. Apply painter’s tape to the cabinets for marking and cutting purposes.
This will protect the cabinet from damage while cutting.
2. Position the template (provided with your sink) on the front of the
3. Trace the template and remove.
4. Using a sharp saw blade, carefully cut the cabinet on the traced line.
IMPORTANT: The cabinet must be installed, secured, plumb, and level BEFORE
installing the sink.
IMPORTANT: Soleil recommends providing the cabinet maker with the actual
sink prior to cabinet fabrication. Before installing the sink, verify that the
distance from the top of the doors to the top of the cabinet is greater than the
apron front.
IMPORTANT: Double check the measurement of the cabinet cutout and
opening.
OUTLINE FOR APRON
FRONT SINK CUTOUT
1. Cut two lengths of support framing to extend horizontally along the
inside walls on each side of the cabinet.
2. Measure and mark the support mounting locations; ensure the sink rim
will sit at or slightly below the top of the cabinet.
3. Position and level the supports.
4. Secure the supports with construction adhesive and screws (not
provided).
5. Cut (4) lengths of support framing to extend from the bottom of the
6. Secure the vertical supports with construction adhesive and screws (not
provided).
IMPORTANT: Long screws may damage adjacent cabinets. Ensure the screws
are long enough to secure the support framing, but short enough not to go
through the walls of adjacent cabinets.
IMPORTANT: A custom sink base cabinet and support framing is required for
proper installation.
IMPORTANT: Make sure the top of the sink does not extend above the top of the
cabinet; otherwise it will interfere with countertop installation.
SUPPORT FRAMING SHOULD BE RECESSED SO THE
SINK FITS FLUSH WITH THE TOP OF THE CABINET
3: INSTALL SUPPORT FRAMING
2: PREP COUNTERTOP
1. Position the template (provided with your sink) on the bottom of the
2.
measurements.
4. Following the countertop manufacturer’s instructions, carefully cut the
countertop on the traced line.
OUTLINE FOR APRON
FRONT SINK CUTOUT
Apron Front Stainless Steel Sink
Installation Instructions
Contact Soleil at (687) 445-4638 or visit www.soleilsinks.com. Copyright ©2015, Soleil Sink Company Inc. All rights reserved.
PAGE 2
3: INSTALL SUPPORT FRAMING
1. Cut two lengths of support framing to extend horizontally along the
inside walls on each side of the cabinet.
2. Measure and mark the support mounting locations; ensure the sink rim
will sit at or slightly below the top of the cabinet.
3. Position and level the supports.
4. Secure the supports with construction adhesive and screws (not
provided).
5. Cut (4) lengths of support framing to extend from the bottom of the
horizontal supports to the floor of the cabinet.
6. Secure the vertical supports with construction adhesive and screws
(not provided).
IMPORTANT: Long screws may damage adjacent cabinets. Ensure the screws
are long enough to secure the support framing, but short enough not to go
through the walls of adjacent cabinets.
IMPORTANT: A custom sink base cabinet and support framing is required for
proper installation.
IMPORTANT: Make sure the top of the sink does not extend above the top of the
cabinet; otherwise it will interfere with countertop installation.
PAGE 2
hts reserved.
1: PREPARE THE BASE CABINET
1. Apply painter’s tape to the cabinets for marking and cutting purposes.
This will protect the cabinet from damage while cutting.
2. Position the template (provided with your sink) on the front of the
3. Trace the template and remove.
4. Using a sharp saw blade, carefully cut the cabinet on the traced line.
IMPORTANT: The cabinet must be installed, secured, plumb, and level BEFORE
installing the sink.
IMPORTANT: Soleil recommends providing the cabinet maker with the actual
sink prior to cabinet fabrication. Before installing the sink, verify that the
distance from the top of the doors to the top of the cabinet is greater than the
apron front.
IMPORTANT: Double check the measurement of the cabinet cutout and
opening.
OUTLINE FOR APRON
FRONT SINK CUTOUT
1. Cut two lengths of support framing to extend horizontally along the
inside walls on each side of the cabinet.
2. Measure and mark the support mounting locations; ensure the sink rim
will sit at or slightly below the top of the cabinet.
3. Position and level the supports.
4. Secure the supports with construction adhesive and screws (not
provided).
5. Cut (4) lengths of support framing to extend from the bottom of the
6. Secure the vertical supports with construction adhesive and screws (not
provided).
IMPORTANT: Long screws may damage adjacent cabinets. Ensure the screws
are long enough to secure the support framing, but short enough not to go
through the walls of adjacent cabinets.
IMPORTANT: A custom sink base cabinet and support framing is required for
proper installation.
IMPORTANT: Make sure the top of the sink does not extend above the top of the
cabinet; otherwise it will interfere with countertop installation.
SUPPORT FRAMING SHOULD BE RECESSED SO THE
SINK FITS FLUSH WITH THE TOP OF THE CABINET
3: INSTALL SUPPORT FRAMING
2: PREP COUNTERTOP
1. Position the template (provided with your sink) on the bottom of the
2.
measurements.
4. Following the countertop manufacturer’s instructions, carefully cut the
countertop on the traced line.
OUTLINE FOR APRON
FRONT SINK CUTOUT
Apron Front Stainless Steel Sink
Installation Instructions
Contact Soleil at (687) 445-4638 or visit www.soleilsinks.com. Copyright ©2015, Soleil Sink Company Inc. All rights reserved.
PAGE 2
Contact Soleil Sinks at (687) 445-4638 or visit www.soleilsinks.com. Copyright ©2015, Soleil Sink Company Inc. All rights reserved.
Contact Soleil Sinks at (678) 445-4638 or visit www.soleilsinks.com. Copyright ©2016, Soleil Sink Company Inc. All rights reserved.
3: INSTALL SUPPORT FRAMING
1. Cut two lengths of support framing to extend horizontally along the
inside walls on each side of the cabinet.
2. Measure and mark the support mounting locations; ensure the sink rim
will sit at or slightly below the top of the cabinet.
3. Position and level the supports.
4. Secure the supports with construction adhesive and screws (not
provided).
5. Cut (4) lengths of support framing to extend from the bottom of the
horizontal supports to the oor of the cabinet.
6. Secure the vertical supports with construction adhesive and screws
(not provided).
IMPORTANT: Long screws may damage adjacent cabinets. Ensure the screws
are long enough to secure the support framing, but short enough not to go
through the walls of adjacent cabinets.
IMPORTANT: A custom sink base cabinet and support framing is required for
proper installation.
IMPORTANT: Make sure the top of the sink does not extend above the top of the
cabinet; otherwise it will interfere with countertop installation.
PAGE 2
Apron Front Stainless Steel Sink
Installation Instructions
1: PREPARE THE BASE CABINET
1. Apply painter’s tape to the cabinets for marking and cutting purposes.
This will protect the cabinet from damage while cutting.
2. Position the template (provided with your sink) on the front of the
cabinet, flush to the top and centered; secure with tape.
3. Trace the template and remove.
4. Using a sharp saw blade, carefully cut the cabinet on the traced line.
IMPORTANT: The cabinet must be installed, secured, plumb, and level
BEFORE installing the sink.
IMPORTANT: Soleil recommends providing the cabinet maker with the actual
sink prior to cabinet fabrication. Before installing the sink, verify that the
distance from the top of the doors to the top of the cabinet is greater than the
apron front.
IMPORTANT: Double check the measurement of the cabinet cutout and
make any necessary adjustments by either adding filler strips or sanding the
opening.
hts reserved.
1: PREPARE THE BASE CABINET
1. Apply painter’s tape to the cabinets for marking and cutting purposes.
This will protect the cabinet from damage while cutting.
2. Position the template (provided with your sink) on the front of the
3. Trace the template and remove.
4. Using a sharp saw blade, carefully cut the cabinet on the traced line.
IMPORTANT: The cabinet must be installed, secured, plumb, and level BEFORE
installing the sink.
IMPORTANT: Soleil recommends providing the cabinet maker with the actual
sink prior to cabinet fabrication. Before installing the sink, verify that the
distance from the top of the doors to the top of the cabinet is greater than the
apron front.
IMPORTANT: Double check the measurement of the cabinet cutout and
opening.
OUTLINE FOR APRON
FRONT SINK CUTOUT
1. Cut two lengths of support framing to extend horizontally along the
inside walls on each side of the cabinet.
2. Measure and mark the support mounting locations; ensure the sink rim
will sit at or slightly below the top of the cabinet.
3. Position and level the supports.
4. Secure the supports with construction adhesive and screws (not
provided).
5. Cut (4) lengths of support framing to extend from the bottom of the
6. Secure the vertical supports with construction adhesive and screws (not
provided).
IMPORTANT: Long screws may damage adjacent cabinets. Ensure the screws
are long enough to secure the support framing, but short enough not to go
through the walls of adjacent cabinets.
IMPORTANT: A custom sink base cabinet and support framing is required for
proper installation.
IMPORTANT: Make sure the top of the sink does not extend above the top of the
cabinet; otherwise it will interfere with countertop installation.
SUPPORT FRAMING SHOULD BE RECESSED SO THE
SINK FITS FLUSH WITH THE TOP OF THE CABINET
3: INSTALL SUPPORT FRAMING
2: PREP COUNTERTOP
1. Position the template (provided with your sink) on the bottom of the
2.
measurements.
4. Following the countertop manufacturer’s instructions, carefully cut the
countertop on the traced line.
OUTLINE FOR APRON
FRONT SINK CUTOUT
Apron Front Stainless Steel Sink
Installation Instructions
Contact Soleil at (687) 445-4638 or visit www.soleilsinks.com. Copyright ©2015, Soleil Sink Company Inc. All rights reserved.
PAGE 2
2: PREP COUNTERTOP
1. Position the template (provided with your sink) on the bottom of the
countertop, flush to the front and centered; secure with tape.
2. Trace the template and remove. Dry fit the sink to verify the
measurements.
3. Following the countertop manufacturer’s instructions, carefully cut the
countertop on the traced line.
hts reserved.
1: PREPARE THE BASE CABINET
1. Apply painter’s tape to the cabinets for marking and cutting purposes.
This will protect the cabinet from damage while cutting.
2. Position the template (provided with your sink) on the front of the
3. Trace the template and remove.
4. Using a sharp saw blade, carefully cut the cabinet on the traced line.
IMPORTANT: The cabinet must be installed, secured, plumb, and level BEFORE
installing the sink.
IMPORTANT: Soleil recommends providing the cabinet maker with the actual
sink prior to cabinet fabrication. Before installing the sink, verify that the
distance from the top of the doors to the top of the cabinet is greater than the
apron front.
IMPORTANT: Double check the measurement of the cabinet cutout and
opening.
OUTLINE FOR APRON
FRONT SINK CUTOUT
1. Cut two lengths of support framing to extend horizontally along the
inside walls on each side of the cabinet.
2. Measure and mark the support mounting locations; ensure the sink rim
will sit at or slightly below the top of the cabinet.
3. Position and level the supports.
4. Secure the supports with construction adhesive and screws (not
provided).
5. Cut (4) lengths of support framing to extend from the bottom of the
6. Secure the vertical supports with construction adhesive and screws (not
provided).
IMPORTANT: Long screws may damage adjacent cabinets. Ensure the screws
are long enough to secure the support framing, but short enough not to go
through the walls of adjacent cabinets.
IMPORTANT: A custom sink base cabinet and support framing is required for
proper installation.
IMPORTANT: Make sure the top of the sink does not extend above the top of the
cabinet; otherwise it will interfere with countertop installation.
SUPPORT FRAMING SHOULD BE RECESSED SO THE
SINK FITS FLUSH WITH THE TOP OF THE CABINET
3: INSTALL SUPPORT FRAMING
2: PREP COUNTERTOP
1. Position the template (provided with your sink) on the bottom of the
2.
measurements.
4. Following the countertop manufacturer’s instructions, carefully cut the
countertop on the traced line.
OUTLINE FOR APRON
FRONT SINK CUTOUT
Apron Front Stainless Steel Sink
Installation Instructions
Contact Soleil at (687) 445-4638 or visit www.soleilsinks.com. Copyright ©2015, Soleil Sink Company Inc. All rights reserved.
PAGE 2
3: INSTALL SUPPORT FRAMING
1. Cut two lengths of support framing to extend horizontally along the
inside walls on each side of the cabinet.
2. Measure and mark the support mounting locations; ensure the sink rim
will sit at or slightly below the top of the cabinet.
3. Position and level the supports.
4. Secure the supports with construction adhesive and screws (not
provided).
5. Cut (4) lengths of support framing to extend from the bottom of the
horizontal supports to the floor of the cabinet.
6. Secure the vertical supports with construction adhesive and screws
(not provided).
IMPORTANT: Long screws may damage adjacent cabinets. Ensure the screws
are long enough to secure the support framing, but short enough not to go
through the walls of adjacent cabinets.
IMPORTANT: A custom sink base cabinet and support framing is required for
proper installation.
IMPORTANT: Make sure the top of the sink does not extend above the top of the
cabinet; otherwise it will interfere with countertop installation.
PAGE 2
hts reserved.
1: PREPARE THE BASE CABINET
1. Apply painter’s tape to the cabinets for marking and cutting purposes.
This will protect the cabinet from damage while cutting.
2. Position the template (provided with your sink) on the front of the
3. Trace the template and remove.
4. Using a sharp saw blade, carefully cut the cabinet on the traced line.
IMPORTANT: The cabinet must be installed, secured, plumb, and level BEFORE
installing the sink.
IMPORTANT: Soleil recommends providing the cabinet maker with the actual
sink prior to cabinet fabrication. Before installing the sink, verify that the
distance from the top of the doors to the top of the cabinet is greater than the
apron front.
IMPORTANT: Double check the measurement of the cabinet cutout and
opening.
OUTLINE FOR APRON
FRONT SINK CUTOUT
1. Cut two lengths of support framing to extend horizontally along the
inside walls on each side of the cabinet.
2. Measure and mark the support mounting locations; ensure the sink rim
will sit at or slightly below the top of the cabinet.
3. Position and level the supports.
4. Secure the supports with construction adhesive and screws (not
provided).
5. Cut (4) lengths of support framing to extend from the bottom of the
6. Secure the vertical supports with construction adhesive and screws (not
provided).
IMPORTANT: Long screws may damage adjacent cabinets. Ensure the screws
are long enough to secure the support framing, but short enough not to go
through the walls of adjacent cabinets.
IMPORTANT: A custom sink base cabinet and support framing is required for
proper installation.
IMPORTANT: Make sure the top of the sink does not extend above the top of the
cabinet; otherwise it will interfere with countertop installation.
SUPPORT FRAMING SHOULD BE RECESSED SO THE
SINK FITS FLUSH WITH THE TOP OF THE CABINET
3: INSTALL SUPPORT FRAMING
2: PREP COUNTERTOP
1. Position the template (provided with your sink) on the bottom of the
2.
measurements.
4. Following the countertop manufacturer’s instructions, carefully cut the
countertop on the traced line.
OUTLINE FOR APRON
FRONT SINK CUTOUT
Apron Front Stainless Steel Sink
Installation Instructions
Contact Soleil at (687) 445-4638 or visit www.soleilsinks.com. Copyright ©2015, Soleil Sink Company Inc. All rights reserved.
PAGE 2
Contact Soleil Sinks at (687) 445-4638 or visit www.soleilsinks.com. Copyright ©2015, Soleil Sink Company Inc. All rights reserved.
2: PREP COUNTERTOP
1. Position the template (provided with your sink) on the bottom of the
countertop, flush to the front and centered; secure with tape.
2. Trace the template and remove. Dry fit the sink to verify the
measurements.
3. Following the countertop manufacturer’s instructions, carefully cut the
countertop on the traced line.
Apron Front Stainless Steel Sink
Installation Instructions
1: PREPARE THE BASE CABINET
1. Apply painter’s tape to the cabinets for marking and cutting purposes.
This will protect the cabinet from damage while cutting.
2. Position the template (provided with your sink) on the front of the
cabinet, flush to the top and centered; secure with tape.
3. Trace the template and remove.
4. Using a sharp saw blade, carefully cut the cabinet on the traced line.
IMPORTANT: The cabinet must be installed, secured, plumb, and level
BEFORE installing the sink.
IMPORTANT: Soleil recommends providing the cabinet maker with the actual
sink prior to cabinet fabrication. Before installing the sink, verify that the
distance from the top of the doors to the top of the cabinet is greater than the
apron front.
IMPORTANT: Double check the measurement of the cabinet cutout and
make any necessary adjustments by either adding filler strips or sanding the
opening.
hts reserved.
1: PREPARE THE BASE CABINET
1. Apply painter’s tape to the cabinets for marking and cutting purposes.
This will protect the cabinet from damage while cutting.
2. Position the template (provided with your sink) on the front of the
3. Trace the template and remove.
4. Using a sharp saw blade, carefully cut the cabinet on the traced line.
IMPORTANT: The cabinet must be installed, secured, plumb, and level BEFORE
installing the sink.
IMPORTANT: Soleil recommends providing the cabinet maker with the actual
sink prior to cabinet fabrication. Before installing the sink, verify that the
distance from the top of the doors to the top of the cabinet is greater than the
apron front.
IMPORTANT: Double check the measurement of the cabinet cutout and
opening.
OUTLINE FOR APRON
FRONT SINK CUTOUT
1. Cut two lengths of support framing to extend horizontally along the
inside walls on each side of the cabinet.
2. Measure and mark the support mounting locations; ensure the sink rim
will sit at or slightly below the top of the cabinet.
3. Position and level the supports.
4. Secure the supports with construction adhesive and screws (not
provided).
5. Cut (4) lengths of support framing to extend from the bottom of the
6. Secure the vertical supports with construction adhesive and screws (not
provided).
IMPORTANT: Long screws may damage adjacent cabinets. Ensure the screws
are long enough to secure the support framing, but short enough not to go
through the walls of adjacent cabinets.
IMPORTANT: A custom sink base cabinet and support framing is required for
proper installation.
IMPORTANT: Make sure the top of the sink does not extend above the top of the
cabinet; otherwise it will interfere with countertop installation.
SUPPORT FRAMING SHOULD BE RECESSED SO THE
SINK FITS FLUSH WITH THE TOP OF THE CABINET
3: INSTALL SUPPORT FRAMING
2: PREP COUNTERTOP
1. Position the template (provided with your sink) on the bottom of the
2.
measurements.
4. Following the countertop manufacturer’s instructions, carefully cut the
countertop on the traced line.
OUTLINE FOR APRON
FRONT SINK CUTOUT
Apron Front Stainless Steel Sink
Installation Instructions
Contact Soleil at (687) 445-4638 or visit www.soleilsinks.com. Copyright ©2015, Soleil Sink Company Inc. All rights reserved.
PAGE 2
2: PREP COUNTERTOP
1. Position the template (provided with your sink) on the bottom of the
countertop, flush to the front and centered; secure with tape.
2. Trace the template and remove. Dry fit the sink to verify the
measurements.
3. Following the countertop manufacturer’s instructions, carefully cut the
countertop on the traced line.
hts reserved.
1: PREPARE THE BASE CABINET
1. Apply painter’s tape to the cabinets for marking and cutting purposes.
This will protect the cabinet from damage while cutting.
2. Position the template (provided with your sink) on the front of the
3. Trace the template and remove.
4. Using a sharp saw blade, carefully cut the cabinet on the traced line.
IMPORTANT: The cabinet must be installed, secured, plumb, and level BEFORE
installing the sink.
IMPORTANT: Soleil recommends providing the cabinet maker with the actual
sink prior to cabinet fabrication. Before installing the sink, verify that the
distance from the top of the doors to the top of the cabinet is greater than the
apron front.
IMPORTANT: Double check the measurement of the cabinet cutout and
opening.
OUTLINE FOR APRON
FRONT SINK CUTOUT
1. Cut two lengths of support framing to extend horizontally along the
inside walls on each side of the cabinet.
2. Measure and mark the support mounting locations; ensure the sink rim
will sit at or slightly below the top of the cabinet.
3. Position and level the supports.
4. Secure the supports with construction adhesive and screws (not
provided).
5. Cut (4) lengths of support framing to extend from the bottom of the
6. Secure the vertical supports with construction adhesive and screws (not
provided).
IMPORTANT: Long screws may damage adjacent cabinets. Ensure the screws
are long enough to secure the support framing, but short enough not to go
through the walls of adjacent cabinets.
IMPORTANT: A custom sink base cabinet and support framing is required for
proper installation.
IMPORTANT: Make sure the top of the sink does not extend above the top of the
cabinet; otherwise it will interfere with countertop installation.
SUPPORT FRAMING SHOULD BE RECESSED SO THE
SINK FITS FLUSH WITH THE TOP OF THE CABINET
3: INSTALL SUPPORT FRAMING
2: PREP COUNTERTOP
1. Position the template (provided with your sink) on the bottom of the
2.
measurements.
4. Following the countertop manufacturer’s instructions, carefully cut the
countertop on the traced line.
OUTLINE FOR APRON
FRONT SINK CUTOUT
Apron Front Stainless Steel Sink
Installation Instructions
Contact Soleil at (687) 445-4638 or visit www.soleilsinks.com. Copyright ©2015, Soleil Sink Company Inc. All rights reserved.
PAGE 2
3: INSTALL SUPPORT FRAMING
1. Cut two lengths of support framing to extend horizontally along the
inside walls on each side of the cabinet.
2. Measure and mark the support mounting locations; ensure the sink rim
will sit at or slightly below the top of the cabinet.
3. Position and level the supports.
4. Secure the supports with construction adhesive and screws (not
provided).
5. Cut (4) lengths of support framing to extend from the bottom of the
horizontal supports to the floor of the cabinet.
6. Secure the vertical supports with construction adhesive and screws
(not provided).
IMPORTANT: Long screws may damage adjacent cabinets. Ensure the screws
are long enough to secure the support framing, but short enough not to go
through the walls of adjacent cabinets.
IMPORTANT: A custom sink base cabinet and support framing is required for
proper installation.
IMPORTANT: Make sure the top of the sink does not extend above the top of the
cabinet; otherwise it will interfere with countertop installation.
PAGE 2
hts reserved.
1: PREPARE THE BASE CABINET
1. Apply painter’s tape to the cabinets for marking and cutting purposes.
This will protect the cabinet from damage while cutting.
2. Position the template (provided with your sink) on the front of the
3. Trace the template and remove.
4. Using a sharp saw blade, carefully cut the cabinet on the traced line.
IMPORTANT: The cabinet must be installed, secured, plumb, and level BEFORE
installing the sink.
IMPORTANT: Soleil recommends providing the cabinet maker with the actual
sink prior to cabinet fabrication. Before installing the sink, verify that the
distance from the top of the doors to the top of the cabinet is greater than the
apron front.
IMPORTANT: Double check the measurement of the cabinet cutout and
opening.
OUTLINE FOR APRON
FRONT SINK CUTOUT
1. Cut two lengths of support framing to extend horizontally along the
inside walls on each side of the cabinet.
2. Measure and mark the support mounting locations; ensure the sink rim
will sit at or slightly below the top of the cabinet.
3. Position and level the supports.
4. Secure the supports with construction adhesive and screws (not
provided).
5. Cut (4) lengths of support framing to extend from the bottom of the
6. Secure the vertical supports with construction adhesive and screws (not
provided).
IMPORTANT: Long screws may damage adjacent cabinets. Ensure the screws
are long enough to secure the support framing, but short enough not to go
through the walls of adjacent cabinets.
IMPORTANT: A custom sink base cabinet and support framing is required for
proper installation.
IMPORTANT: Make sure the top of the sink does not extend above the top of the
cabinet; otherwise it will interfere with countertop installation.
SUPPORT FRAMING SHOULD BE RECESSED SO THE
SINK FITS FLUSH WITH THE TOP OF THE CABINET
3: INSTALL SUPPORT FRAMING
2: PREP COUNTERTOP
1. Position the template (provided with your sink) on the bottom of the
2.
measurements.
4. Following the countertop manufacturer’s instructions, carefully cut the
countertop on the traced line.
OUTLINE FOR APRON
FRONT SINK CUTOUT
Apron Front Stainless Steel Sink
Installation Instructions
Contact Soleil at (687) 445-4638 or visit www.soleilsinks.com. Copyright ©2015, Soleil Sink Company Inc. All rights reserved.
PAGE 2
Contact Soleil Sinks at (687) 445-4638 or visit www.soleilsinks.com. Copyright ©2015, Soleil Sink Company Inc. All rights reserved.
3: INSTALL SUPPORT FRAMING
1. Cut two lengths of support framing to extend horizontally along the
inside walls on each side of the cabinet.
2. Measure and mark the support mounting locations; ensure the sink rim
will sit at or slightly below the top of the cabinet.
3. Position and level the supports.
4. Secure the supports with construction adhesive and screws (not
provided).
5. Cut (4) lengths of support framing to extend from the bottom of the
horizontal supports to the floor of the cabinet.
6. Secure the vertical supports with construction adhesive and screws
(not provided).
IMPORTANT: Long screws may damage adjacent cabinets. Ensure the screws
are long enough to secure the support framing, but short enough not to go
through the walls of adjacent cabinets.
IMPORTANT: A custom sink base cabinet and support framing is required for
proper installation.
IMPORTANT: Make sure the top of the sink does not extend above the top of the
cabinet; otherwise it will interfere with countertop installation.
PAGE 2
Apron Front Stainless Steel Sink
Installation Instructions
1: PREPARE THE BASE CABINET
1. Apply painter’s tape to the cabinets for marking and cutting purposes.
This will protect the cabinet from damage while cutting.
2. Position the template (provided with your sink) on the front of the
cabinet, flush to the top and centered; secure with tape.
3. Trace the template and remove.
4. Using a sharp saw blade, carefully cut the cabinet on the traced line.
IMPORTANT: The cabinet must be installed, secured, plumb, and level
BEFORE installing the sink.
IMPORTANT: Soleil recommends providing the cabinet maker with the actual
sink prior to cabinet fabrication. Before installing the sink, verify that the
distance from the top of the doors to the top of the cabinet is greater than the
apron front.
IMPORTANT: Double check the measurement of the cabinet cutout and
make any necessary adjustments by either adding filler strips or sanding the
opening.
hts reserved.
1: PREPARE THE BASE CABINET
1. Apply painter’s tape to the cabinets for marking and cutting purposes.
This will protect the cabinet from damage while cutting.
2. Position the template (provided with your sink) on the front of the
3. Trace the template and remove.
4. Using a sharp saw blade, carefully cut the cabinet on the traced line.
IMPORTANT: The cabinet must be installed, secured, plumb, and level BEFORE
installing the sink.
IMPORTANT: Soleil recommends providing the cabinet maker with the actual
sink prior to cabinet fabrication. Before installing the sink, verify that the
distance from the top of the doors to the top of the cabinet is greater than the
apron front.
IMPORTANT: Double check the measurement of the cabinet cutout and
opening.
OUTLINE FOR APRON
FRONT SINK CUTOUT
1. Cut two lengths of support framing to extend horizontally along the
inside walls on each side of the cabinet.
2. Measure and mark the support mounting locations; ensure the sink rim
will sit at or slightly below the top of the cabinet.
3. Position and level the supports.
4. Secure the supports with construction adhesive and screws (not
provided).
5. Cut (4) lengths of support framing to extend from the bottom of the
6. Secure the vertical supports with construction adhesive and screws (not
provided).
IMPORTANT: Long screws may damage adjacent cabinets. Ensure the screws
are long enough to secure the support framing, but short enough not to go
through the walls of adjacent cabinets.
IMPORTANT: A custom sink base cabinet and support framing is required for
proper installation.
IMPORTANT: Make sure the top of the sink does not extend above the top of the
cabinet; otherwise it will interfere with countertop installation.
SUPPORT FRAMING SHOULD BE RECESSED SO THE
SINK FITS FLUSH WITH THE TOP OF THE CABINET
3: INSTALL SUPPORT FRAMING
2: PREP COUNTERTOP
1. Position the template (provided with your sink) on the bottom of the
2.
measurements.
4. Following the countertop manufacturer’s instructions, carefully cut the
countertop on the traced line.
OUTLINE FOR APRON
FRONT SINK CUTOUT
Apron Front Stainless Steel Sink
Installation Instructions
Contact Soleil at (687) 445-4638 or visit www.soleilsinks.com. Copyright ©2015, Soleil Sink Company Inc. All rights reserved.
PAGE 2
2: PREP COUNTERTOP
1. Position the template (provided with your sink) on the bottom of the
countertop, flush to the front and centered; secure with tape.
2. Trace the template and remove. Dry fit the sink to verify the
measurements.
3. Following the countertop manufacturer’s instructions, carefully cut the
countertop on the traced line.
hts reserved.
1: PREPARE THE BASE CABINET
1. Apply painter’s tape to the cabinets for marking and cutting purposes.
This will protect the cabinet from damage while cutting.
2. Position the template (provided with your sink) on the front of the
3. Trace the template and remove.
4. Using a sharp saw blade, carefully cut the cabinet on the traced line.
IMPORTANT: The cabinet must be installed, secured, plumb, and level BEFORE
installing the sink.
IMPORTANT: Soleil recommends providing the cabinet maker with the actual
sink prior to cabinet fabrication. Before installing the sink, verify that the
distance from the top of the doors to the top of the cabinet is greater than the
apron front.
IMPORTANT: Double check the measurement of the cabinet cutout and
opening.
OUTLINE FOR APRON
FRONT SINK CUTOUT
1. Cut two lengths of support framing to extend horizontally along the
inside walls on each side of the cabinet.
2. Measure and mark the support mounting locations; ensure the sink rim
will sit at or slightly below the top of the cabinet.
3. Position and level the supports.
4. Secure the supports with construction adhesive and screws (not
provided).
5. Cut (4) lengths of support framing to extend from the bottom of the
6. Secure the vertical supports with construction adhesive and screws (not
provided).
IMPORTANT: Long screws may damage adjacent cabinets. Ensure the screws
are long enough to secure the support framing, but short enough not to go
through the walls of adjacent cabinets.
IMPORTANT: A custom sink base cabinet and support framing is required for
proper installation.
IMPORTANT: Make sure the top of the sink does not extend above the top of the
cabinet; otherwise it will interfere with countertop installation.
SUPPORT FRAMING SHOULD BE RECESSED SO THE
SINK FITS FLUSH WITH THE TOP OF THE CABINET
3: INSTALL SUPPORT FRAMING
2: PREP COUNTERTOP
1. Position the template (provided with your sink) on the bottom of the
2.
measurements.
4. Following the countertop manufacturer’s instructions, carefully cut the
countertop on the traced line.
OUTLINE FOR APRON
FRONT SINK CUTOUT
Apron Front Stainless Steel Sink
Installation Instructions
Contact Soleil at (687) 445-4638 or visit www.soleilsinks.com. Copyright ©2015, Soleil Sink Company Inc. All rights reserved.
PAGE 2
3: INSTALL SUPPORT FRAMING
1. Cut two lengths of support framing to extend horizontally along the
inside walls on each side of the cabinet.
2. Measure and mark the support mounting locations; ensure the sink rim
will sit at or slightly below the top of the cabinet.
3. Position and level the supports.
4. Secure the supports with construction adhesive and screws (not
provided).
5. Cut (4) lengths of support framing to extend from the bottom of the
horizontal supports to the floor of the cabinet.
6. Secure the vertical supports with construction adhesive and screws
(not provided).
IMPORTANT: Long screws may damage adjacent cabinets. Ensure the screws
are long enough to secure the support framing, but short enough not to go
through the walls of adjacent cabinets.
IMPORTANT: A custom sink base cabinet and support framing is required for
proper installation.
IMPORTANT: Make sure the top of the sink does not extend above the top of the
cabinet; otherwise it will interfere with countertop installation.
PAGE 2
hts reserved.
1: PREPARE THE BASE CABINET
1. Apply painter’s tape to the cabinets for marking and cutting purposes.
This will protect the cabinet from damage while cutting.
2. Position the template (provided with your sink) on the front of the
3. Trace the template and remove.
4. Using a sharp saw blade, carefully cut the cabinet on the traced line.
IMPORTANT: The cabinet must be installed, secured, plumb, and level BEFORE
installing the sink.
IMPORTANT: Soleil recommends providing the cabinet maker with the actual
sink prior to cabinet fabrication. Before installing the sink, verify that the
distance from the top of the doors to the top of the cabinet is greater than the
apron front.
IMPORTANT: Double check the measurement of the cabinet cutout and
opening.
OUTLINE FOR APRON
FRONT SINK CUTOUT
1. Cut two lengths of support framing to extend horizontally along the
inside walls on each side of the cabinet.
2. Measure and mark the support mounting locations; ensure the sink rim
will sit at or slightly below the top of the cabinet.
3. Position and level the supports.
4. Secure the supports with construction adhesive and screws (not
provided).
5. Cut (4) lengths of support framing to extend from the bottom of the
6. Secure the vertical supports with construction adhesive and screws (not
provided).
IMPORTANT: Long screws may damage adjacent cabinets. Ensure the screws
are long enough to secure the support framing, but short enough not to go
through the walls of adjacent cabinets.
IMPORTANT: A custom sink base cabinet and support framing is required for
proper installation.
IMPORTANT: Make sure the top of the sink does not extend above the top of the
cabinet; otherwise it will interfere with countertop installation.
SUPPORT FRAMING SHOULD BE RECESSED SO THE
SINK FITS FLUSH WITH THE TOP OF THE CABINET
3: INSTALL SUPPORT FRAMING
2: PREP COUNTERTOP
1. Position the template (provided with your sink) on the bottom of the
2.
measurements.
4. Following the countertop manufacturer’s instructions, carefully cut the
countertop on the traced line.
OUTLINE FOR APRON
FRONT SINK CUTOUT
Apron Front Stainless Steel Sink
Installation Instructions
Contact Soleil at (687) 445-4638 or visit www.soleilsinks.com. Copyright ©2015, Soleil Sink Company Inc. All rights reserved.
PAGE 2
Contact Soleil Sinks at (687) 445-4638 or visit www.soleilsinks.com. Copyright ©2015, Soleil Sink Company Inc. All rights reserved.
Contact Soleil Sinks at (678) 445-4638 or visit www.soleilsinks.com. Copyright ©2016, Soleil Sink Company Inc. All rights reserved.
Contact IPT Sink Company at (678) 445-4638 or visit www.iptsink.com. Copyright ©2016, IPT Sink Company Inc. All rights reserved.