IQeye 7 Series Megapixel Indoor IP Camera Quick Install Guide 1
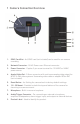
1 Camera Connection Overview 1. SDHC Card Slot - An SDHC card (not included) can be used for on-camera recording. 2. Network Connector - RJ-45 Power-over-Ethernet connector. 3. Power Connector - Captive 2-pin screw terminal for 12-24VDC or 24VAC power source. 4. Analog Video Out - 2.8mm connector with continuous analog video output for NTSC or PAL video systems. Use analog video cable or adapter IQ76x-AVC (not included). 5. Reset Button - for Setting the camera back to factory default settings.
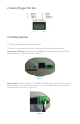
2 Audio/Trigger Pin Out 3 Getting Started 1. Plug the IQeye camera into the network. 2. Power the camera using either Power-over-Ethernet or direct power. Power-over-Ethernet: Input from an IEEE802.3af Power-over-Ethernet (PoE) power injector or switch as show in Figure 1. Figure 1 Direct Power: Connect either a 12-24VDC or 24VAC power source to the camera. Wire polarity is not important, therefore + or - connections can be connected to either terminal as shown in Figure 2.
NOTE: Using a power source with specifications other than those defined will damage the camera, and will void the product warranty. 3. The IQ76x Series camera position, field-of-view and focus adjustment can be performed using an analog monitor with the optional analog video cable adapter IQ76x-AVC (Figure 3) or by using a browser to view the camera image.
The detected cameras will be displayed in the IQfinder window (Figure 5). Highlight a camera from the list and click the “Assign IP” button to edit the selected camera’s IP settings. Figure 5 3. The “Assign IP” window allows the IP Address, Subnet, and Gateway of the camera to be changed. It also allows the camera to be configured to DHCP. Click the “Apply” button after making the desired changes (Figure 6). NOTE: Changing between a static IP address and DHCP will cause the camera to reboot.
5. The “Live” page will be displayed through the default browser (IE recommended). It is also possible to open Internet Explorer and enter the IP address of the IQeye camera in the address field of the browser. If prompted, install the Active X control (Figure 8). Figure 8 6. To perform further configuration of the camera click on the “Setup” tab. NOTE: The default user name is “root” and the default password is “system”. 7.
11. Focus the lens using adjustment on the lens, then lock the focus adjustment set screw. NOTE: The focus adjustment should be close to ensure the one-touch focus adjustment can be completed. The following image (Figure 10) is an example of an image not focused enough to ensure a remote one-touch focus can be completed. Figure 10 The following image (Figure 11) is an example of an image focused enough to ensure a remote one-touch focus can be completed. Figure 11 12.
13. To prepare the camera to serve the H.264 stream, select “H.264” from the drop-down menu (Figure 13). To view the H.264 stream in full screen mode (without ‘Live’ page controls), double click on the video window. Double-click on the video window again to return back to the ‘Live’ page. Figure 13 For additional information and technical documents, please visit www.iqeye.