IQeye Alliance & Sentinel Series ™ ™ Pole Mount Adapter IQ800-PMA - Installation and Operating Instructions
Important Information This product is intended for use with all IQeye Alliance (with Outdoor Back Box and Wall Mount Kit) and Sentinel 8xx Series cameras. It is not designed for, and will not necessarily be compatible with other camera systems. This product is designed for use with the supplied BAND-IT® 0.5 inch (12.7 mm) x 48-inch (1.22 M) metal tensioning straps and a proper tensioning tool (not included) for proper installation to a pole.
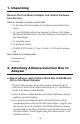
1. Unpacking Remove the Pole Mount Adapter and related hardware from the box Hardware included in the box should include: a. ( 1) IQinVision Pole Mount Adapter for the Alliance or Sentinel 8xx Series camera. b. ( 4) 1-inch M6 Allen head screws for mounting the Alliance (with Outdoor Back Box and Wall Mount Kit) or Sentinel Junction box (not included) to the Pole Mount Adapter c. (1) 5mm Allen wrench d. (4) Spring lock washers e. ( 2) BAND-IT(R) 0.5 inch (12.7mm) x 48-inch (1.
iv. M ake any cable connections and snap the Alliance camera module into the Alliance Outdoor Back Box, and attached the supplied bubble. b. Attach Sentinel Junction Box to Pole Mount Adapter NOTE: If using the rear weather fittings of the Sentinel Junction Box, please follow step ‘i.’ If using the ½” conduit opening on the bottom of the Sentinel Junction Box, skip to step ‘iii.’ i.
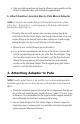
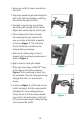
1. E nsure one end of the strap is inserted into the buckle. 2. W rap strap around the pole and through the slots on the Pole Mount Adapter, and bring the end back through the buckle. 3. I f possible, wrap the strap a second time around the pole, through the Pole Mount Adapter slots and through the buckle again. 4. P lace leading end of strap in through the tensioning tool nose and move the nose up as close to the buckle as possible as shown in Figure 1.
9. P ull the cutting handle near the tool nose to cut the strap as shown in Figure 4. 10. Remove tensioning tool, holding the stub of the strap down with thumb as shown in Figure 5. Figure 4 11. Remove thumb and using a hammer, knock the strap stub flat against the buckle, and then hammer down the two buckle ears over the strap stub as shown in Figure 6. Figure 5 Figure 6 4. Attaching Camera Body/Junction Box a. Attach Alliance with Outdoor Back Box and Wall Mount Kit i.
5. IQinVision 2 Year Limited Hardware Warranty Warranty Coverage IQinVision, Inc. (“IQinVision”) warranty obligations are limited to the terms set forth below: IQinVision warrants the original purchaser that the IQINVISION Network Video product enclosed with this limited hardware warranty will in respect of the hardware be free from defects in design, workmanship and materials under normal use for a period of two (2) years from the date of the original end-user purchase (“Warranty Period”).
When you can’t afford to miss a thing. ® www.iqeye.com www.iqeye.com 901-0025 Rev B 33122 Valle Road San Juan Capistrano, CA 92675-4853 USA phone +1.949.369.8100 fax +1.949.369.