
Manual and Installation Guide


Series GA201M2 Page 12 Sept 25, 2020
Installation Instructions
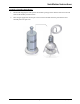
3. Use the contents in Bag 4 (#10 – 24 Socket Head Screw) to secure the head assembly to the pole
assembly (3 screws). **Remove the colored sticker after securing**
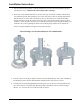
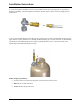
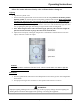
4. Please refer to the illustrations below for clarity in this step. Lift the pole assembly with the head
now attached, upwards. The housing top cover will come with it as there is packing underneath to
hold the top cover in place while you lift the up the pole. Rotate the pole so that the mounting
flanges almost line up with the cutouts on the base plates. Once the top mounting flange is above
the surface, rotate the pole so the holes line up with the treaded bolts. Lower the pole assembly onto
the bolts so they come up through the holes on the mounting flange. Make sure the front of the
heater is facing the evenGLO faceplate on the front of the base.
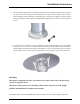
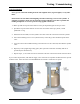
5. Take the contents out of Bag 2. Slip the washers on the threaded bolts (6). Secure pole assembly by
threading the lock nuts onto the threaded bolts and tighten down with wrench or socket.
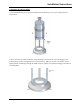
6. Carefully take off the packaging holding the housing top cover up the pole. Carefully slide the top
cover down the pole covering the pole-mounting flange and hardware. Use the contents of Bag 1
(#8-32 x 3/8”) to secure the cover to the base body in 4 places.
*Note: Housing Cover not shown below for ease of illustration.*