
Manual and Installation Guide


Series GA201M2 Page 13 Sept 25, 2020
Installation Instructions
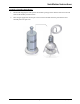
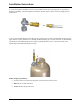
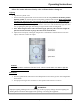
7. Locate the Wheel Kit. Open the packaging and take the wheel assembly and the hardware provided
out. Locate the two mounting holes on the Main Base, line up the wheel assembly as shown below.
Insert both bolts into the matching set of mounting holes. Tip the heater slightly to be able to thread
on the Nylon Nuts provided underneath the Main Base. Tighten the nuts until the wheel assembly is
secure.
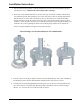
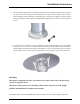
8. Locate the reflector and Bag 5. Install the Top Reflector onto the Shield Support Arms of the Burner
using the four (4) 1/4”-20 x 1/2" carriage bolts with nuts provided. Insert the screws up through the
Shield Support Arms and then through the Top Reflector. Secure each bolt with a nut on top of the
Reflector. Make sure to remove (or peel off) the plastic covering on the reflector before assembly.
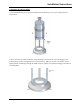
Warning:
This heater is equipped with a tilt / tip switch for your safety. This heater will shut the gas
valve if it is tipped or tilted.
This heater will not operate at an inclined position. Ensure the heater is in the upright
position, and should not be positioned on an incline.
Your Patio heater is now assembled and is ready to connect to your LP-Gas Supply Cylinder.