IRIScan Express 4 Button Manager User Guide
Copyright IRIScanExpress4-dgi_13082015-01 Copyright© 2015 I.R.I.S SA. All rights reserved. Information in this document is subject to change without notice. The software described in this document is furnished under a license agreement or nondisclosure agreement. The software may be used or copied only in accordance with the terms of those agreements. No part of this publication can be reproduced in any form or by any means without prior written permission of I.R.I.S. SA.
Table of Contents 1. Overview .......................................................................... 4 2. Installing Button Manager ................................................ 4 3 Scanning From the Buttons .............................................. 5 3.1 3.2 3.3 3.4 4 Configuring the Buttons ................................................. 10 4.1 4.2 4.3 4.4 4.5 4.6 4.7 4.8 4.9 4.10 4.11 4.12 4.13 4.14 4.15 4.16 4.17 4.18 4.19 ii Starting Button Manager .............................
User Guide 4.20 5. Removing Button Manager Icon from the System Tray ................... 51 Operations ....................................................................... 52 5.1 5.2 5.3 Overview Inserting An Image Directly to a Software Application .................... 52 “Drag and Drop” Your File to a Specified Button ............................. 53 Sending Error Report..................................................................
1. Overview The Button Manager provides you an easy way to scan your documents and send them to your favorite software applications and Cloud destinations. All this can be done with a simple touch of the button on the scanner. With the new Button Manager you can: - Scan your documents directly to Readiris Pro 14. - Scan images into an open application. - Scan images to other applications of your choosing. - Send documents to a printer. - Send documents via mail.
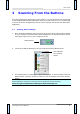
User Guide 3 Scanning From the Buttons By simply pressing the Scan button on the scanner, you scan and send your documents to the designated destination application. Before you scan however, it is recommended to check the button configurations first to ensure a proper file format and destination application. 3.1 Starting Button Manager 1.
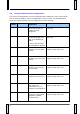
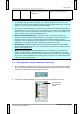
3.2 Using the default button configurations The scanner is shipped with nine preconfigured button settings for your frequent tasks such as scan to Readiris, scan to an application, scan to e-mail. The following table shows the default settings. You can change any of these settings. Button Name Number Destination/ Application Preset Scan Settings 1 Readiris Pro 14 Select this button to send Color, 300 dpi, Simplex, JPEG, documents directly to Auto Crop Readiris for text recognition.
User Guide 9 Archive Select this button to save Auto Color Detection, 200 dpi, images in a folder on your Simplex, JPEG, Auto Crop computer. Note: To accurately use the default settings, you need to set up your computer in an internet environment and install the necessary software applications such as E-mail software, or printer before installing Button Manager.
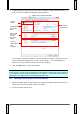
3. The Button Panel shows the first five scanning buttons. Right-click the button you wish to check, the Button Properties window appears. Name of the Selected Button Button Name Image Mode Selection Box Basic Scan Parameters Folder and file name for the scanned image Scan To destination and settings If you wish to change the setting, use this window to reset the setting for the file format, destination application, or other scan settings.
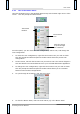
User Guide 3.4.1 Use of the Button Panel Left-click the Button icon in the Windows System Tray at the bottom right corner of the screen. This will prompt the Button Panel. The button icon The Button Number The Function Icon Click the arrows to cycle through the 9 buttons. From this panel, you can check the scan configuration, start a scan, and change the scan configuration. 1. To check the scan configuration, right click the function icon you wish to check.
4 Configuring the Buttons Button Manager allows you to customize the buttons, including scan profiles, destination applications, and how files are stored and named. 4.1 Starting the Button Properties Dialog Box For each of the nine buttons, you can choose a new configuration from the Button Properties dialog box. To start the Button Properties dialog box, 1. Left click the Button icon in the system tray at the bottom right corner of the screen. The Button Panel will be displayed. 2.
User Guide value to improve your scanned image. 5. From the Color Dropout tab, choose your desired color channel to be removed to sharpen your text. 6. From the Image Processing tab, choose if you wish to rotate your image or remove your blank page. 7. Click OK to save your settings and close this window. 4.2 The Basic Tab From the Basic tab, most of your configurations for the button can be completed.
4.2.1 The Button Name This field allows you to rename the button. Simply type your desired name. The new name will be shown in the Button Panel. An alternative way to rename your button: 1. On the Button Panel, right-click the button number you wish to rename. The button name will be highlighted. 2. Type in the new name and press “Enter” on your keyboard. For example, My Printer. 3. The name is changed and will be displayed in the Button Panel as shown.
User Guide 4.2.2 The Image Mode Option Mode: Select the proper image mode for the scanned image. Choice: Detection, Color, Gray, and Black and White. Auto Color Auto Color Detection Click to automatically detect and scan your color document in color image mode. If your document is in color, the scanner will automatically scan the document into a color image. If your document is non-color, the scanner will scan your document in Black and White mode.
4.2.3 The Scan Parameters Option Resolution: The resolution is measured in pixels per inch (ppi) (sometimes referred to as dots per inch or dpi). Higher resolutions result in more detail in the scan, slower scanning and in general, greater file sizes. For example, an A4 size color image scanned at 300 dpi with color mode consumes approximately 25 MB of disk space. When OCR (Optical Character Recognition) is to be performed on a scan, 300dpi should be used for most languages except Asian languages.
User Guide 4.2.4 The File Location Option Directory: Enter the path or click “Browse” to select the path for your scanned image. Default: C:\Users\\Pictures\IRIS IRIScan Express4\Button# (C represents your system drive.) File Name: A joint name of the text string (default: Image) and a numeric suffix is the file name of your scanned image. This suffix is automatically generated to make file names unique, for example, Image_0001.
File Format: The file format that you have selected determined the file format for the scanned image of your document. Choose your ideal file format for the specific button number. Choice includes BMP, PNG, GIF, JPEG, Single-Page PDF, Multi-Page PDF, Multi-TIFF and TIFF. BMP: BMP is the standard Windows image format on DOS and Windows-compatible computers. The BMP format supports RGB, indexed-color, grayscale, and Bitmap color modes.
User Guide Single-Page PDF/Multi-Page PDF: PDF (Portable Document Format) is a very popular file format used by Adobe. You can view PDF files using Adobe Acrobat or Adobe Reader. Multi-Page PDF: Multi-PDF combines all the scanned images into a single PDF file. The following table gives you an idea of file size v.s. file format To scan an A4 color image in 200 dpi, File Format File Size BMP 10M TIFF 10M PDF 53KB JPEG 212KB GIF 1.3M Scan Count: Display your total scan count.
4.3 The Image Adjustment Tab The Image Adjustment tab allows you to adjust the color quality of the image so that it comes close to the original. Note: it is recommended to select Document as Color Profile to obtain optimal colors. Gamma Adjusts the midtones of the image without dramatically altering then lightest and the darkest areas. When the value of gamma changes, the image changes accordingly. Gamma Value: 1.0 18 Gamma Value: 1.4 Gamma Value: 2.
User Guide Brightness and Contrast Brightness Contrast Adjusts the lightness or darkness of an image. The higher the value, the brighter the image. Drag the slider to the right or left to increase or decrease the brightness. The default value is 0. Adjusts the range between the darkest and the lightest shades in the image. The higher the contrast, the bigger the different grayscale. Drag the slider to the right or left to increase or decrease the contrast. The default value is 0.
4.4 The Color Dropout Tab Color Dropout tab allows you to filter out a color channel (red, green, or blue). For example, if you are scanning a document with a red watermark, you can choose to filter out the red channel so the scanned image just shows the text and not the red watermark. Removing colors from the scan might reduce the scan file size and improve optical character recognition (OCR) result. Note: Color dropout only applies to gray and black and white scans. 4.4.
User Guide 3. Choose “OK” to complete. Original 4.5 Remove Blue Color Channel The Image Processing Tab The Image Processing tab includes the following options.
Image Rotation/Flip Select rotation angle for your document if necessary. Choice: None, 90 degrees left (counter clockwise), 90 degrees right (clockwise), 180 degrees around, 180 degrees flipped. Original 180 degrees around 90 degrees right 90 degrees left 180 degrees flipped Blank Page Removal: If you wish to remove the blank page, check the Blank Page Removal option and adjust the sensitivity value to define the threshold.
User Guide 4.6 Setting up Button Manager to send images to a specified printer Button Manager V2 allows you to scan and send documents to a specified printer. Also, if desired, you can print two images in one side of a sheet. To setup Button Manager to upload images to a specified printer, 1. Click the Button icon ( 2. Right-click a button you want to configure. 3. In the Destination list, select Printer. 4. Click “Configuration”. The “Printer Configuration” dialog box appears.
5. If you wish to print your images not from a default printer, select your desired printer from the list. Click “Properties” to prompt the “Properties” dialog box to change your desired print settings and click OK to complete and close the dialog box. 6. Click “Options” to prompt the “Options” dialog box.
User Guide Auto Color Detection : Automatically detect the image type of the scanned image and print the images according to the image type. For example, if the scanned image is color, the image will be printed in color if the specified printer is a color printer; if the scanned image is black and white, the image will be printed in black and white. Duplex Printing (for duplex printers) Choose to print the scanned images in both the front and rear side of a page.
4.7 Setting up Button Manager to Upload Images to a Specified Mail Software Button Manager V2 provides an easy way to scan your document and send it to a specified e-mail software application as an attachment. By typing your recipient and subject in advance, the scanned image can be directly sent to the recipient with a single click. You may need to contact your System Administrator to get the IP address of your mail server. To setup Button Manager to upload images to an E-mail software application, 1.
User Guide - Enter the e-mail address of the sender and recipient. - Type your subject and message on the Subject field and Message field. - If desired, enter the e-mail address of the CC and BCC field. 4. Click the “SMTP” tab to display the SMTP dialog box. - SMTP Server: Enter the IP address of your SMTP server. - Port: Enter the port number of your SMTP server.
- LDAP Server: Enter the IP address of your LDAP server. - Port: Enter the port number of your LDAP server. Default: 389 - If the LDAP server requires a secure connection, check “This server requires a secure connection”. Contact your System Administrator for the details. - If the LDAP server requires authentication, check “Server requires authentication” and then enter your account name and password. - BASE DN: Enter your base DN. Base DN (distinguished name) identifies the starting point of a search.
User Guide 6. Click “OK” to complete. Note: LDAP: Stands for Lightweight Directory Access Protocol. LDAP enables users to access directories and address books directly from external networked devices to simplify document distribution. SSL (Secure Sockets Layer) is a standard security technology for establishing an encrypted link between a server and a client—typically a web server (website) and a browser; or a mail server and a mail client (e.g., Outlook). You must enter your “Sender” address.
3. 4. Click “Configuration”. The “FTP Configuration” dialog box appears. Enter a Host Name URL. The format of the URL is ftp://yourhostname/yoursite. This consists of the following: Scheme — ftp. Host — the name of the server. Port — the port number Enter your login name and password. Contact your System Administrator for authorization to send documents to the site. The User login name may include a domain name.
User Guide 4.9 Setting up Button Manager to upload images to Microsoft SharePoint server / Office 365 SharePoint is a collaboration and document library tool. Button Manager V2 provides a way to scan documents that you want to share and send to the SharePoint server. Once the electronic file is uploaded to SharePoint, you can use the capabilities of SharePoint to manage your scanned documents. You may need to contact your System Administrator to get the correct URL for the SharePoint server.
6. Select a login option. Contact your System Administrator for authorization to send documents to the site. • Select Use SharePoint account if you want to access the SharePoint server with a unique user login and password. If you check this option, you must make an entry in the User login and Password fields. • Select Use Windows login if you want to access the SharePoint server by using the same user login and password that you use to login into Windows on your PC.
User Guide 4.10 Setting up Button Manager to Upload Your Image to Google Drive To upload your image to Google Drive, you first need to sign in to a Google Drive account and then configure the Button Manager. 1. Click the Button icon ( ) to prompt the Button panel. 2. Right-click the Google Drive button to prompt the Button Properties dialog box as shown below. 3. Choose your desired file format from a list of BMP, GIF, JPEG, PNG, Single-Page PDF, Multi-Page PDF. 4. Click “Configuration”.
6. Click the “Proxy” tab to display the following Proxy dialog box. 7. Select your Proxy server to be “Auto Detect” or “Specify Proxy”. If “Specify Proxy” is selected, enter your IP address and port number of your Proxy server. Enter user name and password if required. You can check with your network administrator for the details. 8. Click “OK” to complete. You may click “Test” to try if the account works.
User Guide 4.11 Setting up Button Manager to Upload Your Image to Evernote To upload your image to Evernote, you first need to sign in to an Evernote account and then configure your Button Manager. 1. Click the Button icon ( 2. Right-click the Evernote button to prompt the Button Properties dialog box. 3. Click “Configuration” and the “Evernote Configuration” dialog box will appear. 4. Click the Authorize button to open the Evernote web site and then complete the Login and authorization.
8. The Evernote configuration is completed. 4.12 Setting up Button Manager to Upload Your Image to Dropbox To upload your image to Dropbox, you first need to sign in to a Dropbox account and then configure your Button Manager. 1. Click the Button icon ( 2. Right-click the Dropbox button to prompt the Button Properties dialog box. 3. Click “Configuration” and the “Dropbox Configuration” dialog box will appear. 4.
User Guide 7. Click OK to save your settings and exit. Click Test to send a test image to your account to verify if the account is active. Click Cancel to close this screen without saving changes. 4.13 Setting up Button Manager to Upload Your Image to OneDrive To upload your image to OneDrive, you first need to sign in to a OneDrive account and then configure your Button Manager. 1. Click the Button icon ( 2. Right-click the button you want to configure to prompt the Button Properties dialog box.
8. Click the Proxy tab. If your OneDrive account has been displayed in the User Name field, normally, the proxy server in the Proxy tab will be automatically set to “Auto detect”. You may enter your Proxy server information if desired. For more information, see your Network Administrator. 9. Click OK to save your settings and exit. Click Test to test your settings and verify that the account is active. Click Cancel to close this screen without saving changes. 10. The OneDrive configuration is completed.
User Guide 4.14 Setting up Button Manager to Upload Your Image to Facebook To upload your image to Facebook, you first need to sign in to a Facebook account and then configure your Button Manager. 1. Click the Button icon ( ) to prompt the Button panel. 2. Right-click the button you want to configure to prompt the Button Properties dialog box. 3. Name the button Facebook. 4. Choose “Facebook” from the “Destination” drop-down list box. 5.
11. The Facebook configuration is completed. 4.15 Setting up Button Manager to Upload Your Image to a Shared Folder 1 Click the Button icon ( 2 Right-click the button you want to configure to prompt the Button Properties dialog box. 3 Name the button “Shared Folder”. 4 Choose “Shared Folder” from the “Destination” drop-down list box. 5 Click “Configuration” and the “Shared Folder Configuration” dialog box will appear. 6 Enter your Username and Password.
User Guide 4.16 Possible Error Conditions The following conditions may occur while Button Manager is uploading a file to a network file server such as FTP, SharePoint, Evernote, Dropbox, OneDrive, or Google Drive. Error Message Invalid host. Description The entry in the Host name field is not correctly formatted. User name can not be empty. Incorrect user name or password. The user name is empty. Invalid proxy host URL. Your proxy host URL may not be correct. Invalid port number.
Exceeded the specified size limit. Unable to resolve the host name. The image file you have uploaded to the server may be too large and exceed limit. The host name may be incorrect. Unable to resolve the proxy name. The proxy host name may be incorrect. Unable to receive complete response from server. The request may not be received by the server. The request was cancelled. The request may not be received by the server. The request was not permitted by the proxy.
User Guide Method not allowed. You are not allowed to access the network file server. Unknown error. The document failed to upload for an undetermined reason. This may also occur if Button Manager cannot establish a connection with the network server. You may need to contact your System Administrator to make sure you have permission to access the network file server. Check all network settings of the Button Manager to make sure they are correct.
Button Manager will search the image-editing software application on your computer and display in the Application List. Choose the application you wish to add from the Application List. The application path will be shown in the File Path field. Or Enter the Application path or browse to the new application program (e.g., exe file). Or Choose “All Programs” from the “Start” menu. Drag and drop your new software application to the New Application dialog box.
User Guide 3. Choose any of the preset 9 profiles and click the “Add” button. A new profile will be created and displayed in the list. 4. You can rename the button by typing a new name in the Name field. 5. You may change your settings by click the “Edit” button to prompt the Button Properties dialog box for more advanced settings. Or you may click the “Delete” button to delete a current profile. 6. Click the “OK” button to save your settings and leave this dialog box. 4.
4.19.1 The Settings Tab The Settings Tab contains the following items: Unit: Choose your desired measurement units. Choice: centimeter, inch, millimeter. Language: Choose your desired language shown in the user interface. After clicking the OK button, the specified language will be immediately displayed. Scan Progress Dialog Box: Choose if you wish to show basic or detailed information during scan. Choice: Show Basic Status Only, Show Detailed Information.
User Guide 4.19.2 The Others Tab The Others Tab contains the following items: Time to hide Button Panel: Move the slide bar to set the time to hide the Button Panel. Choice: 0 ~ 120 seconds. To show the Button Panel after timeout, simply click the Button icon at the bottom-right corner of your taskbar. Profile: Check if you wish to show profile information for each button. If selected, basic profile information will be displayed in the Button Panel in special color as shown below.
Static Button Panel: Check “Show” to display a static button panel as illustrated in the bottom-left corner to start scan from the Scan button on the scanner without starting the Button Manager software application. A Static Button Panel The static button panel which can not be interactive is used to remind users nine preset button destinations and let users directly start a scan by a touch of the Scan button without starting the Button Manager software application.
User Guide 4.19.4 The Advanced Tab The Advanced Tab contains the followings options: Default: Click the “Factory Defaults” button to set Button Manager to factory default settings. Register/Unregister: The option is recommended to be used only by the software developers instead of common users. Click the “Unregister” button to stop using Button Manager and use other third-party button program. Scanner Buttons: Click “Disable” to disable the buttons on the scanner.
4.19.5 The Scanner Info Tab The Scanner Info. Tab allows you to view all the information about the scanner including serial number, pad count, roller count, and firmware version. These are helpful information when you report a problem to the service personnel. 4.19.6 The About Tab The About Tab shows current version of the Button Manager program.
User Guide 4.20 Removing Button Manager Icon from the System Tray To remove Button Manager icon from the system tray, 1. Left-click the Button icon ( screen will be displayed. 2. Choose “Quit”. You will close Button Manager and remove Button Manager icon from the system tray. Operation ) in the right corner of your system tray.
5. 5.1 Operations Inserting An Image Directly to a Software Application With Button Manager V2, you can insert the scanned image directly to a software application which is already opened. For example, when you are editing text in Microsoft Word and you wish to insert a scanned picture, you can start a scan right away and the scanned image will be inserted and displayed in your Microsoft Word. To insert an image to a software application already opened, 1. 2. 3.
User Guide 5.2 “Drag and Drop” Your File to a Specified Button Button Manager V2 is designed with a convenient feature to let you drag and drop your file to a specified button. This may be an application or a Cloud destination. To drag and drop your file to a specified button, 1. Browse your file on the Windows Explorer. 2. Click Button Manager icon ( the following Button Panel. ) at the right corner of your system tray to prompt 3. Drag and drop your file to the desired button.
Note: 1. To use the drag and drop function, you need to keep your network scanner connecting to your computer either through the USB cable or through the network cable. 2. 5.3 You may also refer to the preceding section 4.19.4 The Advanced Tab to use the Hotkey to send your image to a specified destination. Sending Error Report When a fatal error occurs and the Button Manager ceases to function, an “Error Report” dialog box appears.