IRIScan Pro 3 Cloud Button Manager User Guide
Trademark I.R.I.S are the trademarks of I.R.I.S s.a. Adobe®, Adobe PDF Scan Technology and Adobe PDF Signature are either registered trademarks or trademarks of Adobe Systems Inc. in the United States and/or other countries. Optical characters recognition (OCR) capabilities are provided by Image Recognition Integrated Systems. Copyright 1987-2013, I.R.I.S. All rights reserved. Microsoft and Windows are registered trademarks of Microsoft Corporation.
Table of Contents 1. Installing the Button Manager ................. 1 2. Scanning From the Button ....................... 4 2.1. Checking the Button Configurations Before Scanning ................................................................. 4 2.2. The Default Button Settings ............................. 6 2.3.1. Use of the Button Panel ......................... 8 3. Using Button Manager on Your Desktop . 10 3.1 3.2 3.3 4. Starting Button Manager ................................
1. Installing the Button Manager 1.1 System Requirements An Intel Pentium IV or higher Microsoft Windows XP, Windows Vista, Windows 7 or Windows 8 USB 2.0 port (compatible with USB 1.1) At least 1 GB of free hard disk space At least 512 MB of system memory At least 1 GB of RAM for Windows Vista or later A DVD-ROM drive 1.2 Introduction The Button Manager provides you an easy way to scan your document and then link the scanned image to your designated software application.
2. Click "Readiris Corporate 14 to install Readiris." 3. Click "IRIScan Pro 3 Cloud Driver" to install the scanner driver. 4. Click “Button Manager” to install the Button Manager. A language selection window appears. 5. Choose the language you wish to install. The InstallShield wizard appears to guide you through the rest of the installation.
. Click “Finish” to complete the installation.
2. Scanning From the Button By simply pressing the Scan button on the scanner, the scanned document will be sent to your designated destination application. Yet, before you scan, it is recommended to check the button configurations first to ensure a proper file format and a destination application. 2.1. Checking the Button Configurations Before Scanning 1.
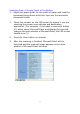
2. The Button Panel shows the first three scanning buttons. Right-click the button (function) you wish to check, the Button Properties window appears. Click to select options or setting. The button number and name. The scan settings for the selected button. (in this case button #1). The destination application. (This is the application that opens after you have finished scanning.) The file format of the scanned image. (*The options vary based on type of scanner.
2.2. The Default Button Settings The scanner is shipped with preconfigured button settings for your basic scanning tasks such as, scan-to-folder, scan-to-email, and scan-to-paint. The following table shows these factory default settings. You can change any of these settings.
Scanning From A Simple Touch of the Button 1. Adjust the paper guide for the width of paper and load the document facing down with their tops into the automatic document feeder. 1. Check the number on the LED screen to ensure if you are selecting the proper scan settings and destination application. (For example, if you want to scan with button #3, which opens Microsoft Paint and display the scanned image in the main window of Microsoft Paint, the LED screen should show 3). 2.
2.3.1. Use of the Button Panel Double click the Button icon in the Windows System Tray at the bottom right corner of the screen. This will prompt the Button Panel. The Button Icon The Button Number This number corresponds to the number shown in the LCD screen on the scanner. The Function Icon Click the arrows to cycle through the 9 buttons. The Button Panel From this panel, you can check the scan configuration, start a scan, and change the scan configuration. 1.
document to your selected destination application. 3. To change the scan configuration, right click the function icon you wish to check. This will prompt the Button Properties window which allows you to customize button function and its configurations. 4. To see the details for a button, press the Scan button on the scanner or left click the function icon. The scanning progress bar and the details for the button appear. The Detailed View 5.
3. Using Button Manager on Your Desktop Instead of pressing the button on your scanner to complete an easy scan, I.R.I.S.’s Button Manager provides you an alternative and easy way to complete your scan with a single click on your desktop. 3.1 Starting Button Manager You can start Button Manager as follows: 1. Choose Start>All Programs>I.R.I.S.
3.2 Checking the Scan Configurations Before you scan, it is recommended to check the button configurations first to ensure a proper file format and a destination application. 1. The Button Panel shows the first three scanning buttons. Right-click the button (function) you wish to check. The following Button Properties window will be displayed. Click to select options or setting. The button number and name. The scan settings for the selected button. The destination application.
3.3 1. 2. Scanning from the Button Panel On the Button Panel, left-click the button you wish to use to start scanning. After the scanning is finished, the designated software application such as Microsoft Paint will be launched and the scanned image appears in the main window of Microsoft Paint as below.
4. Configuring the Buttons The Button Manager allows you to change current button configurations, rename destination application, or change your destination application. The scanned image is either shown in the main window of the specific destination application or served as an attachment to the application. 4.1 A Glance at the Button Properties Window The Button Properties window allows you to choose new settings for the buttons.
4.2 Choosing New Settings For A Button For each of the nine buttons, you can choose a new Destination Application, Scan Configuration, and File Format. Choose a scan configuration for the scanned image. Click the arrow to change the button number. Choose a software application as the destination to send the scanned image. Select a file format for the scanned image. To choose new settings for a button, 1. Click the Button icon ( ) in the system tray at the bottom right corner of the screen. 2.
3. Right-click the button to prompt the Button Properties window. 4. From the Choose Destination list, select your ideal software application to link the scanned image to. Or you may add a new application by clicking Add/Delete to add a new software application. 5. From the Choose Configuration list, select a scan configuration.
Or you may create a new scan configuration for the specific software application by clicking Add to prompt the Scan Configuration window. 6. From the Choose a File Format option, select a proper file format supported by the software application. 7. Click OK to save and leave the window or click Apply to save and continue to work with other features.
4.3 Choosing a Proper File Format The file format that you have selected determined the file format for the scanned image of your document. To select a proper file format, From the Button Properties window, choose your ideal file format for the specific button number. Choice includes BMP, JPEG, TIFF, GIF and PDF. BMP: BMP is the standard Windows image format on DOS and Windows-compatible computers. The BMP format supports RGB, indexed-color, grayscale, and Bitmap color modes.
4.4 Adding A New Destination Application The Button Manager allows you to add your own software applications as a destination for your scanned image. To add a new destination application, 1. From the Button Properties window, click Add/Delete. The Application Manager window appears. 2. Choose Add in the Application Manager window to prompt the Add A New Application window. From the Add A New Application window, follow these steps. 3.
4. The new application will then be shown in List of All Applications in the Application Manager window. 5. Choose the new software application and click Add to include it to List of Applications for the Button #. Click Add to include the new application to the specific button. 6. Click OK to return to the Button Properties window.
7. 4.5 1. Choose the new application as your destination application in the Button Properties window and click OK or Apply. Then this new application will be the new destination application for the specific button number. Deleting A Current Destination Application From the Button Properties window, choose the Button number which you want to edit and then choose Add/Delete. Click the arrow key to select the button number 2. The Application Manager window appears. 3.
Note: If the application is selected by other buttons, you need to move the application for the specific button from the “Destinations for the button” list box to the “All destinations” list box to remove the application. 4.6 Creating A New Scan Configuration From the Button Properties window, click Add to prompt the Scan Configuration Properties window.
Mode: Select proper image mode for the scanned image. Choice: B&W, Gray, and Color. Image Type B&W Gray Color B&W Description Choose B&W if your original contains only text, pencil or ink sketch. Choose Gray image if your original contains actual shades of gray. Choose Color if you wish to scan a color image for your original in colors.
Brightness and Contrast Brightness Adjusts the lightness or darkness of an image. The higher the value, the brighter the image. Drag the slider to the right or left to increase or decrease the brightness. The default value is 0. The range can be from -100 to +100. Contrast Adjusts the range between the darkest and the lightest shades in the image. The higher the contrast, the bigger the different grayscale. Drag the slider to the right or left to increase or decrease the contrast.
Resolution: Resolution A good control of the resolution results in a good detail of the scanned image. The resolution is measured in dots per inch (dpi). Normally, the greater the dpi number, the higher the resolution and the image file size. Be aware that greater resolution takes more time to scan, and more disk space for the scanning image. For your information, an A4 size color image scanned at 300 dpi at True Color mode consumes approximately 25 MB of disk space.
Cropping Cropping allows you to capture a portion of the document being scanned. Choice: Automatic, Fixed to Transport, EOP (End of Page) Detection. Options Description Automatic Automatic adjusts the cropping window according to different document sizes. Use this option for batches of mixed-sized documents. Fixed to Transport This feature allows you to define the area or zone to be imaged. Use for batches of same-sized documents.
Duplex Check the box if you need to scan front and rear side of documents. Yet, before you scan, make sure that you have purchased a duplex scanner. Automatic Deskew Use this option to automatically deskew a document. Note: If the skew angle is too great, some of the image may be cut off. Scan Area Choose your desired paper size with the drop-down list box. Or you may select a custom paper size by clicking the Scan Area box and then click Add to include in the choice. Choice: None, US Letter- 8.
Additional Length Detection Additional Length Detection allows you to define the length of document being multi-fed. This value indicates the additional length exceeding your designated scan area. The Display window will show the size of the document as you change the value. A value of 0 indicates no additional length detection. The Additional Length Detection is best used when scanning same-size documents in the auto document feeder.
Multi-Feed Alarm If a wave file is added, the scanner will make a sound alarm if multi-feed is detected yet no Warning dialog box will be displayed. If “Stop Scanning after Multi-Feed” is selected, the scanner will stop the feeder. If “Stop Scanning after Multi-Feed” has not been selected, the scanner will continue to scan till the end of your document. Action: 1.
4.6.2 The Color Dropout Tab From the Scan Configuration Properties window, click Color Dropout tab to prompt the Color Dropout window. If your image contains red color watermark or background, choose the R(Red) channel then any red watermark or background will be removed. This feature is used to sharpen your text when using OCR (Optical Character Recognition) software. Note that this function supports only black & white and gray image.
Background Level The pixel which is higher than the background value will be adjusted to the lightest point. Adjust the value for both the Filter Threshold and Background Level to produce the best optimal result. Example, slightly adjusting the background value makes your text more clear.
Remove Blue, Threshold: 20, Background Level: 210 31
4.6.3 The Color Adjust Tab Color Adjust: From the Scan Configuration Properties window, click Adjust Color to prompt the Adjust Color window. Adjust the color quality of the image so that it comes close to the original. Use ICC Profile: The ICC profile format was defined by the International Color Consortium (ICC) as a cross-application standard. ICC profiles help you reproduce colors accurately across different platforms, devices, and ICC-compliant applications.
Use ICC Profile Normal Gamma: Adjusts the midtones of the image without dramatically altering the lightest and the darkest areas. When the value of gamma changes, the image changes accordingly. Gamma Value: 1.0 Gamma Value: 1.4 Gamma Value: 2.0 Highlight and Shadow: Highlight refers the lightest point in a scanned image while shadow refers the darkest point. Using Highlight and Shadow tool together allows you to extend the range of color and reveal more details in a gray or color image.
When the value of highlight and shadow change, the image changes accordingly.
4.7 Deleting A Current Scan Configuration 1. From the Button Properties window, choose the scan configurations you want to delete. 2. Click Delete. A confirmation window appears. Chose OK to delete or Cancel to quit.
4.8 Selecting Options For a Button From the Button Properties window, click the Options tab to select options for a button. Path and Folder Options Path and Folder Name Enter the path or click Browse to select the path for your scanned image.
Folder Select the folder name to store your scanned image. Choice includes None, Application Name, File Format, Date, Date + Time. (Default: File Format) For effective management, please choose one to group your scanned image. For example, if you choose Date + Time, your folder name will display 2012-10-31-13-56-41. This indicates year-month-date-hour-minute-second. You may click the “Disk Clean Up” box to view and delete all the scanned images.
Separate document by “Patchcode”. Choose this if you wish to separate your document by “Patchcode”. Separate document by page number. Choose this if you wish to separate your document by a specific page number.
4.9 Removing a Blank Page From the Setting tab in the Button Properties window, check Blank Page Removal Threshold if you wish to remove the blank page and move the slider to the left or right to your desired threshold.
4.10 Performing Continue Scan From the Document Feeder Continue to scan next batch from the document feeder: Check this box if you wish to perform continue scan from the auto document feeder. If yes, after completing scanning the first batch of document, the following dialog box appears. Load your document into the auto document feeder and then click “Continue” to scan next batch of document.
4.11 Saving and Loading Profiles Button Manager allows you to save your profile (custom settings) and load the profile in just a few seconds. To save a profile, 1. 2. 3. Customize your settings. (For example, change your resolution, file format, destination application, or other scan settings.) From the Setting tab in the Button Properties window, click “Save Profiles”, a Save As dialog box appears. Enter the file name of your profile and then click “Save” to save the profile.
To load a profile, 1. From the Setting tab in the Button Properties window, click “Load Profiles”, an Open dialog box appears. 2. Choose the profile which you want to load. (For example, betsy.abp) Click “Open” to load the profile. Your selected profile appears on the screen. 3. Factory Defaults: Click this button and your existing settings for each button will be cleared and return to the factory default settings.
4.12 Solving A Problem If you encounter an error message and can not solve the problem, you can send a report.txt file to your nearest service center for quick trouble shooting. To send the report.txt file, please follow these steps. 1. Right-click the button icon ( ) on the right bottom of your screen. A pop-up screen appears. 2. Click “About” to prompt the Information dialog box.
3. Click the Report button. A report.txt file (C:\Button_Report.txt) will be generated and displayed on the screen. Please send this file to the nearest service center for a quick trouble shooting. The “Reset Pad Count” button」: After scanning approximately 50,000 pages (the number varies based on type of scanner) through the Auto Document Feeder (ADF), the ADF pad may be worn out and you may experience problems with document feeding.
Index A G Additional Length Detection, 36 Gray, 31 B H B&W, 31 Background Level, 39 Blank Page Removal Threshold, 47 BMP, 23 Brightness, 32 Button Properties window, 5 Highlight, 41 I ICC profile, 40 Image Segmentation, 25 J C JPEG, 24 Color, 31 Color Adjust, 40 Continuous Scan, 12 Contrast, 32 Cropping Automatic, Fixed to Transport, EOP Detection, 34 M mode B&W, Gray, Color, 30 Multi-Feed Detection, 35 P D PDF, 23 PDF/A, 25 Deskew, 35 DjVu, 25 Duplex, 35 R Reset Pad Count, 53 Reset Roller
Dropout, Color Adjust, 30 Searchable PDF Compression, OCR, Security, 23 Shadow, 41 T TIFF, 23 U Ultrasonic Detection, 36 46