User’s Manual http://www.iriver.com Thank you for purchasing the product. Please read the manual carefully before use.
Welcome Thank your for your iRiver purchase. The iMP-1100 comes complete with a long list of advanced features. It is important that you read the manual to ensure that you get the most out of your new player. Copyrights / Certification / Trademarks / Limited Liability Copyrights iRiver Limited has all the rights of patent, trademark, literary property and intellectual property related to this manual. You may not reproduce any part of this manual unless authorized by iRiver Limited.
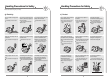
Handling Precautions for Safety Handling Precautions for Safety Please read before using for your safety. Electricity Do not overload a single power circuit. Overheating or fire can result. Product Do not kink or crease the power cable or place heavy objects on the power cable. Do not handle power plug and adapter with wet hands. Electrical Shock may result. Fire can result from damaged power cables. Firmly plug the adapter into the wall socket. Fire can result from improper use.
Handling Precautions for Safety Handling Precautions for Safety Others Keep the player away from strong magnets. Do not disassemble or modify the product. It can cause a damage to your player because of improper usage. It can cause a damage to your player because of improper usage. Reduce volume while walking, especially at pedestrian crosswalk. Do not use headphone / earphones at high volume. Do not use at high volume for continuous listening.
Contents Specific features Welcome 4-1 Navigation mode 28 Copyrights / Certification / Trademarks / Limited Liability 1 4-2 EQ 29 Handling Precautions for Safety 2 4-3 Play 30 4-4 Interval Repeat / Reservation 31 4-5 Programming 32 4-6 -10 / +10 function 34 4-7 BOOKMARK feature 35 4-8 Other features 37 4-9 Menu 38 4-10 Menu operation 39 4-11 Menu setup 42 4-12 Firmware upgrade 69 Before using 1-1 Features of iMP-1100 8 1-2 Components 9 Using the Controls 2-1 Locating the Con
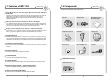
1-1 Features of iMP-1100 Before using 1-2 Components Before using Accessories are subject to change without notice. Plays Movie files on CD! Also plays MP3 CD along with standard Audio CDs. The iMP-1100 will play DivX encoded AVI and ASF movie files burned onto CDR and CDRW discs on the built in LCD screen. Discs with JPG and BMP pictures can be displayed. It will also play MP3, WMA, and ASF audio files burned to disc along with standard Audio CD’s.
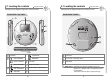
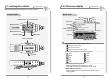
2-1 Locating the controls Using the Controls Actual player may vary slightly from images shown. Functions are similar. Product View - top / sides 2-1 Locating the controls Using the Controls Actual player may vary slightly from images shown. Functions are similar.
2-1 Locating the controls Using the Controls 2-2 LCD screen display Using the Controls Actual player may vary slightly from images shown. Functions are similar. Remote Control Music mode Hold Play mode POWER ON,OFF / PLAY / PAUSE Button iRiver Shock Free Volume Track Number Battery indicator Folder Name Artist Song Title Next file to be played Play time Progress Bar PREVIOUS Button NEXT Button EQ Level Meter Volume Control Button File Format Sampling Rate Bit Rate 1.
2-2 LCD screen display Using the Controls 2-3 Connecting product Using the Controls Power on Picture mode Charging with AC Adaptor 1. Use the AC Power adapter supplied with product for safety. 2. Connect the AC adapter to the 5.0V DC jack on the player and into power outlet. (AC adaptor of this product is for 100~240V, 50~60Hz.) 3. The player will be charged automatically when the AC adapter is connected to the player.
2-3 Connecting product Using the Controls Power on 2-3 Connecting product Using the Controls Connecting Remote control / Earphones External Battery pack 1. Connect the external battery pack as indicated below. 1. Connect Remote control cable with product as shown on below diagram. 2. Connect Remote control with earphones jack. Earphones jack Remote control Recharging is possible with supplementary battery pack. Connect TV The player can be recharged even when powered off. 1.
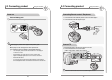
3-1 Detailed operation Getting started Playing Audio Click 6 Press the or button to select another track. : Plays previous track Insert a disc, label facing up and close the lid. : Plays next track Long Click 2 Getting started Playing Audio Playing Audio 1 3-1 Detailed operation 7 Connect the Remote controller and earphone. Press and hold the or to scan within a track. : Reward within a song : Fast-forward within a song Click+Long While playing press the button to pause the song.
3-1 Detailed operation 3-1 Detailed operation Getting started Viewing images Viewing images Displaying an image file 1 Getting started View Image Information Insert a disc, label facing up and close the lid. Long Click 1 Press and Hold the A-B / EQ button. A short list of information about the image will be displayed. 2 Press the button to power on the player. The first image on the disc will automatically display on the LCD screen.
3-1 Detailed operation Getting started Viewing images Getting started Viewing images ZOOM Click 3-1 Detailed operation Reversing image 1 Long Click Press the A-B / EQ button to Zoom in on the displayed image. 1 Press and hold the + or button to reverse the image. You can reverse an image horizontally/vertically.
3-1 Detailed operation Getting started Viewing images Playing video file 1 Press and hold the button to display thumbnail images on the disc. 2 Press the + or -, or button to move the cursor and scroll through all the images on the disc. , 1 Insert a disc, label facing up and close the lid. 2 Press the button to power on the player. Once powered on, video playback will begin automatically. While playing video, press the button for pause and press it again to resume play.
3-1 Detailed operation Getting started Playing Video file Click+Long 5 6 Getting started Playing Video file Playing video file Long Click 3-1 Detailed operation Press and hold Display Video Information or . Long Click : Reward : Fast-forward 1 Press and Hold the A-B / EQ button. A short list of information about the video will be displayed. Press the or button, release immediately, then press and hold the same button again to skip one folder at a time.
4-1 Navigation mode 4-2 EQ Specific features 1 EQ Press the NAVI / MENU button. A list of files on the disc will be displayed. 2 Press or to scroll up and down the list. 3 If a folder is selected press button to enter the folder. 4 Press button to move to upper folder. 5 Press the button to play the selected file. The list of titles Navigation Mode Specific features Long Click 1 Press and Hold the A-B / EQ button to display the current EQ selection.
4-3 Play 4-4 Interval Repeat / Reservation Specific features Specific features Play a selected interval repeatedly during play. Set Mode 1 Press MODE button during play. Click 1 Press A-B / EQ button while playing to select the beginning (A) point. Click 2 Press A-B / EQ button again to select the end (B) point. MODE ICON Icon is changing whenever MODE button is press. The interval (A to B) will be repeated. Press the A-B / EQ button to cancel the interval repeat.
4-5 Program Mode 4-5 Program Mode Specific features Specific features 2. Playing Program List Program Mode Program Mode allows you to program a list of songs to play. Click 1 When stopped (no songs are playing) Press the A-B / EQ button to enter the Program Mode. If there’s Playlist (*.m3u) file of Winamp in the disc, then "Playlist" is supported. (Refers to Page 37) 1 button after Press setting a program. The tracks will be played in order set by Program.
4-6 -10/+10 function 4-7 BOOKMARK feature Specific features Only applicable to optional remote control. Specific features Only applicable to optional remote control. -10/+10 function 1. BOOKMARK Function Place a BOOKMARK within an audio file to quickly return to that position in the track. 1 Play previous 10 tracks/next 10 tracks. Next +10 previous +10 A BOOKMARK can only be set when STUDY mode is activated. (Refer to Page 63) Press the -10/+10 button during play.
4-7 BOOKMARK feature Specific features 3. Deleting BOOKMARK Long Click 1 4-8 Other features Specific features How to use Winamp playlist Press and Hold the -10 button enter BOOKMARK mode. 1 Make a PLAYLIST(*M3U) using Winamp. Winamp execution picture Click 2 Press MODE button. BOOKMARK is deleted from the current position. BOOKMARK is deleted from the end consecutively whenever MODE button is pressed. 2. Name the file name (ex:iriver.m3u) and click "SAVE" button. A new list will be created. 1.
4-9 Menu Specific features 4-10 Menu operation Specific features Functions may vary with product and firmware revisions. 1. Menu 2. Switching between Menus Long Click 38 1 Press and Hold the NAVI / MENU button to display the main menu system. 2 Press or button. : Moves to the previous Menu. : Moves to the next Menu.
4-10 Menu operation Specific features 3. Entering submenu Click 1 Specific features 5. Exiting from submenu Press thet the NAVI / MENU button or the button to display the desired sub-menu. 4. Setting up the User's function 1 Select the desired feature and press the NAVI / MENU button or to view and change settings for the feature. 2 The + or -, are used to change settings in each feature. Click 4-10 Menu operation 40 Click 1 Press the button to exit back to the menu.
4-11 Menu Setup Specific features GENERAL 4-11 Menu Setup Specific features GENERAL 1. RESUME 3. Shock Free You can select how to resume the last track played. If iRiver Shock Free mode is set, the player can absorb more impacts. However poorly recorded discs may play with reduced quality. Track # : Plays the beginning of the last track played. Track Time : Resumes to the exact position in the song. 2. LANGUAGE 4. CD Anti-Shock Supports 40 languages.
4-11 Menu Setup Specific features GENERAL Specific features GENERAL 1. Activating the PASSWORD option 5. Sort Mode Using the directory structure example on the right, the sort methods will play folders in the following order. 1 Press the repeatedly to toggle between ON, OFF, and CHANGE. 2 Turn off the power and turn it on again. Password window will be displayed. PHYSICAL ADDR.
4-11 Menu Setup Specific features GENERAL Specific features GENERAL 2. Changing Password 1 Long Click 4-11 Menu Setup 2 2. Change Password Press the button to select "CHANGE". If the password to change and the password to confirm are the same, the password is automatically changed and the player will reset. If you select “ON” on the password menu, you must input the new password to turn on the player. Press and hold the NAVI / MENU button to display the password window.
4-11 Menu Setup Specific features GENERAL 4-11 Menu Setup Specific features GENERAL 7. Multi Session 9. Registration Code (DRM Certification No.) OFF : Player will not read multi-session discs. This displays the certification number required for using DRM VOD (Video On Demand) service. ON : Player will read multi-session discs. If you are not using audio CD's created in Multi Session format, set this feature to OFF to shorten the access time of your CDs.
4-11 Menu Setup Specific features DISPLAY 4-11 Menu Setup Specific features DISPLAY 1. LCD Bright (Main) 3. LCD Contrast (Remote LCD Contrast) Adjust the brightness of the main TFT LCD display. Use the or button to adjust the value. Adjust the brightness of the Remote Control LCD (sold separately). Use the or button to adjust the value. This setting only applies to the optional LCD remote controller. 2. LCD Contrast (TFT LCD Contrast) 4.
4-11 Menu Setup Specific features DISPLAY 4-11 Menu Setup Specific features DISPLAY 5. Tag Information 7. Battery Indicator ON :Displays track with ID3 tag information or with lyrics if there are lyrics. Adjust the level of the battery indicator to compensate for different style of batteries. OFF : Displays track with file name. Lower numbers will make the battery indicator higher, higher numbers will make the battery indicator lower.
4-11 Menu Setup Specific features DISPLAY 4-11 Menu Setup Specific features TIMER 9. Interlace Mode 1. Sleep Power Off When AV OUT/OFF/LCD switch at the back of the player is AV OUT, select Non-interlace/ Interlace for the display generated with AV OUT. Automatically power off after fixed time (Time range can be set from 0 to 99 minutes). Interlace mode is used to reduce overall flicker. Select Non-Interlace if you see shaking or vibrating screen.
4-11 Menu Setup Specific features TIMER 4-11 Menu Setup Specific features TIMER 3. Main LCD Display Off 5. Picture Slideshow LCD screen will turn off after the designated time to conserve battery life (only while playing audio tracks). Always On / 5 sec / 10 sec / 20 sec / 30 sec / 40 sec / 50 sec / 60 sec. Set automatic image transfer time (Off / 5sec / 10sec / 30 sec / 1min) during image play. 4.
4-11 Menu Setup Specific features CONTROL 4-11 Menu Setup Specific features CONTROL 1. FF/RW Scan 3. FF/RW Scan Speed After setting FF/RW SCAN function to ON, press the or button for more than 1.5 sec for speedy search. Press with short click, it will skip to the previous/next track. If FF/RW SCAN function is OFF, it will pass the track numbers rapidly. and button can be used for this setting. The fast scan speed can range from 1x / 2x / 4x / 6x.
4-11 Menu Setup Specific features CONTROL 4-11 Menu Setup Specific features CONTROL 5. - / +10 Button 7. Power Save Mode Sets the movement of -/+ 10 button of the remote control. When the main TFT LCD display is in use, the Power Save Mode is activated to extend the battery life. -/+10 : Moves to the previous 10th or the next 10th file of the file that is currently played back. -/+ DIRECTORY : Moves to a folder before or after the file folder that is currently played back.
4-11 Menu Setup Specific features MODE 4-11 Menu Setup Specific features MODE 1. Repeat Mode 3. Intro Mode Chose the various repeat modes that are availabe during playback by pressing the MODE button. This does not set any mode, but makes them availabe for selection while playing files. Plays about 10 seconds of each track at the beginning or in the middle (1min from the beginning). The scrolling between each category is done by pressing the or buttons and selection is with the button.
4-11 Menu Setup Specific features MODE 4-11 Menu Setup Specific features MODE 5. Name 7. Caption Alignment You can input your name or custom text. (maximum 12 characters in English) Set video captioning justification (Left / Center / Right). Use with character selection. Use with character deletion Use with character entry Use with other character selection Cursor movement Store character/exit 6. Caption Mode Set video captioning position (Bottom / Top) or OFF to disable.
4-11 Menu Setup Specific features SOUND 4-11 Menu Setup Specific features SOUND 1. Beep Sound Volume 3. Sound Balance Select the volume level of the beep sound. Set the value to "0" to turn off the beep completely. When Sound Balance bar is moved to L (Left, 0),the sound outputs at the left earphone. When the lever is moved to R (Right, 40) the sound outputs at the right earphone. The default value is 20 and the sound outputs the same level at both earphones. 2. Sound Fade In 4.
4-11 Menu Setup Specific features 4-12 Firmware upgradable Specific features What is FIRMWARE? SOUND 5. User EQ A user can control 5 bands, range of 60Hz, 250Hz, 1KHz, 4KHz, and 12KHz, with 1dB intervals in between -10dB to +10dB and achieve various sound effects. It is the operating system that works in the iMP-1100. iRiver provides you with the latest and best features through Firmware Upgrade Visit www.iRiver.com to upgrade your Firmware.
5-1 Questions and Answers Additional Information Product 5-1 Questions and Answers Additional Information Recording How long does Anti-Shock last? How do I copy MP3 or WMA files on to a CD? With MP3 files (128Kbps, 44.1KHz) , Anti-Shock lasts up to 850 seconds. With Audio CD, you can set it up to 80 or 320 seconds. You need to record MP3 or WMA files on a CD-R or CD-RW disc to play in the iMP-1100. Mechanical noise is heard from the player. In general, there are two kinds of blank CDs.
5-1 Questions and Answers Additional Information Recording 5-1 Questions and Answers Additional Information Playing How do I make a CD from a tape or record? How do I listen to a spot on the track I last listened to? To convert the tape's information into CD requires many items, including: A player to play the tape or record, a stereo cable to attach the player to your computer, and third party recording software to capture and edit the audio.
5-1 Questions and Answers Additional Information Playing 5-1 Questions and Answers Additional Information Playing The sound cuts out when the player skips. Can I change the playing order? If the player is shaken in a sudden or violent manner, or shaken excessively, skipping may occur. Under normal circumstances, skipping will not occur. Please carry and handle the player under normal circumstances. (i.e., without excessive shaking). The iMP-1100 supports m3u file lists.
5-2 Troubleshooting Additional Information Should any problem continue after you have checked these symptoms, contact your nearest iRiver Customer Support department. Trouble Player will not power on. Solution Check whether the HOLD switch on remote is ON (Switch to OFF position) Check whether the player door is opened Check whether the rechargeable batteries are not charged or the batteries are drained. Check that the batteries were properly inserted into the external battery pack.
5-2 Troubleshooting Additional Information 5-3 Precautions Additional Information Should any problem continue after you have checked these symptoms, contact your nearest iRiver Customer Support department. On Handling Disc Trouble Solution Picture files does not display. The image not adhering to product specification may not display. Please, check the specification. Avoid touching the surface (bright side) where data is stored. LCD screen shuts off during playback.
5-3 Precautions Additional Information Memo Caution During playback, dirty or scratched CD's may cause distortion or skipping. If the file is unable to play due to damage, the damaged part will skip; if it is not possible to play continuously it will skip to the next song. Only regular music CD and file extension with MP3, WMA, ASF, AVI, BMP, and JPG can be played. Files in each folder will be ordered alphabetically , and number will be assigned accordingly on the order.
5-4 Specifications Additional Information General Specifications Category Audio Specifications Frequency/Range 20Hz~20KHz 14mW(L) + 14mW(R)(16 Ω) Max. Volume 8mW(L) + 8mW(R)(32 Ω) Max. Volume 0.95V rms (47KΩ) Max. Volume 90dB (CD-DA), 90dB (MP3 CD) ± 3dB (Line output) Stereo (L+R) 220 X 176 Transmissive LCD NTSC / PAL CD-DA, CD-Text (8cm/12cm) CD-ROM Mode1, Mode 2 Form1 Enhanced CD, Mixed CD Packet Write, ISO9660, Joliet Romeo, Multi-Session DC 5.0V, 2A Li-Ion 1900mAh 4, 1.
REGULATORY INFORMATION Additional Information SAFETY WARNING Additional Information Federal Communications Commission (FCC) The device manufactured and found to comply with limits for a Class B computing device according to the specifications in FCC rules Part 15. Operation is subject to the following two conditions; 1. This device may not cause harmful interference, and 2. This device must accept any interference received, including interference that may cause undesired operation.
Memo