Instruction Manual MP3 PLAYER/FM TUNER Model iFP-300 Series iFP-300 Series Thank you for your purchase. Please read this manual carefully before using your new player. www.iRiver.com www.iRiver.
THIS DEVICE COMPLIES WITH PART 15 OF THE FCC RULES. OPERATION IS SUBJECT TO THE FOLLOWING TWO CONDITIONS: (1) THIS DEVICES MAY NOT CAUSE HARMFUL INTERFERENCE, AND (2) THIS DEVICE MUST ACCEPT ANY INTERFERENCE, RECEIVED, INCLUDING INTERFERENCE THAT MAY CAUSE UNDESIRED OPERATION. Note : This equipment has been tested and found to comply with the limits for a Class B digital device, pursuant to part 15 of the FCC Rules.
URL : www.iRiver.com Find information on our company, products, and customer and technical support. Update your player with firmware downloads. Firmware upgrades offer support for new CODECS and deliver new product features. Consult the product FAQ. Register your iRiver product online so that our Customer Service is able to provide support as efficiently as possible.
INTERNET........................................................................................................................... 2 UNIQUE FEATURES........................................................................................................... 3 CONTENTS......................................................................................................................... 4 1. LOCATING THE CONTROLS FRONT VIEW, SIDE VIEW 1.........................................................................
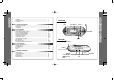
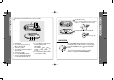
LCD Window SIDE VIEW 2 USB Connection Port Hold THE ORDER OF SONGS PLAY TIME PLAYBACK MODE HOLD BATTERY INDICATOR Earphone FOLDER NAME ARTIST/TITLE NAME Battery Compartment FILE FORMAT BIT RATE SAMPLE RATE VOLUME EQUALIZER WAVEFORM PROGRAM 6 7
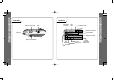
iFP-340 doesn’t feature FM Tuner or Line-in recording. To adjust the volume Press + on volume button to increase volume and press – on button to decrease volume. h Pus Selecting FM Mode when listening FM : Click (Refer to page 34) NAVIGATION 1. LCD window. 2. To select the previous music for MP3 or station for FM. 3. To increase volume. 4. To select the next music for MP3 or station for FM. 5. To decrease volume. 6. To select NAVI/MENU function. 7.
MENU DELETING FILES ON THE PLAYER A long press of the NAVI/MENU button will enter the menu system. Stop playback. Scrolling between menus : Press and . Exit : Push the VOL - switch down or hold down the NAVI/MENU button. Select Function: Press the NAVI/MENU button. lick Long C Click the “MODE” button. “FILE DELETE ARE YOU SURE?” is displayed on the LCD. Select “YES”by using and to delete. Then click NAVI/MENU button.
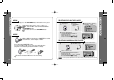
Insert the Installation CD into the CD-ROM drive. The following screen appears after inserting the CD. If installation doesn't automatically begin, execute the "setup.exe" file of the installation CD. The installation program will begin. To install “New hardware” Connect the USB cable (provided) to the USB port of your computer. Type “A” The installation CD contains the following contents : - Device Driver - iRiver Music Manager The player can store MP3 files or files of any type.
Click “Next” after selecting the language to install. Select the folder to Install. Click “Next”. 14 Click “Next” to Install iRiver Music Manager. Click “Install” to install. Installation is progressing. Click “Finish” Completed the installation of “New hardware”.
When installing in Windows XP 1. Basic operation After installation of Manager that is included in the install CD and connect your player with PC, the pop-up window like left image comes up. Select 'Install the software automatically (Recommended)' and click 'Next'. When the warning screen like below image pops up, please click 'Continue Anyway'. (The CD comes with iRiver player is iRiver's official software to ensure the safe installation of product.
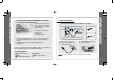
2. PLAYER & FILE TRANSFERRING Download is processing. Download is completed. 1) Downloading from the PC Activate the Manager program after connecting the USB cable between the player and PC. Select the folders or files on the PC to transfer to the player. Select the destination folder on the player. CAUTION Click the “Download” icon or select “Download” in the Transfer menu to transfer the selected files to the player.
2) Uploading to the PC Activate the Manager program after connecting the USB cable between the player and PC. Select files or folders in the player to save. Upload is processing. Upload is completed. Select the destination folder on the PC. CAUTION Click the “Upload” icon or select “Upload” in the Transfer menu to transfer the selected files from the player to your PC. 20 - Music Files (MP3, WMA, ASF) can be uploaded from the player to the PC in accordance with current copyright laws.
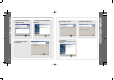
3) Change position of folders or files on the player Click and Drag to move folders or files to the desired location. 4) Moving to upper folder (PC & Player) Click the move to “upper folder” icon in the menu bar of the iRiver Music Manager. Move to upper folder on the PC Move to upper folder on the player Left Click & Drag 5) Refresh (PC & Player) Click the “Refresh” icon to display the contents of the PC or player. NOTE Only one file or one folder moving is allowed.
2) Making new folders on the PC 3. Managing files 1) To make a new folder on the player Click the “New Folder” icon or select “File-New folder” in the file menu to make a new folder. Click the “New Folder” icon to make a new folder. New folder is created. New folder is created. Type the name in the new folder. Type the name in the new folder.
3) Deleting folders or files of the player 4) Deleting folders or files of the PC After starting the “Manager” program, select the files or folders to delete. Click the “Delete” icon or the menu option "File-Delete". After starting the “Manager” program, select the files or folders to delete. Click the “Delete” icon. Click “Yes”. Files are deleted. Click “Yes”. Delete is completed. NOTE Note this will delete files permanently from your hard drive. Use with caution.
4. Additional functions The window below is displayed as the firmware upgrade is processing. Click “OK” after the player turns off. 1) Upgrading the firmware Download the latest Firmware from our website. Unzip it. Execute the “*** .EXE” file. IFP-3XXT.HEX or IFP-3XX.HEX (for iFP-340 only) file is created. Click the "Transfer-Firmware Upgrade" menu option. 28 Locate and select the IFP-3XXT.HEX or IFP-3XX.HEX file then click Open.
2) Format iFP-340 doesn’t feature FM Tuner or Line-in recording. 3) Modifying the Radio Stations Format will erase all files in your player memory. You can modify the FM Radio stations with the iRiver Music Manager. Click the “format” icon or select “Fileformat” in the file menu to format. Click “Start”. Select “Transfer-Tuner Setting” in the menu to modify radio channels. The alert below is displayed. Click “Yes” to initialize. Format is completed. You can edit the list of your FM stations.
iFP-340 doesn’t feature FM Tuner or Line-in recording. Listening to music Connect the earphones as shown below. Put the HOLD switch to “OFF”. To turn on the player Click To play the next folder h Pus To play Press the PLAY/STOP button to turn on the player. Press it again to play.
iFP-340 doesn’t feature FM Tuner or Line-in recording. iFP-340 doesn’t feature FM Tuner or Line-in recording. Tune to your favorite station (FM 87.5~108MHz) While playing MP3, Press and hold the MODE/REC button. lick Long C To change frequency, push the or switch to the left or the right. (ex : 87.5 The function selection graphic displays on the LCD. or MP3 FM RADIO VOICE LINE IN Push the , button to select FM RADIO. Press the NAVI/MENU button to confirm.
iFP-340 doesn’t feature FM Tuner or Line-in recording. iFP-340 doesn’t feature FM Tuner or Line-in recording. Memory Function (Save stations) Select the station by pushing the Memory delete function (Delete saved stations) or Select the station to be deleted at preset mode switch to the left or the right. Press and hold the memory button. Click lick Long C Push or and select the desired stations. again Select CH02 Up to 20 stations can be saved.
iFP-340 doesn’t feature FM Tuner or Line-in recording. To record FM Press Recording Voice Press and hold the MODE/REC button. the MODE/REC button during FM reception. Press the or Voice mode. lick Long C switch to select h Pus To stop FM recording Press the MODE/REC button again to stop recording. The recorded file is saved as TUNER000.REC. It is saved in the RECORD folder. MP3 FM RADIO VOICE LINE IN Press the NAVI/MENU button (or PLAY/STOP) to go to Voice recording mode.
iFP-340 doesn’t feature FM Tuner or Line-in recording. To stop recording Press the MODE/REC button. To play a recorded file Press the PLAY/STOP button. Click Recording from the external audio source Connect LINE OUT jack of the external equipment to LINE IN jack of the player. Click To pause voice recording MONO 32KHz 32KBPS Press Press recording. button during recording. button again to restart Set “Line In Recording Mode” in the MENU.(Refer to p.
iFP-340 doesn’t feature FM Tuner or Line-in recording. Press the or switch to select Line-In mode. iFP-340 doesn’t feature FM Tuner or Line-in recording. Press the NAVI/MENU button (or PLAY/STOP) to go to Line-In recording mode. To stop recording Press the MODE/REC button. h Pus Click or Click Click STEREO 44.1KHz 128KBPS MP3 FM RADIO VOICE NOTE The recorded file is saved as AUDIO000.REC, AUDIO001.REC... in sequential order. It is saved in the RECORD folder.
iFP-340 doesn’t feature FM Tuner or Line-in recording. To play a recorded file Navigation is the function used to search for tracks. < Method 2> You can select a song by pressing the NAVI/MENU button and using the VOL +, VOL - buttons. After pressing the NAVI/MENU button, select a recorded file using VOL + or VOL - button. Click NAVI/MENU button Scroll up Scroll down Press the PLAY/STOP button.
Select the track Scroll up Select the track REPEAT Play a single track repeatedly. Play all tracks in the folder and stop. Play all tracks in the folder repeatedly. Scroll down Play all tracks in the player repeatedly. SHUFFLE Randomly play all tracks in the player and stop. Play a single track repeatedly. MODE (Playback Mode) Randomly play all tracks in the folder and stop. You can set various Repeat and Shuffle options by choosing these selections under Mode.
Program mode: Create your own playlists. Press the MEMORY/EQ button to save the program list. Click Activating Program mode 001 002 003 At stop mode To remove files from the program list. Click Scroll to Program mode Program mode is activated while in Stop Mode. Repeat A-B is activated while playing. Press the MODE/REC button after selecting the file to be deleted using the MEMORY/EQ button. The program list is automatically changed.
Program Play EQ MODE After programming, press to play the tracks in sequential order. The program mode icon appears Cancel Program Mode Press stop then h Pus Interval Repeat Press and hold the MEMORY/EQ button to display the current EQ. Every time you click this button, the EQ mode scrolls in sequential order. Play a selected interval repeatedly Press button once to select the beginning Point. NOTE Please refer to the Function Control (Page 62) for configuring Xtreme EQ.
Menu is subject to change with different firmware versions. Users can configure their own settings. MENU OPERATION MAIN MENU Press and hold the NAVI/MENU button to display the menu system. It is composed of 6 main menus with submenus. CONFIGURATION 1.00 SUB MENU 2 When you select a sub menu, you can set your preference to be displayed. Shift between Menus Press the or button to move between main menu and sub menu. 1.
GENERAL Enter Sub Menu Click h Pus 2 2 Three button markings are rather buried with this picture. Maybe enlarge or otherwise highlight those buttons, maybe use the “Hand” icon. BEEP VOLUME : Set beep volume level. Set to "0" for OFF. RESUME : When ON, player resumes to previous place in song after STOP or Power OFF. FADE IN : When activated, volume increases gradually at playback mode to prevent sudden loudness.
LOAD DEFAULT VALUE : Initialize Menus to the original factory settings. Button operation order is as below. Click NAVI/MENU (select default menu) (select YES) Click NAVI/MENU (select YES : Initialization) DISPLAY BACK LIGHT : You can adjust the time that the Backlight stays on. SEC : Backlight stays on from 0 to 30 seconds. MINUTE : Backlight stays on from 0 to 30 minutes. Press the NAVI/MENU button to set SEC/MINUTE. LCD CONTRAST : Adjust LCD contrast of remote control.
TIMER (SET AUTO POWER OFF) FF/RW SCAN SPEED The fast scan speed can range from 1x/2x/ 4x/6x. SLEEP POWER OFF : Automatically turns power off after a fixed time. (Time range can be set from 0 to 180 minutes by a minute) Use the or button to adjust time. recording quality SOUND BALANCE BEEP Set BEEP ON/ OFF by pressing the NAVI/MENU button. When the power is off, the sleep power off setting goes back to Zero setting. STOP POWER OFF : Automatically turns power off at stop mode.
iFP-340 doesn’t feature FM Tuner or Line-in recording. TUNER RECORDING MODE TUNER RECORDING MODE MONO STEREO You can adjust recording quality when recording from the FM Tuner. Bit Rate : 8Kbps~320Kbps Sampling Frequency : 11.025KHz ~44.1KHz LINE-IN RECORDING MODE LINEIN RECORDING MODE MONO STEREO You can adjust recording quality when recording from External equipment. Bit Rate : 8Kbps~320Kbps Sampling Frequency : 11.025KHz ~44.
INSERTING A BATTERY Xtreme EQ Xtreme EQ You can adjust the sound to your preference. There are 5 band frequency steps, set from -12dB to +12dB by 3dB step. HOW TO SET Xtreme EQ 1. Select the Frequency step to set using the Open the battery cover. Insert the battery. Be sure to match the + and ends of the battery with the diagram inside the battery compartment. or button h Pus Close the battery cover. 2. Adjust the level using the VOL + or VOL - button. NOTE h Pus 3.
Should any problem persist after you have checked these symptoms, consult your iRiver dealer or contact support at iRiver.com. No Power 64 Check whether the battery have been inserted properly. Check whether the HOLD switch on the player is ON (Switch to OFF position) Insert a fresh battery. No sound is heard from the player or distortion is heard during playback. Check whether VOLUME is set to "0". Connect the earphones/remote plug firmly. Check whether plug is dirty.
Earphone/ Earphone cover USB cable Installation CD Distributing copies of MP3 tracks without permission is a violating of international copyright law. Memory Model No.
68 69