Dear iRobot Roomba Owner, Thank you for purchasing an iRobot Roomba vacuum cleaning robot. You’ve joined the millions of people who clean with robots the smarter way to get it done. Please take a few moments to read this manual and get acquainted with your Roomba, to get the best performance from your robot. If you have any questions, visit our website at www.irobot.com for more information.
Important Tips efore using Roomba the first B time, you need to activate Roomba by removing the battery pull tab. Charge Roomba overnight before first time use. Remove battery pull tab Turning Roomba on and off • To turn Roomba ON, press CLEAN once. You will hear a beep and the CLEAN button will light. • To start a cleaning cycle, press CLEAN again. Roomba will start a cleaning cycle. • To pause Roomba, press CLEAN while Roomba is cleaning. • To resume the cleaning cycle, press CLEAN again.
Table of Contents iRobot Roomba Anatomy..............................................6 Cleaning Pattern............................................................7 Cleaning Modes.............................................................8 Cleaning System............................................................9 Battery Storage and Charging.............................. 10-11 Optional Accessories..................................................12 Virtual Wall® .........................................
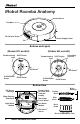
iRobot Roomba Anatomy Infrared Sensor Faceplate Bin Release Button Power Supply Socket Bin Buttons and Lights (Models 650 and 660) (Models 620 and 630) Troubleshooting Light SPOT Button SPOT Button Troubleshooting Light Dirt Detect™ CLEAN/Power Button DOCK Button Scheduling Interface Dirt Detect™ CLEAN/Power Button DOCK Button Bottom View Cliff Sensor Openings Edge-Cleaning Side Brush Right Wheel Module Contact Points for Home Base (selected models) Removable Caster Wheel Left Wheel Module
Cleaning Pattern Roomba is a robot that cleans floors differently than the way most people clean their floors. Roomba uses its robot intelligence to efficiently clean the whole floor, under and around furniture and along walls. Roomba calculates the optimal cleaning path as it cleans and determines when to use its various cleaning behaviors: Spiraling: Roomba uses a spiral motion to clean a concentrated area.
Cleaning Modes Roomba will clean based on the cleaning mode you select. Roomba has three cleaning modes. Clean Mode (all models) Roomba automatically calculates the room size and adjusts its cleaning time appropriately. Spot Mode (all models) Roomba will spiral approximately three feet in diameter and then spiral back to where it started, intensely cleaning a localized area. Scheduled Cleaning Mode (Models 650 and above) When a future cleaning time is programmed, Roomba enters Scheduled Cleaning Mode.
Cleaning System Roomba features a patented three-stage cleaning system. Filter 1 Side brush sweeps along edge of walls and into corners. 2 Two counter- rotating brushes scoop up dirt, hair, and debris into the bin. 3 Powerful vacuum picks up the remaining fine particles, dirt, and hair. The filter traps dust and small particles. Floor Surfaces Roomba works on wood, carpet, tile, vinyl, and linoleum, and adjusts automatically to different floor types.
Battery Storage and Charging Roomba is powered by a rechargeable battery. Roomba’s battery can last for hundreds of cleaning cycles if cared for properly. Battery Life To extend the battery life, iRobot recommends always storing Roomba plugged in. For more details on how to maintain Roomba’s battery life, visit www.irobot.com/support. TIP: R echarge Roomba as soon as possible. Waiting several days to recharge Roomba can damage the battery.
Charging Roomba Charge Roomba in one of two ways: Or Using the Home Base Using the Power Supply Only TIP: When Roomba is on the Home Base, always make sure that the Home Base power light is on. Charging Lights Roomba uses the CLEAN button light to indicate that it is charging. Use this chart to determine the status of the battery.
Virtual Wall® (optional accessory for all models) Virtual Walls create an invisible barrier that Roomba will not cross. This invisible barrier can be used to confine Roomba to a particular room or area, and prevent it from getting too close to electrical or computer cords, delicate objects on the floor, etc. The Virtual Walls can be set to block an opening up to seven feet long.
Virtual Wall® Halo (optional accessory for all models) The Virtual Wall Halo is perfect for homes with pets. It sets up a protective zone, gently guiding Roomba around your pet’s food and water bowls to keep the contents intact. To set up the Halo, take the Virtual Wall out of the sleeve. Install batteries as shown on the previous page. Set the Virtual Wall to “Auto” mode and fully insert it into the sleeve. Make sure the Virtual Wall is inserted all the way into the sleeve.
Home Base® Roomba returns to the Home Base at the end of a cleaning cycle or when its battery is running low. Roomba needs to find the infrared signal of the Home Base in order to return. Always keep the Home Base plugged in. When the Home Base is plugged in, the power light will blink to indicate that the Home Base is connected to the power source. When Roomba connects to the Home Base, the power light will be solid to indicate that Roomba has successfully connected to the Home Base.
Remote Control (optional accessory for all models) Directional Buttons SPOT Button ... Button CLEAN/Power Button The Remote Control lets you conveniently control Roomba’s functions. You can use it to turn Roomba on and off and steer it around your room without bending down. It also gives you remote access to these commands: ... SPOT Roomba spirals approximately three feet in diameter and then spirals back to where it started, intensely cleaning a local area.
Scheduling Roomba (Models 650 and above) Setting the Time You must set the time before scheduling Roomba to clean. 1 Press and hold CLOCK. 2 While holding CLOCK, use the DAY, HOUR, and MINUTE buttons to set the correct time. 3 Release CLOCK. Roomba will beep to indicate that the time has been set. Setting a Schedule You can schedule Roomba to clean once per day, up to seven times per week. You must set the time before setting a schedule. To set a schedule: 1 Press and hold SCHEDULE.
To Delete a Schedule 1 Press and hold SCHEDULE. 2 While holding SCHEDULE, press the DAY button to cycle through Roomba’s scheduled cleaning times. 3 When Roomba is displaying the scheduled cleaning time you’d like to delete, press and hold DAY to delete the scheduled cleaning time. 4 Release SCHEDULE. To Change a Schedule 1 Press and hold SCHEDULE. 2 While holding SCHEDULE, press the DAY button to cycle through Roomba’s scheduled cleaning times.
Regular Maintenance To keep Roomba running at peak performance, it is recommended that you perform the following maintenance regularly: 1 Remove and empty Roomba’s bin after each use Press button and pull to remove bin. 2 Clean Roomba’s filter A. Push down and remove to clean filter* Empty bin *Replace filter every 2 months Visit www.irobot.com/support for information on keeping Roomba running at peak performance. Tip: B in emptying and brush cleaning should be done after every cleaning cycle.
3 Clean Roomba’s brushes A. R emove brush guard by lifting both yellow tabs. B. Remove and clean Roomba’s brushes. Brush Bearings Tip: W hen maintaining Roomba, look for the yellow parts. These parts are designed to be removed and cleaned every time you empty Roomba’s bin. C. Remove and clean hair and dirt from Roomba’s yellow brush bearings. Bearings D. Use the included cleaning tool to easily remove hair from Roomba’s bristle brush by pulling it over the brush.
Clean Roomba’s front wheel 1 Pull firmly on Roomba’s front wheel to remove it from the robot. Wheel Axle 2 Remove debris from inside the front wheel cavity. Housing 3 Remove the front wheel from its housing and clear any hair wrapped around the axle. Push firmly on the wheel axle to remove it completely from the wheel. 4 Wipe the wheel clean. 5 Re-install the wheel into the housing, and the module into the robot. Front wheels clogged with hair and debris could result in floor damage.
Language Selection Mode Roomba 600 Series can provide troubleshooting messages in English, French, German, Spanish, Italian, Dutch, Danish, Swedish, Norwegian, Finnish, Polish, Russian, Portuguese, Japanese, Korean and Chinese. Roomba’s default language is English. Setting the Language 1 Turn OFF Roomba. (Press and hold CLEAN until Roomba’s lights turn off.) 2 Press and hold CLEAN until Roomba beeps and says the currently selected language. 3 Release CLEAN.
Troubleshooting Roomba will tell you something is wrong with a two-tone “uh-oh” sound followed by a narrated voice. The troubleshooting light will also blink. Refer to the chart below to resolve Roomba’s problem. If the problem is not resolved, visit www.irobot.com/support. Tip : To repeat Roomba's error message, press the "clean" button. Runtime Errors Roomba Roomba says…. blinks... Likely cause What to do Error 1. Move Roomba to a new location then press CLEAN to restart.
Charging Errors (while charging) Roomba Roomba blinks... displays... Roomba says…. Likely cause What to do 1 blink - Charging Error 1. Roomba’s battery is not connected. Confirm that Roomba’s battery pull-tab is removed. Remove the bottom cover of Roomba to remove and re-install Roomba’s battery. See page 27. 2 blinks Err2 Charging Error 2. Roomba has a charging error. Let Roomba cool down for at least one hour and try charging again. 3 blinks Err3 Charging Error 3.
Replaceable Modules Roomba has a number of modules that can be replaced, including its drive wheels, side brush, main cleaning head, vacuum bin, caster wheel, and battery. To access Roomba’s replaceable modules, remove the bottom cover of Roomba by removing the four screws that hold down the bottom cover and the screw that holds the spinning side brush.
Faceplate Removal Follow these instructions to remove and install Roomba’s faceplate. 1 Remove Roomba’s bin. 2 Remove Roomba’s faceplate by pulling up from the bin. The faceplate is secured in several places. For more detailed information, visit: www.irobot.
3 Install Roomba’s faceplate by inserting the tabs into the appropriate slots, and then pushing down firmly on the inside and outsides edges of the faceplate. 4 Reinsert Roomba’s bin.
Battery Removal Follow these instructions to remove and reinstall Roomba’s battery. 1 Remove Roomba’s side brush screw. 2 Remove Roomba’s side brush. For more detailed information, visit: www.irobot.
3 Unscrew the four screws shown below and remove Roomba’s bottom cover. 4 Remove Roomba’s battery. 5 Reinstall Roomba’s battery with the iRobot logo facing up. 6 Replace Roomba’s bottom cover and the four screws. 7 Replace Roomba’s side brush and the side brush screw.
Frequently Asked Questions Why does Roomba’s Side Brush occasionally spin backwards? When caught on items such as carpet tassels or wires, the Side Brush may spin slowly or briefly spin backwards to free itself. This may also occur on thick or high-pile carpets. If this behavior should occur on hard floor surfaces or when no tassels or wires are present, the Side Brush should be cleaned. Using a small Philips head screwdriver, first remove the screw from the center of the Side Brush.
Important Safety Instructions AUTION: DO NOT EXPOSE THE ELECTRONICS OF ROOMBA, C ITS BATTERY, OR THE POWER SUPPLY. THERE ARE NO USERSERVICEABLE PARTS INSIDE. REFER SERVICING TO QUALIFIED SERVICE PERSONNEL. PLEASE ENSURE VOLTAGE RATING FOR ENCLOSED POWER SUPPLY MATCHES STANDARD OUTLET VOLTAGE. Always exercise caution when operating your Roomba.
Declaration of Conformity Roomba Robotic Vacuum Cleaner and Accessories Manufacturer: iRobot Corporation, 8 Crosby Drive, Bedford, MA 01730, USA declares that Roomba Robotic Vacuum Cleaner along with Battery Power Supply and the Home Base conform to the requirements of Low Voltage Directive 73/23/ EEC as amended by 93/68/EEC and EMC Directive 89/336/EEC as amended by 92/31/EEC. Low Voltage tests and EMC tests have been conducted by TUV Rheinland of North America.
iRobot Customer Care USA and Canada If you have questions or comments about Roomba, please contact iRobot before contacting a retailer. Please visit our web site at www.irobot.com for support tips, frequently asked questions, or information about accessories and other iRobot products. We would like to hear from you. Should you still need assistance: • Visit the iRobot support web site at www.irobot.com/support • Call our customer care representatives at 877.855.