Welcome! EN Dear iRobot® Roomba® Owner, Thank you for purchasing an iRobot Roomba vacuum cleaning robot. You’ve joined the millions of people who clean with robots — the smarter way to get it done. To get the best performance from your Roomba, please take a few moments to read this manual and get acquainted with it. If you have any questions, please visit www.irobot.com/support for more information. I also encourage you to register your Roomba right now at www.irobot.com/roomba800.
Table of Contents EN Important Safety Instructions...................................................................................... 5 Important Tips............................................................................................................. 8 iRobot® Roomba® Anatomy......................................................................................10 Setting the Language................................................................................................
Important Safety Information EN THIS APPLIANCE CAN BE USED BY CHILDREN AGED FROM 8 YEARS AND ABOVE AND PERSONS WITH REDUCED PHYSICAL, SENSORY OR MENTAL CAPABILITIES OR LACK OF EXPERIENCE AND KNOWLEDGE IF THEY HAVE BEEN GIVEN SUPERVISION OR INSTRUCTION CONCERNING USE OF THE APPLIANCE IN A SAFE WAY AND UNDERSTAND THE HAZARDS INVOLVED. CHILDREN SHALL NOT PLAY WITH THE APPLIANCE. CLEANING AND USER MAINTENANCE SHALL NOT BE MADE BY CHILDREN WITHOUT SUPERVISION.
EN Important Safety Information The symbol on the product or its packaging indicates: Do not dispose of electrical appliances as unsorted municipal waste, use separate collection facilities. Contact your local authority for information regarding the collection systems available. If electrical appliances are disposed of in landfills or dumps, hazardous substances can leak into the groundwater and get into the food chain, damaging your health and well-being.
Important Safety Information EN BATTERY AND CHARGING • Charge using a standard outlet only. Product may not be used with any type of power converter. Use of other power converters will immediately void the warranty. • Use only the Home Base supplied by the manufacturer to charge this device. • Do not use a Home Base with a damaged cord or plug. If the cord or plug is damaged, it must be serviced by the manufacturer or similarly qualified persons. • Use only rechargeable battery packs approved by iRobot.
EN Important Tips Before using Roomba the first time, you must activate it by removing the battery pull tab. Charge Roomba overnight before first-time use. 1 2 3 Turning Roomba on and off • To turn Roomba on, press CLEAN once. You will hear a beep, and the CLEAN button will light up. • To start a cleaning cycle, press CLEAN again. Roomba will start a cleaning cycle. • To pause Roomba, press CLEAN while Roomba is cleaning. • To resume the cleaning cycle, press CLEAN again.
Important Tips EN Battery Life To extend Roomba’s battery life and keep Roomba cleaning at peak performance: • Always keep Roomba charged when not in use. • Recharge Roomba as soon as possible following use; waiting several days can damage the battery. • For storage off of the Home Base, remove the battery from Roomba and store in a cool, dry place. Floor Conditioning Process for Homes with Heavily Shedding Pets In homes with heavily shedding pets, Roomba’s bin may fill quickly with hair.
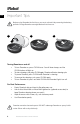
EN iRobot® Roomba® Anatomy Top View Faceplate Bin Release Button High-Capacity Powered Bin 10 Roomba 800 Series Owner’s Manual RCON (Room Confinement Sensor) Carry Handle
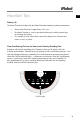
iRobot® Roomba® Anatomy EN Buttons & Lights Battery Light Dirt Detect™ Anti-Tangle Light CLEAN CLEAN/ Power Button Troubleshooting Light OK Spot Day Dock Hour Clock Minute Schedule Full Bin Light Roomba 800 Series Owner’s Manual 11
EN iRobot® Roomba® Anatomy Bottom View Right Wheel Module AeroForce™ Extractors Spinning Side Brush Home Base® Contact Point Removable Caster Wheel Home Base® Contact Point Battery Door Cliff Sensors 12 Roomba 800 Series Owner’s Manual Left Wheel Module Cliff Sensors
iRobot® Roomba® Anatomy EN Cleaning Head Extractor Frame Extractor Frame Release Tabs AeroForce™ Extractors Extractor Caps High-Capacity Sealed Bin Filter Door Filter Door Release Tab Filter Sensor Port Roomba 800 Series Owner’s Manual 13
EN Setting the Language Roomba can provide troubleshooting messages in English, French, German, Spanish, Italian, Dutch, Danish, Swedish, Norwegian, Finnish, Polish, Russian, Portuguese, Japanese, Korean and Chinese. Roomba’s default language is English. To change the default language: 1 2 3 sec x1 Take Roomba off the Home Base. Turn on Roomba by pressing CLEAN, the lights will turn on. 3 English (x1) Press and hold DOCK until Roomba beeps and says the current language. Release DOCK.
Cleaning Pattern EN Roomba cleans floors differently than the way most people do, using its robot intelligence to efficiently clean the whole floor, under and around furniture and along walls. As it cleans, Roomba calculates the optimal cleaning path and determines when to use its various cleaning behaviors: Spiraling Roomba uses a spiral motion to clean a concentrated area. Wall Following Roomba cleans the full perimeter of the room and navigates around furniture and obstacles.
EN Cleaning Modes Roomba cleans based on the cleaning mode you select. Roomba has three cleaning modes: ~3 ft (1 m) Clean Mode Roomba automatically calculates the room size and adjusts its cleaning time appropriately. Spot Mode Roomba spirals approximately three feet (one meter) in diameter and then spirals back to where it started, intensely cleaning a localized area. Scheduled Cleaning Mode When a future cleaning time is programmed, Roomba enters this mode.
Cleaning System EN AeroForce™ Performance Cleaning System The AeroForce System uses a combination of two breakthrough technologies, tangle-free AeroForce™ extractors and a high-powered vacuum channel, to deliver more cleaning power and less maintenance hassle. Tangle-Free AeroForce™ Extractors Dual counter-rotating extractors incorporate durable rubber treads that grab dirt and debris from any floor type, while ensuring that you never hassle with hair-tangled brushes.
EN Battery Storage and Charging For best performance, charge Roomba’s battery overnight before using Roomba for the first time. Roomba is powered by a rechargeable battery. Roomba’s battery can last for hundreds of cleaning cycles if cared for properly. Battery Life To extend the battery life, iRobot recommends always keeping Roomba charged. For more details on how to maintain Roomba’s battery life, visit www.irobot.com/support.
Auto Virtual Wall® EN (optional accessory compatible with all models) A Virtual Wall® creates an invisible barrier that Roomba won’t cross. That makes it easy to confine Roomba to a particular room or area, and prevent it from getting too close to anything delicate or dangerous. You can set a Virtual Wall to block openings of up to seven feet (approximately two meters). It creates a cone-shaped barrier, so the beam gradually gets wider.
EN Virtual Wall® LighthouseTM (optional accessory for some models) A Virtual Wall Lighthouse can act as both a Lighthouse and a Virtual Wall. • In Lighthouse mode, it allows Roomba to efficiently clean multiple rooms before returning to the Home Base. • In Virtual Wall mode, it blocks off areas you don’t want cleaned. Simply use the Mode Selector to make your choice. Either way, the Lighthouse turns on and off automatically as you turn Roomba on and off. When on, the light on top is lit.
Virtual Wall® HaloTM EN (optional accessory compatible with all models) The Virtual Wall® Halo™ makes Roomba perfect for homes with pets. By setting up a protective zone around the Virtual Wall®, the Halo prevents Roomba from bumping into and disturbing your pet’s food and water bowls. Follow these steps to set up the Virtual Wall Halo: 1. Once you have installed batteries in the Virtual Wall, insert it all the way into the Halo.
EN Home Base® At the end of a cleaning cycle or when Roomba’s battery is running low, it returns to the Home Base® to charge. Roomba needs to find the infrared signal of the Home Base® in order to return. • Always keep the Home Base plugged in. When the Home Base is plugged in, its power light blinks to indicate the Home Base is connected to the power source. • If Roomba returns to the Home Base and is unable to dock, it will try again until it docks successfully.
Remote Control EN (optional accessory for all models) The Remote Control lets you conveniently control Roomba’s functions. You can use it to turn Roomba on and off and steer it around your room without bending down. It also gives you remote access to these commands: Directional Buttons SPOT Button CLEAN / Power Button Dock Button Before using your remote for the first time, install 2 AA batteries.
EN Wireless Command Center (optional accessory for the 880 model) The Wireless Command Center lets you control all Roomba functions from up to 25 feet (7.6 meters) away. Use the Wireless Command Center to turn Roomba on and off, schedule up to seven cleaning times a week and steer Roomba around the room. To schedule Roomba to clean, use the buttons on the Wireless Command Center as if they were on the robot itself.
Scheduling Roomba® EN Setting the Time You must set the time before scheduling Roomba to clean. To set the time: 1 Press CLOCK. 2 SUN 1 MON 2 TUES 3 WED 4 THRS 5 FRI 6 SAT 7 Use the DAY, HOUR and MINUTE buttons individually to set the correct time. 3 Press OK, Roomba will beep to indicate the time and date has been set.
EN Scheduling Roomba® Setting a Schedule You can schedule Roomba to clean once per day, up to seven times per week. You must set the time before setting a schedule. To set a schedule: 1 2 Press SCHEDULE. 3 ress OK, Roomba will beep to P indicate the schedule has been set. 26 Roomba 800 Series Owner’s Manual SUN 1 MON 2 TUES 3 WED 4 THRS 5 FRI 6 SAT 7 se the DAY, HOUR and MINUTE U buttons individually to set the schedule.
EN Viewing Schedules To view Roomba’s scheduled cleaning times: 1. Press SCHEDULE. 2. Press DAY to cycle through the scheduled cleaning times. 3. Press OK. Deleting a Schedule To delete a scheduled cleaning time: 1. Press SCHEDULE. 2. Press DAY to cycle through the scheduled cleaning times. 3. When Roomba displays the scheduled cleaning time you’d like to delete, press and hold DAY for five seconds. Roomba will beep to indicate the cleaning time has been deleted. 4. Press OK.
Regular Maintenance EN To keep Roomba running at peak performance, you should perform the following maintenance: Component Maintain Replace Bin After each use Not applicable Filter Once per week (twice per week in homes with pets) Every two months AeroForce™ Extractors Every four months (every three months in homes with pets) Every twelve months Sensors Wipe once per week Not applicable Front Wheel Once per week As needed Spinning Side Brush Once per week As needed Roomba Contact Poin
Regular Maintenance Cliff Sensors Robot contact points EN Cliff Sensors Clean Roomba’s sensors. Wipe the following items with a clean, dry cloth every week: 1. Four front cliff sensors 2. Two rear cliff sensors 3. Two Home Base contact points 4. Two robot contact points 5. Two bin sensors 6. Two inner bin sensor ports 7. Two outer bin sensor ports Bin Sensors Clean Roomba’s front wheel. 1. Pull firmly on Roomba’s front wheel to remove it Wheel from the robot. 2.
EN Troubleshooting Roomba will tell you something is wrong with a two-tone “uh-oh” sound followed by a narrated voice. The troubleshooting light will also blink. Refer to the chart below to resolve Roomba’s problem. If the problem is not resolved, visit www.irobot.com/support. Runtime Errors To repeat Roomba’s error message, press CLEAN. Roomba blinks and says … Likely cause What to do Error 1. Move Roomba to a new location, then press CLEAN to restart. Roomba is stuck with a wheel hanging down.
EN Error 10. Spin Roomba’s side wheels to clean. Roomba’s side wheel is stuck, or its bumper isn’t detecting obstacles. If Roomba is circling, clean its side wheels of hair and debris. Push the wheels in and out, and check that they both turn freely. If it's not circling, Roomba may be in a very large room. Use a Virtual Wall to create a smaller cleaning area. Error 11. Roomba has an internal error. Call iRobot Customer Service.
EN Replaceable Modules Visit global.irobot.com to order replacement parts Roomba has a number of modules that can be replaced, including its drive wheels, spinning side brush, main cleaning head, vacuum bin, caster wheel and battery. To access Roomba’s replaceable modules, remove the following items in this order: 1. 2. 3. 4.
Battery Removal EN Follow these instructions to remove and reinstall Roomba’s battery. 1. Unscrew the two screws shown below and remove Roomba’s battery door and battery. 2. Reinstall Roomba’s battery with the iRobot logo facing up. 3. Replace Roomba’s battery door and the two screws.
EN Registration Register your Roomba now to activate your warranty and enjoy exclusive access to: • • i Robot’s award-winning customer service: Get support tailored to your specific robot, including answers to questions, maintenance tips, video demos and live chat. Product updates and other valuable information: Be among the first to learn about new robots, exclusive discounts and special promotions. When you register, you can also tell us about your experience with your Roomba.
Declaration of Conformity EN iRobot Roomba® Vacuum Cleaning Robot and Accessories Manufacturer: iRobot Corporation, 8 Crosby Drive, Bedford, MA 01730, USA Declares that Roomba along with Model 17062 and 17063 Battery Chargers and the Home Base, conform to the requirements of: Low Voltage Directive 73/23/EEC as amended by 93/68/EEC and EMC Directive 89/336/EEC as amended by 92/31/EEC.
EN iRobot Customer Care USA & Canada If you have questions or comments about this product, please contact iRobot before contacting a retailer. Please visit the iRobot home support site at www.irobot.com/support for support tips, frequently asked questions and information about accessories and other iRobot products. Should you still need assistance: Call our Customer Care team at 877.855.8593.