
2020 Installation Instructions


Ironing Board
Height
Mounting
Height
SURFACE MOUNT INSTALLATION
STEP ONE: Determine Mounting Height
46” Boards: 11”
Ex: Desired Height 35” - 11” = 24” Mounting Height
42” Boards: 7”
Ex: Desired Height 35” - 7” = 27” Mounting Height
UD-42: 16”
Ex: Desired Height 30” - 16” = 14” Mounting Height
Identify your desired ironing board height (typical ironing board is
33”-35” high). Then subtract the number below based on the length of
your model’s ironing board to determine mounting height (FIG 2.1). Take
into consideration the adjusted position of your ironing board, which is
4” higher than the normal, default position.
STEP TWO: Locate Stud & Pre-Drill Holes
Locate and mark stud on wall. Cut two 2” x 4” braces to the desired
mounting height to use for bracing the unit for installation.
Using 3/16” drill bit, pre-drill hole into the center of the top cleat of
cabinet.
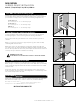
With 2“ x 4” braces in place for support (FIG 2.2), place unit on wall,
centering with desired stud.
Mark the location for mounting by placing the drill bit through the
pre-drilled hole in cabinet. Dimple the wall by lightly pushing the drill
bit into the dry wall. Set unit aside, then adjust location if not centered
on stud, and pre-drill hole in wall for mounting.
FIGURE 2.1
FIGURE 2.2
STEP THREE: Install Unit On Wall
Partially insert one #14 x 4” screw into the pre-drilled cabinet hole.
Then, using 2” x 4” braces, place unit back on the wall (FIG 2.2) and fully
insert screw through cabinet cleat and into stud. Remove braces. Plum
and level unit.
Using 3/16” drill bit, pre-drill hole through bottom cleat of cabinet into
stud. Insert remaining #14 x 4” screw through cleat into stud to fully
anchor the unit.
STEP FOUR: Apply Trim
Apply trim [not provided] to sides of cabinet to flush the side wall with
the cabinet trim (FIG 2.3) to create a sleek look.
FIGURE 2.3
FIGURE 2.4
STEP FIVE: Anchor Swivel
Locate swivel brackets near bottom of cabinet and remove top screws
only from both sides. Pre-drill pilot hole into bracket and replace with
#14 x 1” screws [not provided] into holes (FIG 1.3). This will provide
anchoring for your swivel.
INSTALLATION COMPLETE!
Note: May use custom trim or purchase Surface Mount Trim
Please call 1-800-536-9495 to order.
Note: #14 x 1” screws available upon request. Please call us at 1-800-536-9495.
ADJUSTABLE SWIVEL
ADJUSTABLE SWIVEL IRONING CENTER | PG. 4
MODELS AE46, AE42, & UD42:
PLEASE REFER TO ELECTRICAL INSTRUCTION ON PG. 7 BEFORE PROCEEDING.
Models | AE46, ANE46, AE42, ANE42, UD42