
Instructions / Assembly


Door Installation Guide
1. Verify that the rough opening (r/o) is at least ½” wider on all sides of the outside of the jamb. This means your r/o will
need to be 1’’ wider and ½’’ taller than the outside measurements of the jamb.
2. Make sure the framing surrounding the door is solid and free of movement. If the walls surrounding the door are not
properly secured, this could allow for unwanted movement of the door after it is installed in the r/o. This could result in
damage of the door unit.
3. Check the r/o for any security wires that may need to be installed into the jamb of the door and the slab. Drill and
install wires and contacts as necessary.
4. Check the height of the finished floor in relation to where the sweep on the door slab will be. It may be necessary to
raise the area under where the threshold of the door will rest. Keep in mind any rugs or floor coverings the customer is
considering placing at the interior entrance area of the door and allow for clearance of the door slab and the sweep. If
extra room is required, you will need to add this to the height of the r/o.
5. Place the door jamb, or frame, in the r/o. Make sure the threshold portion of the frame is resting completely flat on
the subfloor and that no debris is under the jamb.
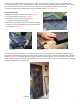
6. After making sure the jamb is plumb, square, and level, mark the studs or sheetrock where the mounting flanges are
and the bolt holes of the flanges (picture 1). For retro-fit installations, it is necessary to remove the sheetrock behind
the flanges so the bolts do not hinder the ability to install casing on the inside after the door is installed (picture 2).
Picture 1 Picture 2
7. Next, pre-drill pilot holes for the mounting bolts to keep the studs from splitting, which would weaken the integrity of
the installation (picture 3). Now you are ready to secure the jamb into the r/o with the bolts through the mounting
flange into the studs (picture 4)
Picture 3 Picture 4
1