430r Owner’s Manual IRONMAN 430r RECUMBENT Customer Service 1.800.750.IRON 1.800.750.4766 Ironman Fitness 4009 Distribution Drive Suite 250 Garland, TX 75041 www.ironmanfitness.
Table of Contents Important Safety Information 3 Before You Start 4 Assembly 5-9 Console Overview 10-15 Monitoring Your Heart Rate 16-17 Moving Instructions 18 Warm Up Exercises 19 Exploded View 20 Parts List 21 Warranty 22 2
Important Safety Information WARNING! Before using this unit or starting any exercise program, consult your physician. This is especially important for persons over the age of 35 and/or persons with pre-existing health problems. The manufacturer or distributor assumes no responsibility for personal injury or property damage sustained by or through the use of this product. SAFETY PRECAUTIONS AND TIPS 1.
Before You Start Thank you for purchasing the Ironman 430r Recumbent! This quality product you have chosen was designed to meet your needs for cardiovascular exercise. Before you start, please read the Owner's Manual and become familiar with the operation of your new unit. Remember to take the time to perform the stretching exercises provided to avoid injury. If you are taking medication, consult your physician to see if the medication will affect your exercise heart rate.
Assembly INSTRUCTIONS FOR ASSEMBLY: Unpack the box in a clear area. Check to make sure all components are present and in good condition. Do not dispose of the packing material until the assembly is completed. Tools have been provided for you to use when assembling this product. Locate the hardware pack and identify the following parts required for assembly. Tools: 1. Allen Wrench 2. Wrench Main Components: 1. Owner’s Manual 2. REAR FOOT TUBE 3. FRONT FOOT TUBE 4. MAIN FRAME 5. LEFT AND RIGHT PEDALS 6.
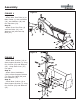
Assembly FIGURE 1 Figure 1 Step 1: Attach Rear Foot Tube (4) to Main Frame (1) with two Bolts (19), two Washers (49) and two Cap Nuts (61). Step 2: Attach Front Foot Tube (4) with two Bolts (19), two Washers (49) and two Cap Nuts (61). Figure 2 FIGURE 2 Step 1: Attach Back Cushion (14) to Seat Support Bracket (3) using four Screws (93) and Washers (63). Snap Seat Cover (57) into place. Step 2: Attach Pulse Handlebars (13A).to Seat Support Bracket (3) using four Bolts (89) and four Washers (49).
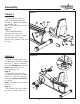
Assembly Figure 3 FIGURE 3 Step 1: Connect Cables (34a) to (66a) and slide Endcap (80) into place. Attach Endcap with two Screws (70). Note: Be careful not to pinch the cables. Step 2: Slide Assembled Seat Carriage (30) onto Seat Bracket (21). Attach to brackets using one Screw (84), Spacers (83), Washer (63), and Nut (62). FIGURE 4 Figure 4 Step 1: Thread the Right Pedal (31) into the right crank area of Main Frame (1). Secure in place by turning it clockwise to tighten.
Assembly FIGURE 5 Step 1: Connect Cables 8, 38, 37 and 66 as shown. Step 2: Attach Console Tube (2) to Main Frame (1) using three Screws (55), three Washers (49), three Nuts (50), two Screws (90) and two Washers (49). Step 3: Attach Connecting Covers (16) to Main Frame (1) by sliding covers down console tube until they meet main frame. Use six Screws (70) to attach Connecting Covers to Main Frame.
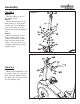
Assembly FIGURE 7 Figure 7 Step 1: Connect the Pulse Wires (66) and Extension Wires (58) to Console (15). Secure Console (15) to Console Tube (2) using four Screws (39). Note: The four Screws (39) will already be installed into the back of Console (15) when you remove it from the box. Step 2: Attach Water Bottle Holder (2A) using two Screws (81).
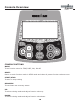
Console Overview CONSOLE BUTTONS: MODE: To set function value for TIME, DIST, CAL, PULSE. RESET: Return to main function mode in STOP mode and clean all preset function values at zero. START/STOP: To start or stop training RECOVERY: To test heart rate recovery status. UP: To select training mode and adjust function value up. DOWN: To select training mode and adjust function value down.
Console Overview FAN: Console is equipped with a fan that has four settings, AUTO/LOW/MED/HIGH/OFF. Press the button to turn the fan to the preferred setting. The AUTO setting will adjust the fan speed based on the RPMs produced, the more RPMs produced the faster the fan speed will be. BODY FAT: Press the button to start body fat measurement. CONSOLE FUNCTIONS TIME: Count up - No preset target, Time will count up from 00:00 to maximum 99:59 with each increment is 1 second.
Console Overview CALENDAR: Screen will display year/month/day in sleep mode. When the unit is plugged in the console will prompt user to input correct information. Use the UP and DOWN button until correct year is found. Press MODE to select and move on to the Month. Repeat to input correct month and day. Note: All information will be saved until unit is unplugged. CLOCK: Screen will display time in sleep mode. Once the calendar is set, you will be able to input the correct time.
Console Overview Use the UP/DOWN buttons to scroll to this program. Press MODE to select this program. TIME will flash in the display. Use the UP/DOWN keys to set desired TIME. Press MODE to confirm value. Repeat steps for DISTANCE and KCAL. Press START/STOP to begin exercising. Grasp Pulse Grips loosely with both hands to activate PULSE function. You can change the tension level at any time during your workout session by pressing the UP/DOWN buttons.
Console Overview There are three Heart Rate Programs. 60% HRC (Heart Rate Control), 75% HRC and 85% HRC. The Console will adjust the Tension to keep you within your Target Heart Rate ± 5. Example: The tension will increase if your Heart Rate is below the Target Heart Rate. The tension will decrease if your Heart Rate is higher that your Target Heart Rate. Press MODE until Program number shows on display. Use the UP/DOWN buttons to scroll to this program.
Console Overview FITNESS TEST: (Pulse Recovery Feature) The fitness test compares your pulse rate before and after training. You will notice that your fitness will improve with regular exercise. Press the PULSE RECOVERY button immediately after your workout. Grasp the Pulse Grips. Timer will count down from 60 seconds. Your personal fitness will display on the screen.
Monitoring Your Heart Rate Monitoring Your Heart Rate To obtain the greatest cardiovascular benefits from your exercise workout, it is important to work within your target heart rate zone. The American Heart Association (AHA) defines this target as 60%-75% percent of your maximum heart rate. Your maximum heart rate may be roughly calculated by subtracting your age from 220. Your maximum heart rate and aerobic capacity naturally decreases as you age.
Monitoring Your Heart Rate TARGET HEART RATE ZONE 100% 200 195 190 185 180 Serious athletic training range 85% 170 166 162 Cardiovascular conditioning range 75% 150 146 143 157 139 153 135 Fat burning range 60% 120 20 117 25 114 30 111 35 108 40 175 149 131 105 45 AGE 17 170 145 128 165 140 124 160 136 120 102 99 96 50 55 60 155 132 116 93 65
Moving Instructions CAUTION! TO REDUCE THE POSSIBILITY OF INJURY WHILE LIFTING, BEND YOUR LEGS AND KEEP YOUR BACK STRAIGHT. AS YOU LEAN THE UNIT, LIFT USING YOUR LEGS, NOT YOUR BACK. First, kneel down and grasp the rear support tube with both hands as shown in Figure 1. Next, with a firm grasp on rear support tube stand up bringing the rear of the bike up in the air and tilt the unit until it rolls freely on the transport wheels.
Warm Up Exercises EXERCISE GUIDELINES WARNING! Before beginning this or any exercise program, you should consult your physician. This is especially important for individuals over the age of 35 or individuals with pre-existing health problems. Warming up prepares the body for the exercise by increasing circulation, supplying more oxygen to the muscles and raising body temperature. Begin each workout with 5 to 10 minutes of stretching and light exercise to warm up.
Exploded View 20
Parts List 430r Recumbent Bike Parts List Rev A Ref # Part # Description Qty Ref # 1 323-00369 FRAME, 420R 1 48 302-00375 Part # M8X38MM SCREW Description 2 323-00370 CONSOLE TUBE, 420R 1 49 302-00449 M8X19MM WASHER BLACK U/R/E 220/240/250 Qty 1 34 2A 310-00012 BOTTLE RACK CM835/850 HT840 ALL900/920/5 1 50 302-01231 8MM BLACK LOCKNUT (THICK) 8 3 323-00371 SEAT CARRIAGE, 420R 1 51 302-00765 SPRING, HT840R/HT840U.1/420R 1 4 323-00014 FOOT TUBE, 420R/HT840R.
Warranty Information Residential Warranty Frame: Lifetime Parts: 1 Year This Limited Warranty applies in the United States and Canada to products manufactured or distributed by Ironman Fitness (“Ironman”) under the Ironman brand name. The warranty period to the original purchaser is listed above in the table.
Customer Service 1.888.340.0482 Keys Fitness 4009 Distribution Drive Suite 250 Garland, TX 75041 www.keysfitness.com Ironman and M-dot are registered trademarks of the World Triathlon Corp., used here by permission.