
user manual


13
Installation
Planning the Installation
To get the best possible protection from your Watchguard Digital alarm system, it is
imperative that you follow the following guidelines on where to place the system
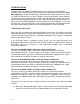
components. Below is a diagram of where we suggest you should place the Main Control
Unit, the External Siren and the Detectors.
Please Note: The main unit will enter test mode when first turned on. This mode will allow
you to verify that all wireless devices you have installed work correctly. When the unit is
turned on, Walk Test Mode is entered by default. Please see instructions to complete the
Walk Test Mode. Refer page 43.
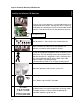
Typical Alarm System Layout, with optional wireless smoke sensor & wireless reed switch
shown.
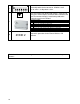
Installation Sequence:
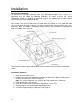
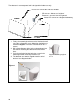
1. Install the Main Control Unit.
2. If required, change your Monitoring Plan from the Home Plan (default setting) to the
Business or Basic Plans. Refer to Page 16.
Note: This must be done the very first time the main control unit is turned on.
3. Install the Wireless PIR Sensors.
4. Install the External Siren and Perform Auto Wireless Siren Test
5. Register with the SecureNet Digital Monitoring Centre.
6. Customise Programming (if required). Refer Page 41.