Owners Manual Power 10 Magnetic Rower Customer Service (800) 750-4766 Assembly (888) 559-8810 Manufactured by: Ironman Fitness Products 4009 Distribution Drive Suite 250 Garland, TX 75041 www.ironmanfitness.com 715-00001 03/19 Rev C Serial tag is located on the side of the track Model Name: ________________ Date of Purchase: ________________ Serial Number: ________________ Caution! Read all precautions and instructions in this manual before using this equipment.
Table of Contents 2 Table of Contents 2 Important Safety Information 3 Getting Started 4 Assembly Steps 5 Parts Identifier 5 Assembly Steps 5 Console Instructions 9 Warm Up Excercises 14 Monitoring Your Heart Rate 17 Workout Information 19 Frequency: How Often Should You Exercise 19 Intensity: How Hard Should You Exercise 19 Weight Management 18 Exercise Practice Procedures 19 Workout:
Important Safety information WARNING! Before using this unit or starting any exercise program, consult your physician. This is especially important for persons over the age of 35 and/or persons with pre-existing health problems. The manufacturer or distributor assumes no responsibility for personal injury or property damage sustained by or through the use of this product.
Getting Started (..cont.) Thank you for purchasing the Ironman Fitness Power 10 Magnetic Rower! The quality product you have chosen was designed to meet your needs for cardiovascular exercise. Before you start, please read the Owner’s Manual and become familiar with the operation of your new unit. Remember to take time to perform stretching exercises, provided in this manual, to help avoid injury.
1- Étapes de montage Assembly Steps (1) Screw Vis (10) Screw Vis (1) (10) (11) Vis (C1)Molette Knob (C1) Identificateur Parts Identifierde pièces (A1)Main (A1)Main Frame Frame (A1)Main Frame (A1)Main Frame (A1) Cadre principal (A1)Main Frame (A2) (A2) Front Front Stabilizer Stabilizer (A2) Stabilisateur avant (A2) Front Stabilizer (A2) (A2) Front Front Stabilizer Stabilizer (A2) Front Stabilizer (A2) avant (A2) Front Stabilizer (A2)Stabilisateur Fr
(A2) Stabilisateur avant Assembly Steps Figure 2 Assembly for upper track(B9)Saddle Set Step 1. Secure main frame (A1) with upper slide track (A4) using bolt (11), Nut (12) and (B3-1) Pédale gauche tight it by knob (C2). 6mm 13/14mm (B3) Pédale droite 14mm (B3-1) 21mm (A4)Upper Slide Track O Étapes de montage (1) Vis (10) Vis Illustration 1 (1) S Montage du stabili cadre principal (C1) Knob Figure 3 Assembly for Wireless Pulse Receiver Step 1.
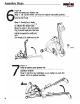
Assembly Steps Identificateur de pièces (1) Vis (10) Vis (A1)Main Frame (A1)Main Frame Figure 4 (A2) Stabilisat Assembly for saddle seat with slide track (A1) Cadre principal Step 1. Lower slide track back into place. Step 2. Equip saddle (B9) into slide track (A4). (A2) Front Stabilizer Identificateur de piè (2) Écrou (12) Écrou Step 3. Fold up rear stabilizer (A7) (A2) Stabilisateur avant Step 4. Secure the knob with (C1) and washer (28).
Console Instructions Console Layout and Design Take a few moments to review the console layout. Below is an overview of the console and their different functions. The miles / kilometer switch is located on the back of the console. To remove the console, push in the tab of the lower part of the console and lift up. To change from miles to kilometers and vice versa, flip the switch highlighted inside the circle. Once switched, you must restart the console to activate.
Console Instructions B. Button Functions: Enter This button is used to confirm desired settings into the console for function purposes. - During PAUSE mode, press ENTER key to enter desired program. Start/Stop This button is used to start and stop training. Recovery This button is used to begin the recovery feature of the console (Heart rate chest strap must be worn to activate this feature.) When pressed, the recovery button will begin to check pulse from the monitoring system located in the chest strap.
Console Instructions Once it reaches 1000 yards, it will convert to 0.6 miles. Note: If the units are by kilometers the count up and down will be by meters into KM. Count down: If distance is set, the monitor will count down from your set values. Once set value is reached, monitor will produce an audible sound, and then the count value starts counting up. PULSE The monitor will display your current heart beat rate in beats per minute. The pulse reading ranges are: Low (40 bpm) - High (220 bpm).
Console Instructions 2. Press the ENTER button to enter your target heart rate program. 3. The pulse display will flash, and then press the UP OR DOWN button to set up the desired limit heart rate you would like to keep. Press ENTER button to confirm your setting value. 4. The Time display will flash, and then press the up or down button to set up the desired time to do the exercise. Press ENTER button to confirm your setting value. 5.
Console Instructions Program profiles Program Profiles 1. Program 1 ( Manual ) 7. Program 7 ( Intervals ) 2. Program 2 ( Rolling ) 8. Program 8 ( Mountain ) 3. Program 3 ( Valley ) 9. Program 9 ( User setting ) 4. Program 4 ( Fat Burn ) 10. Program 10 ( User setting ) 5. Program 5 ( Ramp ) 11. Program 11 ( User setting ) 6. Program 6 ( Manual ) 12.
Warm up Excercises EXERCISE GUIDELINES WARNING! Before beginning this or any exercise program, you should consult your physician. This is especially important for individuals over the age of 35 or individuals with preexisting health problems. Flexibility is a key to fitness. Stretch all major muscle groups at least two to three times per week after a 5 to 10 minute warmup. Stretch just to the point of a gentle tug. If you have back, joint, or other health problems, talk to your doctor first.
Warm Up Excercises WARNING! Before beginning this or any exercise program, you should consult your physician. This is especially important for individuals over the age of 35 or individuals with pre-existing health problems. Wrist Extensor Extend your right arm in front of you with your palm up and your elbow straight. Point your fingertips toward the floor by bending at the wrist. Using your left hand, pull the back of your right hand toward you gently.
Warm Up Excersises WARNING! Before beginning this or any exercise program, you should consult your physician. This is especially important for individuals over the age of 35 or individuals with pre-existing health problems. Calf Stretch Face a solid structure such as a wall with your left foot ahead of your right, toes straight ahead. Bend your left knee, press your hips forward, and lean into the wall. Keep both heels down, your right leg straight, and you left knee over your ankle.
Monitoring Heart Rate TARGET HEART RATE ZONE 100% 200 195 190 Serious athletic training range 85% 170 166 Cardiovascular conditioning range 75% 150 146 162 143 Fat burning range 60% 120 20 117 25 114 30 185 157 139 111 35 180 153 135 108 40 175 149 131 105 45 170 145 128 165 140 124 160 136 120 155 132 116 102 99 96 93 50 55 60 65 AGE Monitoring Your Heart Rate To obtain the greatest cardiovascular benefits from your exercise workout, it is important
Monitoring Heart Rate Before beginning your workout, check your normal resting heart rate. Place your fingers lightly against your neck, or against your wrist over the main artery. After finding your pulse, count the number of beats in 10 seconds. Multiply the number of beats by six to determine your pulse rate per minute.
Workout Information Frequency, Intensity, Time, Target Heart Rate Zone The exercise practices include four major variables: frequency, intensity, time, target heart rate zone. A continuous workout will help to improve your cardiovascular functions and increase the ability of your muscles to obtain the oxygen and nutrition. A good workout provides a greater advantage to extend the endurance of muscle and body flexibility.
Workout Information Exercise Practice Procedures Warm-Up Workout Cool Down A good warm-up will help you perform better and will decrease the aches and pains. The warm-up prepares your muscles for exercise and allows your oxygen supply to ready itself for what is to come. Experience tells us that muscles perform best when they are warmer than normal body temperature. This normally takes about 5-10 minutes when you begin to perspire on your brow and breathe more deeply.
Chest Strap Information SAFETY PRECAUTIONS AND TIPS FOR CHEST STRAP 1. It is the owner's responsibility to ensure that all users of this unit have read the Owner's Manual and are familiar with warnings and safety precautions. 2. Do not place chest strap near devices that generate large magnetic fields. TV sets, electric motors, radios, and high voltage power lines can affect the transmitter’s performance.
Notes 22
Notes 23
Notes 24
Parts List Ref # A2 A3 A4 A5 A6 A7 A8 A9 B1 B2 B3 B4 B5 B6 B7 B8 C1 C2 C3 C4 C5 C9 D1 D2 D3 D5 D6 D7 D8 1 2 Part # 723-00012 719-00001 719-00002 719-00003 723-00013 719-00004 702-00029 707-00001 705-00001 702-00030 706-00030 707-00002 706-00031 706-00032 706-00036 706-00033 710-00007 710-00004 719-00005 710-00006 713-00001 702-00031 710-00005 706-00034 706-00035 711-00001 702-00032 713-00002 713-00004 702-00033 702-00034 POWER OF 10 PART LIST REV A.
Exploded View 26
Warranty Information Residential and Personal Use Limited Warranty PLEASE READ THESE WARRANTY TERMS AND CONDITIONS FULLY AND CAREFULLY BEFORE USING YOUR IRONMAN FITNESS EQUIPMENT. BY USING THE EQUIPMENT, YOU ARE CONSENTING TO BE BOUND BY THE FOLLOWING TERMS AND CONDITIONS. Frame: Lifetime Parts: 1 yr Labor: 1 yr Missing/Cosmetic Parts: 30 Days Limited Warranty This Limited Warranty applies in the United States and Canada to Products manufactured or distributed by Ironman Fitness Products, L.P.
Customer Service (800) 750-4766 Assembly (888) 559-8810 Manufactured by: Ironman Fitness Products 4009 Distribution Drive Suite 250 Garland, TX 75041 www.ironmanfitness.com Ironman, Ironman Triathlon and M-dot are registered trademarks of the World Triathlon Corporation. This product is licensed by the Ironman Triathlon.